
Lorem ipsum dolor sit amet, consectetur adipiscing elit. Suspendisse varius enim in eros elementum tristique. Duis cursus, mi quis viverra ornare, eros dolor interdum nulla, ut commodo diam libero vitae erat. Aenean faucibus nibh et justo cursus id rutrum lorem imperdiet. Nunc ut sem vitae risus tristique posuere.
Receiving Vouchers
Receiving Vouchers provide an easy and organized way to receive incoming items from a purchase order. In order to receive inbound items ordered through a purchase order, vouchers must be created. Vouchers are created from the purchase orders that are in ordered status, and closing all vouchers associated with the PO is required in order to close a purchase order. Note that closing a voucher requires the completion of three main steps:
- Receiving all item quantities
- Attaching an invoice with an Attached Value equal to the Voucher Total
- And click Mark Closed in the Action bar
New Receiving Vouchers
Users can create new Receiving Vouchers from OrderedPurchase Orders by clicking New Voucher, or New Receive All Voucher on the Actions tab. After clicking New Voucher, the page will redirect to the Receiving Voucher page with the new title at the top left and its InternalVoucher ID directly below.After clicking New Receive All Voucher, the page will redirect to the Receiving Voucher page though with all items automatically received. Again, see [hyperlink to the Voucher Article] for information on received vouchers.Users can also add new vouchers to Purchase Orders by clicking Add New on the Receiving Vouchers tab of the Purchase Order page. Once clicked, the page will automatically redirect to the newly created voucher and the list of vouchers to the Purchase Order will populate in the Receiving Vouchers tab.[Add pictures/videos]
Voucher Details
The Receiving Voucher details include multiple information tabs such as Voucher Details located furthest left. In the Voucher Details tab, the QB Bill No., Terms, Due Date, and Invoice Date are all listed. To Edit Voucher Details, click the blue Edit button directly below, and enter the necessary information before clicking Save.[Add pictures/videos]
Vendor Info.
All necessary vendor information including the average delivery time, is displayed just right of the Voucher Details tab. Vendor information includes a hyperlink to the vendor dashboard.[Add pictures/videos]
Purchase Order Details
All necessary Purchase Order Details are displayed to the right of Vendor information and begin with a hyperlinked Purchase Order # that redirects to the Purchase Order page. Other information included in the Purchase Order Details includes PO Type, location, shipping type, creation and order date, and messages. [Add pictures/videos]
Totals
The total values of the packaging are included in the Totals tab just right of the Purchase Order Details. The Totals tab includes the Difference amount, Items amount, Fees/Credits amount, Voucher total, and Attached Values. The Total numbers will not change until items are received. If the Difference value is negative, it will be colored red, though, if the Difference value is positive, it will be black. The voucher will not be closeable until the Difference value is at $0.00, or colored green.[Add pictures/videos]
Item Lines
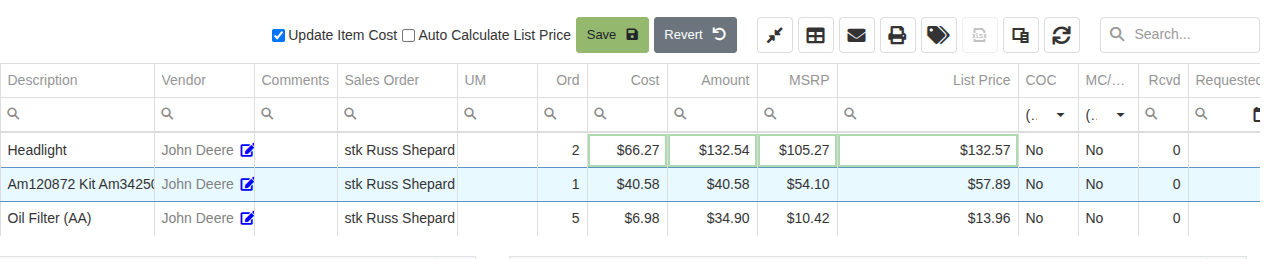
Below the voucher, vendor, PO, and cost totals grids, is the item line table. This table includes an item list and all necessary item information such as #, Item #, Description, Sales Order, Receive, Cost, Qty., Unit, Extended, RcvCost, RcvQty, and Ext Rcv. Note that in the following columns:
- #: This item list is numbered (1, 2, 3, …) by the # column on the furthest left
- Item #: Users can access Item Dashboards by clicking on individual hyperlinked Item #s
- Sales Order: If the Receiving Voucher is associated with a Sales Order, then the Sales Order # will show as a hyperlink in the Sales Order column.
[Add pictures/videos]
How to Receive an item
Users can receive items by:
- Clicking the Receive button for each item in the Receive column of a voucher
- After clicking, a popup page will appear asking for item and quantity information such as:
- Date on which the item is received on
- Total quantity being received
- Received cost
- Check box if cost should update the Item’s Cost/Price
- Bin Location
- If any Cancelled, Rejected, Destroyed, or Returned quantity
- If an open invoice needs to be fulfilled
- Price Adjustments to the Cost, MSRP, and List
- All adjustments made here will update Item Pricing
- Includes a price calculator table to calculate $ Current, Curr. Margin, $ Adjusted, Adj. Margin, and % Change
- Also includes an option to Maintain current margins on adjusted cost
- Before clicking the Receive button, select one of the three options at the bottom of the Quantity Pop-up page to either Receive All At Expected Cost, Undo Receive, or Cancel Remaining Qty.
If Receive All At Expected Cost is selected before clicking Receive, then the expected cost will be applied and all quantities of that specific item will be received. If Undo Receive is clicked when the item has been previously received, the item’s receivement will be reversed and the item will be queued up to be received again. If Cancel Remaining Qty is clicked, then the quantity in the Cancel box will change to whatever remaining item quantity is still queued to be received. After reviewing and verifying all item and quantity information, click the Receive button, and the item line and Receive cell will update to display received quantity, and date received. To edit this, click the green checkmark to open the Receive Quantity pop-up page again.
- If all quantity is either Cancelled, Rejected, Destroyed, or Returned, then a red X will display instead of the green checkmark
- In order for the item line to be marked received in full, the Received, Cancelled, Rejected, Destroyed, and Returned quantities must add up to the ordered quantity, listed below the Qty column
- After making edits in the Receive popup page, refresh the page so that the edits will update in the table appropriately
Receiving all Quantities in full is required before closing out the Voucher. Once all item lines are Received and have either a green checkmark or a red X, the Purchase Order status, displayed in the Purchase Order Details grid, will change from Part to Received.Once when all quantities on the Purchase Order have been accounted for and closed with vouchers, the Purchase Order will automatically close.[Add pictures/videos]
Actions Tab
The Actions tab, located in the top right of the Receiving Voucher page, includes options to mark the voucher as closed, reopen, force refresh, and delete voucher.To close out a receiving voucher, click Mark Closed, and the page will refresh but with the Receiving Voucher in Closed status.
- If Mark Closed is clicked while the voucher has a different value other than $0.00, than a notification will pop-up saying Balance Error
- To fix this, alter the received, or exceptioned quantities, or alter the attached values before attempting to close again
To reopen a closed voucher, click Reopen and the page will refresh though with the voucher in open status.To refresh the voucher page, click Force Refresh and the page will automatically refresh with all updates to the voucher.To delete the voucher, click Delete Voucher and the voucher will automatically be deleted. Reload the Purchase Order page and the Voucher will be deleted from its voucher list.[Add pictures/videos]
How to add a Fee or Credit to a Purchase Voucher
The Fees/Credits grid includes all fees and credits of a Purchase Voucher. Users can add a new fee or credit to a voucher by clicking the + button [picture of icon], and entering the Action type, Description, and Amount. After all fee information is entered, click Save. [Add pictures/videos]
How to Add an Invoice or Other Attachments to a Voucher
Users can add an invoice or other attachments to a Receiving Voucher by:
- Clicking Add New in the Attachments grid
- After clicking, a page pops up prompting you to upload a file, and enter the amount, document number and relevant comments
- Use this page to upload the invoice included in the Purchase Order
- The amount value should match the amount listed on the invoice
- This amount will display in the Totals grid as the Attached Values
[Add pictures/videos]
Creating more than one Receiving Voucher
Users can create more than one Receiving Voucher for a single Purchase Order by clicking New Voucher (In the Actions tab on the Purchase Order page) when there is already a voucher created. All receiving vouchers will be listed in the Receiving Vouchers grid on the Purchase Orderpage. Note that when multiple Receiving Vouchers are created for one Purchase Order, the received quantities of one voucher will not be included in received quantities for other vouchers. To best enter the correct receiving data, attach one invoice per voucher and receive only arrived quantities before adjusting shorts or overs using the canceled value in order to balance Voucher Total, and Attached Values.[Add pictures/videos]
Features
Above and to the right of the item line table, a row of buttons that provides users functions such as receive all quantities, print receive voucher form, print stocking labels, view will call labels, email receive voucher form, and export data to Excel. To Receive All Items:
- Click on the Receive All button [picture of this button]
- After clicking, confirm the notification
- The page will refresh though with all quantities received
To print the receive voucher form:
- Click on the Print button [picture of this button]
- After clicking, the page redirects to the Receive Voucher form
- Use the download and print icons in the top right corner of the form
To print stocking labels:
- Click on the Print Stocking Labels button [picture of this button]
- After clicking, ?? not working ??
To view will call labels:
- Click on the Will Call labels button [picture of this button]
- After clicking,
To email receive voucher form:
- Click on the email button [picture of this button]
- After clicking, a new page will open to an email report with the Receive Voucher Form attached as a PDF
- Information included in the Receive Voucher form includes the number, date, vendor information, messages, item list, and receiver name
- Fill in the email information such as recipients, subject, and body before clicking Send
To Export to Excel:
- Click on the Export button [picture of this button]
[Add pictures/videos]
Notes
Users can create new notes on the Receiving Voucher by typing them in the Add Note text box at the top of the Voucher page. After typing, click Add Note, and the note will appear in the Receive Voucher report as a message, as well as listed in the Notes grid on the Receiving Voucher page.[Add pictures/videos]
Logs
Users can view all Receiving Voucher Logs, which are listed in the Logs grid at the bottom right of the Receiving Voucher page. The log information displayed includes the User, Message, and Timestamp.[Add pictures/videos]
.svg)
.svg)
.svg)


