
Lorem ipsum dolor sit amet, consectetur adipiscing elit. Suspendisse varius enim in eros elementum tristique. Duis cursus, mi quis viverra ornare, eros dolor interdum nulla, ut commodo diam libero vitae erat. Aenean faucibus nibh et justo cursus id rutrum lorem imperdiet. Nunc ut sem vitae risus tristique posuere.
Purchase Order Overview
Users can finalize orders on the Purchase Order (PO)page as well as make the necessary edits and actions to the order. A Purchase Order contains its own specific number, vendor name, relevant dates, and shipping information, all displayed on the Purchase Order page, as well as the item list, list of receiving vouchers, vendor account information, notes, attachments, and more. Users can access Purchase Order pages on the Company Open Purchase Orders table.
- From the navigation menu, go to Parts -> Company Open Purchase Orders
- Click the hyperlinked PO # in the PO cell of the desired Pucharse Order line
[Add pictures/videos]
Purchase Order # and Vendor
Once a Purchase Order is created, a new Purchase Order # is assigned and then listed at the top of its Purchase Order page, along with its vendor name. This purchase order # can be used for future look-ups, access, and checking order status. The vendor dashboard is accessible by clicking on the vendor name in the header. [Add pictures/videos]
Title and Heading
The status is bolded in the heading, as well as its order location in parentheses. Statuses include New, Ordered, and Received. Below the initial heading, the shipping type, shipping location, date created, requested receipt date, confirmed receipt date, and ordered date is listed. The requested and confirmed receipt dates are changeable by clicking the green icons [picture of icons]. The total, fee, and received amounts are listed on the right side of the page.[Add pictures/videos]
Item Lines
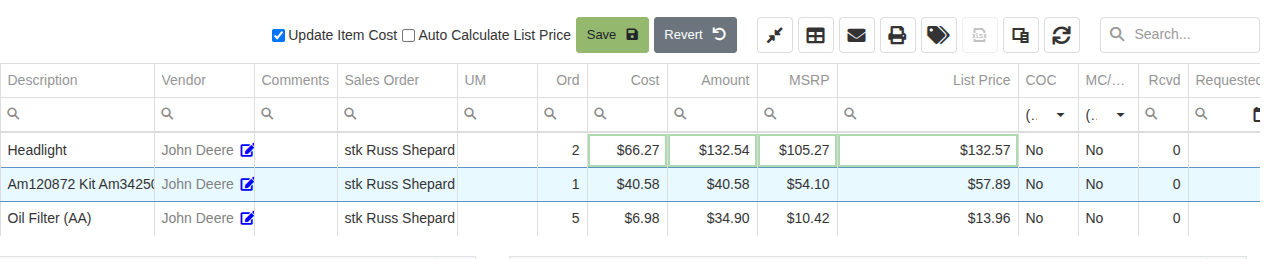
All items queued to the purchase order are listed as item lines which include important item information such as: item #, description, sales order, cost, amount, received quantity, dates, open quantity, and voucher details. These item lines include a search function which allows looking up specific items within the purchase order. The item dashboard is accessible by clicking item #s in the item cell. The Description will include hyperlinks to affiliated Work Orders as well as some highlighted notes such as if the entire quantity canceled.In the same cell, users can Report Purchasing Exceptions by
- Clicking the ladybug icon [picture of icon]
- After clicking, a menu pops up prompting reporting information such as reason, quantity, a comment section, and notification information. All reporting reasons include:
- Test
- Discontinued
- Substitution
- MinQtyOverride
- MinQtyStop
- Administrative
- BackOrder
- Hazmat
- NoFly
- Shortage
- Wrong Part Sent
The report window also includes options to create a new purchase, notify requesting user, and to notify user by text
- Once all reporting information is entered, click the Report Exception button and all exceptioned purchase items will propagate to item lines on the purchase order table
If the purchase order is associated with a sale order, users can access that SO by clicking on the hyperlinked line in the SO cell.Users can create labels for individually purchased items. Information displayed in the labels include:
- Customer name and phone number (if affiliated to a sale order)
- If not affiliated with a sale order, the label will head with stock
- Customer name and phone number (if affiliated to a sale order)
- Item #
- Item description
- Allocated and received quantities
- SO #s (if affiliated to a Sale Order)
[Add pictures/videos]
Actions
The purchase order page includes an add note option as well as all actions necessary to satisfy a wide range of user requests. To add a note, use the text box at the top of the page and then click the Add Note button to its right. Notes will propagate in the Notes tab in the middle of the page along with its user and timestamp. Click the Actions tab-down button to complete any of the following:How to change Purchase Orderstatus to Marked Ordered:Users can change the Purchase Order status to Ordered by:
- Clicking Mark Ordered in the Actions tab
- After clicking, the page automatically refreshes and the Purchase Order changes status from New to Ordered and will be set for vouchers
[Add pictures/videos]How to duplicate a Purchase Order:Users can duplicate a Purchase Order by
- Clicking Order Again in the actions tab, and confirming the notification,
- An order automatically duplicates with a new Purchase Order number
[Add pictures/videos]How to Request a Quote:Users can Request a Quote by:
- Clicking Request Quote in the actions tab,
- After clicking, a menu will pop-up prompting you to choose the vendor, an option to hide the rate on the quote, and to continue by clicking on the generate quote request button
- Then, the page will redirect to an email report page that includes an attached Request Quote
- The Request Quote includes Quote Number, date, vendor, address, shipping, contact, item line, and cost information
- This report is downloadable as well as printable by using the icons at the top right of the report
- Enter the appropriate recipients, subjects, and messages, then click send
[Add pictures/videos]How to Edit the Purchase Order:Users can Edit the Purchase Order by:
- Clicking Edit in the actions tab
- After clicking, the page will refresh though with editable options
- Editable options include the vendor, at the top of the page, as well as shipping methods, shipping location, and an additional message box.
- After editing purchase order, click the red Finish Editing button
- The message appears at the top middle of the purchase order page
[Add pictures/videos]How to Merge multiple Purchase OrdersUsers can Merge multiple Purchase Orders by:
- Clicking Merge in the actions tab
- After clicking, a tab pops up prompting you to select other purchase orders of the same vendor, to merge into the current
- Displayed Purchase Orders are ordered by date, and include hyperlinked PO #s, and their status
- Purchase Orders are only mergeable with ones that have shared vendors
- To finalize merging, click the Merge button displayed on the desired PO’s line, and confirm the notification
- Once merged, the page will redirect to the new purchase order and all items will combine into one table
[Add pictures/videos]How to extract an item from the Purchase OrderUsers can extract items from a Purchase Order by:
- Clicking Extract Item in the actions tab
- After clicking, choose which item to extract on the pop-up menu and click the Extract Item button
- Confirm the notification, and the page will refresh automatically though without the extracted item
- After a short delay, the extracted item will show in the PO’s logs
[Add pictures/videos]How to remove zero lines from the Purchase OrderUsers can remove all zero lines from a Purchase Order by:
- Clicking Extract Item in the Actions Tab
- After clicking, a notification will ask for confirmation
- After confirming, the page will refresh and all zero lines will be removed
[Add pictures/videos]How to Force Refresh while on a Purchase OrderUsers can Force Refresh by:
- Clicking Force Refresh in the Actions tab
- The page automatically refreshes with all relevant updates to the Purchase Order
- Force Refresh helps prevent stale pages
[Add pictures/videos]How to Cancel a Purchase OrderUsers can Cancel the Purchase Order by:
- Clicking Cancel in the Actions Tab
- After clicking, confirm the notification and the Purchase Order will be deleted
- The page will redirect to the Open Purchase Orders list
[Add pictures/videos]
View Import Ready Order
Users can view the Import Ready Order list by clicking the [Add picture of button]. The page will redirect to a Purchase Order list with only 3 columns: Item, QTY, and SO Bin. This PO page has a clipboard feature [Add picture of button] where the table can be copied with standardized formatting and pasted into other ordering systems easily.This table can be exported by clicking [Add picture of button].Other options for column classifications are accessible by clicking [Add picture of button]. Switch columns by dragging column options between the table and the column chooser tab. [Add pictures/videos]
Email Purchase Order Report
Users can email the Purchase Order Report by:
- Clicking [Add picture of button]
- Once clicked, a new page will open to a new email with the report attached
- Enter the appropriate recipients, subject and body
- Review all information on the report and email then click Send
[Add pictures/videos]
Print Purchase Order Report
Users can print the Purchase Order Report by:
- Clicking [Add picture of button]
- Once clicked, a printable report will open in a new page
- Then, use the icons in the top right to download or print
[Add pictures/videos]
Print all Purchase Order Labels
Users can print all Purchase Order Labels by:
- Clicking [Add picture of button]
- Once clicked, a printable list of labels will open in a new page
- Then, use the icons in the top right to download or print
[Add pictures/videos]
Export Purchase Order Data
All Purchase Order Data can be exported to an Excel spreadsheet by:
- Clicking [Add picture of button]
- After clicking, an Excel spreadsheet, titled the current PO’s number, will download
- The columns of the Excel file will be the same as displayed on the Purchase Order
[Add pictures/videos]
New Receiving Vouchers
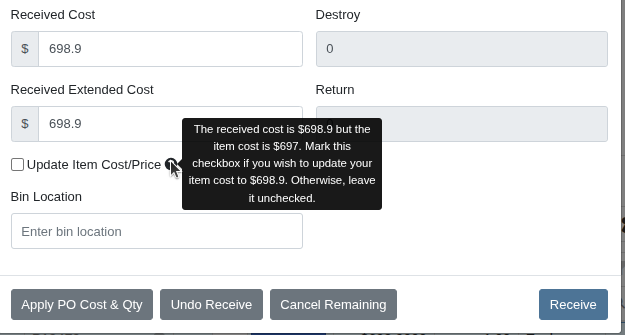
Users can create New Receiving Vouchers when on the Purchase Order page. After clicking Mark Ordered in the Actions tab down menu, the Purchase Order will change statuses to Ordered and the Actions tab down menu will instead display two options: New Voucher and New Receive All Voucher. After clicking New Voucher, the page will redirect to the Receiving Voucher page. See [hyperlink to the Voucher Article] for further voucher and receiving information.After clicking New Receive All Voucher, the page will redirect to the Receiving Voucher page though with all items automatically received. Again, see [hyperlink to the Voucher Article] for information on received vouchers.Users can also add new vouchers to Purchase Orders by clicking Add New on the Receiving Vouchers tab of the Purchase Order page. Once clicked, the page will automatically redirect to the newly created voucher and the list of vouchers to the Purchase Order will populate in the Receiving Vouchers tab.[Add pictures/videos]
Notes
All Notes created throughout the Purchase Order process by the Add Note text box will be displayed in the Notes tab. This list of Notes will include User, Message, and Timestamp. [Add pictures/videos]
John Deere and Stihl Vendor Account
If a Purchase Order is to either John Deere or Stihl, an additional tab may appear in the Purchase Order page that includes an option to connect the dealership’s John Deere or Stihl account. The added features of connecting the vendor account are: ??Not sure?[Add pictures/videos]
Attachments
Users can upload Attachments to Purchase Orders by clicking Add New on the Attachments tab. Once clicked, a pop-up menu will provide a space to drag files, as well as to select a file. Once all necessary attachments are uploaded, click submit, and the newly attached file will populate in the table below displaying file information such as filename, comment, date uploaded, user, and size.[Add pictures/videos]
Newest 10 Logs
The 10 most recent relevant changes and edits will be logged in the lowest right tab of the Purchase Order and will include information such as user, message, and timestamp. To view all logs, click View all and a new page will pop up that includes all records for the Purchase Order.[Add pictures/videos]
.svg)
.svg)
.svg)


