Opportunity
When making a sale, knowing the Customer’s account or deposit balance is helpful to the salesperson. To access this information, they would have to access the Customer’s dashboard page, which was inconvenient and time consuming with a customer waiting.
Solution
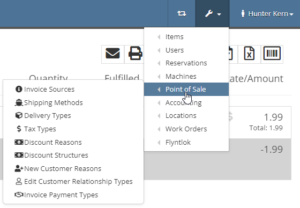
We’ve added the Customer’s balance information to the top of the Payment popup. When clicking the green “Pay” button on a Sales Order, will now see this information displayed at the top of the box:
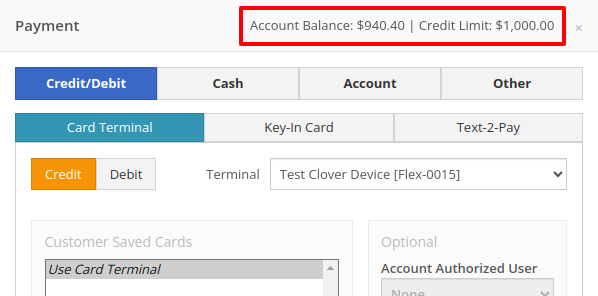
For non-account customers, it will show their deposit balance instead:
Opportunity
Managers requested the ability to allow or restrict deletion of payment lines on Point of Sale based on their user roles.
Solution
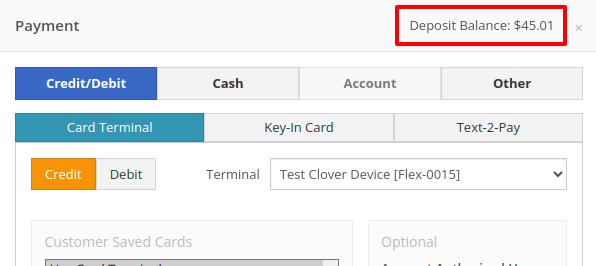
We have added a new permission on our Access Controls page. The "Delete Payment Line" permission can be found under the "Point of Sale" category. Disabling this permission will block deletion of payment lines for Sales Orders in any status.
Opportunity
Previously, the text searcher on the Rental Category Timeline combined both Model and Class searching at once. Rental clerks complained that when they searched by a Machine’s Class specifically, it would display no Models underneath, because the searcher required that both Model and Class match the search filter.
We split the text searcher into two separate inputs, for Models and Classes:
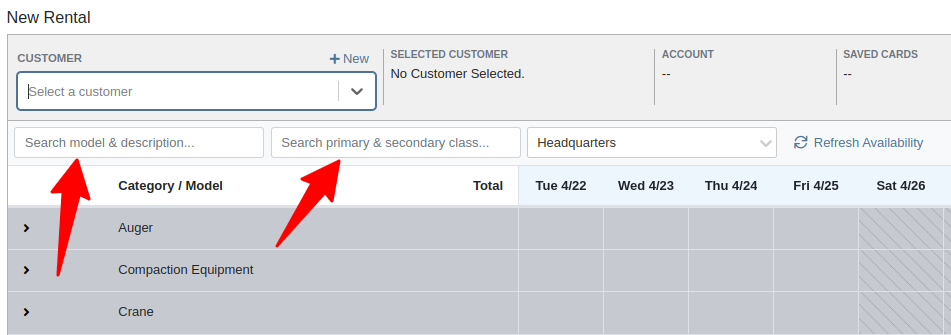
Users can still use the Model searcher to limit results to Models whose Make, Model, or Description matches the filter. Additionally, the Class searcher can be used to limit results to Classes whose name matches the filter.
Having both options available allows users to precisely specify which results they are looking for.
Opportunity
Rental Managers noticed that when viewing a Machine Dashboard, the rental rates from a different location would show first by default, causing confusion. They wanted the system to prioritize the user's location-specific rental schedule instead.
Solution
We’ve updated the Rental Rates menu so that rental rates matching the user’s current location are shown at the top of the list. Additionally, we added location badges to clearly identify which rental schedule belongs to which location, making it easier to find the correct rates quickly.

Opportunity
Managers using Flyntlok's Shopify integration requested more insight into a Shopify-linked Item's status. Previously, we would only show if an Item was initially linked to Shopify. Modifications made to the Item in Shopify that resulted in a de-sync was not being communicated clearly on our Item Dashboard. This led to confusion about the actual sync status of the Item.
Solution
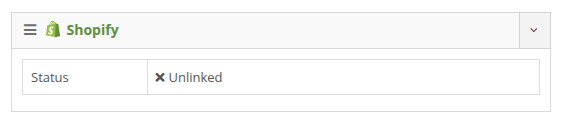
The "In Shopify" checkmark at the top of Item Dashboard has been replaced with a dedicated Shopify section in Item Dashboard. This allows you to view more details, including connection status of the Product, sync status, and the last sync time:

An Item with no Shopify link will display as "Unlinked":
In the case of a linked item that can no longer be found in your Shopify store, the Item's connection status is displayed as "Previously Linked":

Additionally, there are two buttons to external pages provided: "View in Shopify Store" directs you to your storefront's Product page. "Edit in Shopify" directs you to the Product on your Shopify Admin page.
Opportunity
Dealers receiving large quantities of Models requested a more streamlined way to enter Machine serial numbers in bulk. While Flyntlok previously supported bulk entry via barcode scanning, we did not have support for bulk text entry. This is especially important for dealers who prefer to enter serial numbers from a vendor's invoice before physically receiving the stock.
Solution
To use this feature, click the "Enter Serial Numbers" button near the top of an MPO Voucher:
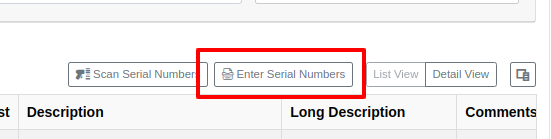
From this dialog, select a Model, then type or paste in the serial numbers. Serial numbers can be separated by line breaks, commas, or a mix of both:

Check "Detect duplicates" to remove any duplicates before proceeding to the next step.
Clicking on "Next" will reveal the preview. From here you can verify that the serial numbers to be applied look correct. We will also display warnings if too many serial numbers were entered as compared to the number of machines on the voucher. If too many are entered, you can remove lines as needed, or click on "Back" to restart the process.
Use the "Overwite existing serial numbers" checkbox if you wish to ignore any existing serial numbers entered on that model. This is especially useful for dealers who use a placeholder serial number.
Complaint: Parts Managers asked for the ability to edit comments on Part Transfers that have been received.
Correction: Comments can now be edited.
Complaint: Service Managers noted that they were sometimes not able to add a new “Work Action” through the Work Actions Admin Editor.
Correction: Fixed.
Complaint: Rental Managers mentioned that when attempting to edit the default title or body for a contract in Rental Settings, the changes were not appearing on newly created Rental Contracts.
Correction: Fixed.
Complaint: Inventory Managers noted that when printing a Receiving Voucher PDF, the footer did not contain the "Generated by" user and timestamp info that commonly appeared on other PDFs.
Correction: Fixed.
Complaint: Inventory Managers complained that when adding a Model Option, sometimes the currency would not be correctly set.
Correction: Fixed. It will now default to the Vendor's currency when adding a new Model Option.
Complaint: Managers reported that under the Balance Sheet section on the mobile version of the Machine Dashboard, the Liabilities section was not accurate and would always appear as $0.00.
Correction: Fixed.
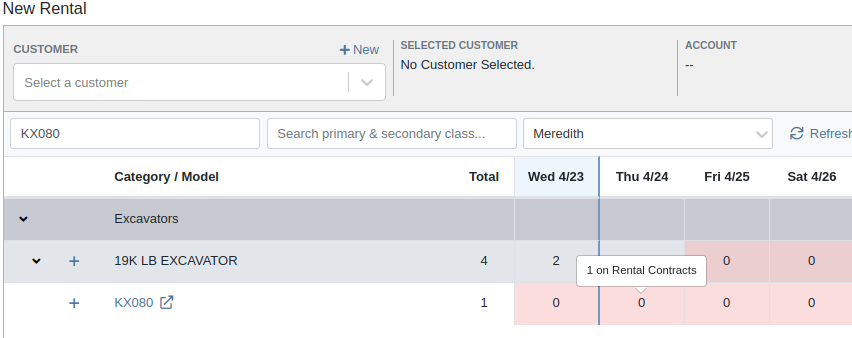
Complaint: Rental Clerks reported that sometimes the “Category Timeline” view on the New Rental page would report no conflicts, even when the Model had Machines that were out on rent.
Correction: Fixed.
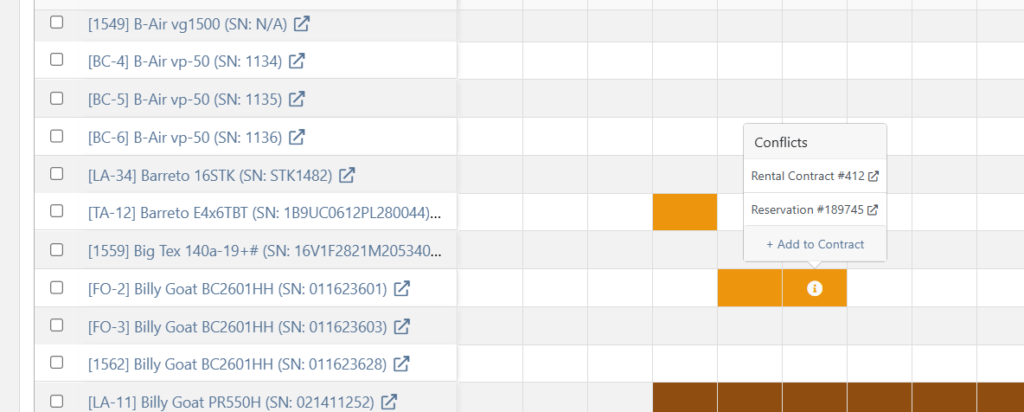
Complaint: Rental Clerks noticed that some machines showed days with conflicts (denoted by colored cells), but when they clicked on the cell the pop up would show “No Conflicts”.
Correction: Fixed.
Complaint: When printing a Purchase Order, core items were appearing twice on the PDF.
Correction: Fixed.
Complaint: Damage waivers were not being automatically applied to new customers without insurance.
Correction: Fixed.
Complaint: Customers using Sparks were unable to select the "Account" payment method and were forced to use a credit card to place orders.
Correction: Fixed. We've restored the "Account" payment option for eligible customers in Sparks.
Complaint: Parts Managers noticed that John Deere information was failing to load with Flyntlok’s API link to John Deere for some parts.
Correction: Fixed. The lookup now ignores white spaces at the start or end of part numbers.
Complaint: Managers reported times were showing in the incorrect timezone on the Issue Dashboard.
Correction: Fixed. Times shown on the Issue Dashboard will be displayed in the current location’s timezone.
Complaint: Technicians reported that some parts they search for on the desktop Work Order don’t appear in the search results when requesting parts on Mobile Work Orders.
Correction: Fixed.
Complaint: Parts Managers complained that they were not able to cancel a Reversal on Part Receiving Vouchers.
Correction: Fixed.
Complaint: Rental Clerks with AvaTax integration noted that they were sometimes unable to reverse Invoices.
Correction: Fixed. This issue only affected reversing of Rental Return invoices whose original sale was processed by AvaTax.
Complaint: Inventory managers using MPO Voucher's detail view complained that they were seeing a "De-sync on Machine Cost" warning even though no changes were being made to the cost.
Correction: Fixed. This was causing bugs in other editable fields on the same view, sometimes preventing the user from editing those fields.
Complaint: Managers mentioned that they were not able to add a note to an issue ticket immediately after submitting it.
Correction: Fixed a bug where the note input was not appearing on issues in "New" status.
Complaint: Service Writers noted that their customer SMS messages were displayed in the wrong order on the Activity Tab of Work Order Dashboard, displaying from oldest to newest.
Correction: Adjusted SMS message history on Work Order Dashboard to always display the newest messages first.
Complaint: Sales Managers mentioned that they were sometimes unable to print a Packing Slip, and that it would show up as a blank PDF.
Correction: Fixed a bug where special characters in a Customer’s contact record would sometimes cause an error in displaying Packing Slip PDFs.
Complaint: Managers noted that their notifications for an expiring Machine Reservation was not showing the correct Machine ID.
Correction: Fixed.
Congratulations are due to Flyntlok staffers Michael F. who welcomed his first baby on April 25, a bouncing boy named Bogdan! And Dylan T. welcomed baby girl Willow (number 3) on May 6! These future Flyntlokers will be coding new features and closing out tickets in no time!!
Learn More at Flyntlok Dealer Management System
Check out our Flyntlok YouTube channel for more highlights of the application!
Non Alaskans be like: Wait, what?! That’s a thing? Yes, Monday March 31 is Seward’s Day in Alaska and it is an official Flyntlok holiday. However, we recognize that all you folks outside of the 49th state are all going to be working. So we will have a reduced staff that day to manage your questions and to provide help; just understand if we don’t respond quite as quickly as we normally do...
And if you are bored this weekend, you can go read up about William H. Seward and fill your head with fun facts to amaze your lower 49 state or fellow Canadian friends. E.g. Did you know Seward was wounded in an assassination attempt at the exact same time that Booth killed Lincoln? It was part of a plan to slay the three senior members of the Executive Branch. (Spoiler: the assassination plan of Seward failed).

Here at Flyntlok we are not only building the most cutting-edge Dealer Management software, but we also want to act as industry thought leaders. To that end, we encourage you to follow us on LinkedIn and review our periodic blog posts. For example, here is a recent posting about our integration with Avalara for better sales tax management.
If you have a suggestion for a blog post that you think other Flyntlok customers, or the industry in general, might find interesting, please let us know. Drop us a line at sales@flyntlok.com.
Opportunity
Intuit is pushing applications integrated with QuickBooks Online, like good ol' Flyntlok, to upgrade to their newer back-end application interfaces. In order to continue communicating with them, we’re required to update Flyntlok’s QuickBooks accounting integration.
Solution
We took this as an opportunity to upgrade our entire back-end accounting integration services to improve reliability and eliminate some longstanding issues that have been impacting our users. We started to undertake this project at the end of 2024 and it will continue for several months still to come.
The first phase of this project was essentially invisible to you, but we have migrated all of our services to a newer technology and made it compatible with QuickBooks Online’s latest specs. Now, when an accountant hits one of the processing buttons on their QuickBooks Online page, it uses the updated logic. This back-end update is going to allow us to have better automated testing and allow us to make changes much faster. So, while not visible to you as a user, it's going to pay huge dividends for us going forward. We felt like you oughta know.

Additionally, we’ve resolved some long-standing bugs with the process, including where Credit Memos and Refund Receipts sometimes posted even when their associated Journal Entry failed; and Customer Deposits using Gravity credit card fees subtracted the fee from every payment. Those bugs have now been addressed.
Over the coming months we will provide notifications across all accounting-sync processes for failed transactions. We aim to tell you why a transaction failed, what the offending transaction was, and how to fix it. We want you to have the ability to fix issues on your own rather than forcing you to create a support ticket to resolve simple problems. Power to the people! Stay tuned..
Opportunity
John Deere offers an optional, dealer-paid service called Retail Parts Management (RPM) that helps dealers manage their parts inventory. A key tool from RPM is called JDPrism, which is used to manage dealer stock levels. Using JDPrism, RPM can recommend stock orders, special orders, and transfers between dealer store locations based on stocking levels and sales history.
Our John Deere dealers have requested an integration with JDPrism so they can leverage this powerful tool to better manage their inventory and receive suggestions from John Deere.
Solution
We have implemented an integration with JDPrism that allows dealers to better manage their John Deere parts inventory. To drive this integration, your John Deere parts inventory data (e.g. quantity on hand, sales history, etc.) will be uploaded to JDPrism on a regular schedule set by John Deere. Then, you can approve Orders or Transfers within JDPrism that will be ingested into Flyntlok periodically throughout the day (every 15 minutes or so) to create Purchase Orders and Part Transfers.
If you are interested in the JDPrism integration, please reach out to your friendly Flyntlok consultant for assistance.

Opportunity
Sales Managers requested the ability to better organize their Model Options. Previously, managing Models with a large number of options could feel a bit overwhelming.
Solution
Our enhancements to Model Options are designed to make managing Model Options easier and more efficient. To simplify this, we’ve introduced two key improvements to the Model Options Editor:
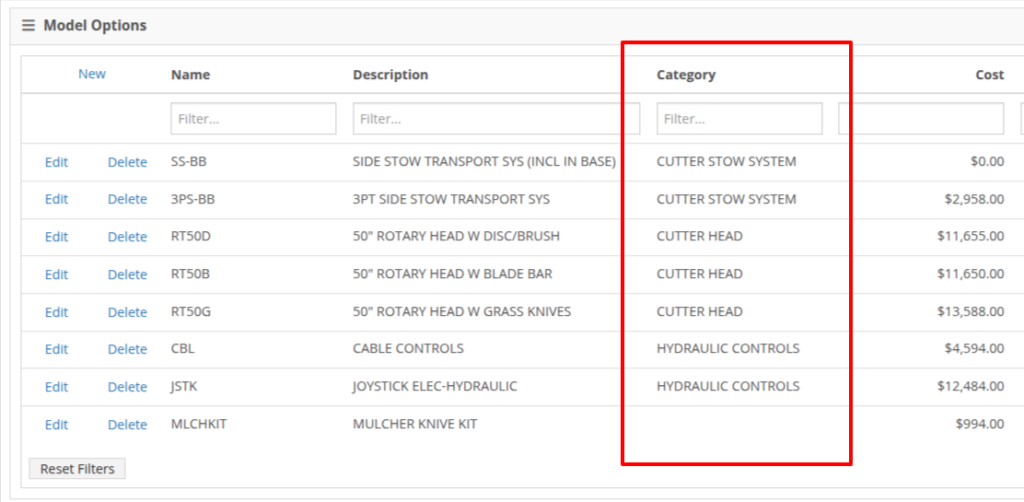
NOTE: This is just the beginning of the “Model Option” fun! The new "Category" field will play a key role in upcoming enhancements to Model Options, including updates to Sales and Purchasing workflows. Stay tuned for more updates!
Opportunity
Salespeople shared that knowing about potential Machine sale conflicts earlier in the sales process would be a game-changer. While we already provided warnings during the sale processing stage, we did not show this critical information at any other time during the life of the sale. Selling the same Machine unknowingly could lead to accuracy issues and impact customer satisfaction.
Solution
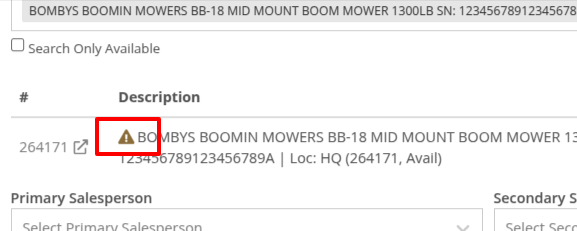
An indicator icon will now appear on the Machine sale line whenever there’s a potential conflict, such as the same Machine being listed on another Sales Order. This gives you a heads-up before finalizing the sale.

We've also added the same indicator when searching for a Machine to add to a sale. This means you’ll know about potential conflicts before adding the Machine to the order, saving time and avoiding surprises.
Opportunity
Service Managers have asked for greater control over workflow automations, specifically at the Job level within Work Orders. Previously, our automation tools could only update Work Order statuses.
Solution
We've expanded this functionality to include Job-level status updates as well! By automating Job status changes based on key workflow actions, shops that rely on Job-level tracking can reduce manual updates, improve reporting accuracy, and ensure that technicians, parts teams, and service managers stay aligned in real-time. This means fewer bottlenecks, better communication, and faster turnaround times.
New Automation Triggers
You can now configure Work Order Jobs to automatically update their statuses based on the following actions:
Reach out to your friendly Flyntlok consultant for assistance in setting up these new automations!
Opportunity
Service Managers handling cost-of-sale (COS) Work Orders struggle to track the associated customers from the linked invoices, as these details are not visible on the Service Scheduler.
Solution
We have improved the display of the Work Order search results in the Service Scheduler to show the Cost-of-Sale Invoice's customer, making tracking and scheduling more seamless. Additionally, we have enhanced the title of scheduled events in the Service Scheduler when a Work Order is scheduled at the time of creation.

Opportunity
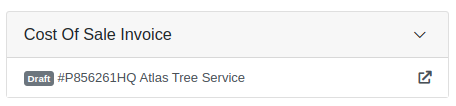
Users managing Cost-of-Sale Work Orders often need to verify the linked Sales Order and associated invoice. Previously, this required navigating back to the Sales Order, leading to inefficiencies and potential tracking issues.
Solution
Cost-of-Sale Work Orders now display the linked invoice directly within the Work Order, allowing users to quickly access relevant details without leaving the page.
Opportunity
Technicians faced challenges identifying machines because the mobile view did not display their descriptions.
Solution
Machine descriptions are now included in the Work Order Search display results on the mobile view, making it easier to identify equipment.
Service Managers have requested that Correction Notes be included on Work Order Estimates to provide more clarity and context when sharing with customers.
Solution
We've added a new setting: "Show Job Correction on Work Order Estimates". When enabled, this setting will include Correction Notes on newly generated estimates. To turn this feature on, go to Flyntlok Settings and find it under the Service section.
Opportunity
Users find adding or locating contacts on the New Work Order page to be cumbersome and occasionally buggy.
Solution
Opportunity
Sales Managers requested an automation that updates Shopify orders when an invoice moves to "Pickup" or "Delivered" statuses in Flyntlok. Previously, Salespeople had to manually update Shopify, which is time-consuming and redundant.
Solution
Flyntlok now automatically updates Shopify orders to reflect "Pickup" and "Delivered" statuses when corresponding invoice updates occur. This eliminates the need for manual intervention, streamlining order management.
Opportunity
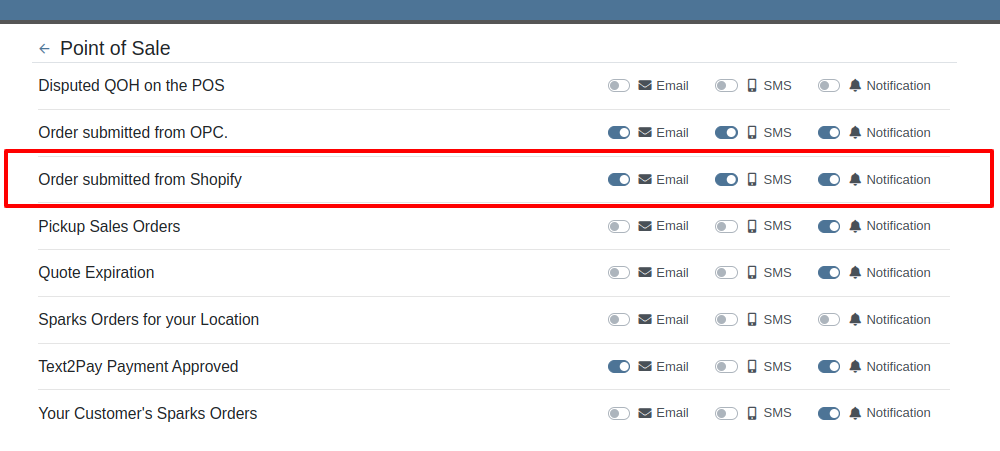
Sales Managers requested a notification for incoming Shopify orders, so that any salesperson that wants or needs to know about such orders will be notified immediately.
Solution
There is now a new notification for orders from Shopify that can be enabled for anyone who wants it.
Opportunity
Users found the reversal process for posted splits confusing, as they would end up in a "Delivered" status if the parent invoice was not also reversed.
Solution
Now, when attempting to reverse a split, a warning will inform users if the parent invoice must be reversed first.

Complaint: Parts Managers had noted that, when attempting to merge parts, sometimes mergeable parts would not show up in the list to be merged.
Correction: Fixed.
Complaint: When using Scan Mode on the Receiving Voucher, scanning a barcode resulted in a "Part Not Found" error, even though the part was listed on the voucher.
Correction: The issue was caused by a leading space in the scanned item number, preventing an exact match. The Scan Mode has been updated to automatically trim leading and trailing spaces from the scanned input.
Complaint: A technician was able to add parts to a Work Order after it had been invoiced, even though no changes should be allowed once the Work Order has been Invoiced.
Correction: Fixed.
Complaint: The total amount on the printed Work Order report was off by one cent compared to the final invoice.
Correction: Fixed the rounding of the estimated tax on the print, ensuring that the total calculation now matches the final invoice.
Complaint: Users were unable to edit the Certificate of Conformance (COC) requirement from the Purchase Order.
Correction: Enabled the COC field to be editable in PO edit mode, allowing users to update the requirement as needed.
Complaint: Sales Managers noted that they would sometimes receive duplicate CRM Leads generated from their marketing site's "Text Us" form.
Correction: Fixed an issue with CRM Text Us widgets where customers were able to inadvertently submit an inquiry multiple times.
Complaint: Managers complained that they were not able to update their Sales Order default footer in Flyntlok Settings.
Correction: Fixed. We have updated this setting to support longer default footer messages.
Complaint: Rental Clerks were unable to load Rental Dashboard without errors.
Correction: Fixed an issue where Rental Dashboard failed to load defaults when store hours were not configured in Rental Settings.
Complaint: Salespeople mentioned that some Sales Order links appeared broken on their CRM Lead Dashboard timeline.
Correction: Fixed. Deleted Sales Orders associated to a CRM Lead will no longer display as a link.
Complaint: Managers complained that when using the "Merge Model" tool, they were unable to find a model by searching its internal ID.
Correction: Fixed. “Merge Model” searcher can now search by internal Model ID.
Complaint: Sales Managers mentioned that when using the Bulk Update action on the Part Price Matrix page, it did not appear to be factoring in Unit Qty when auto-calculating list price. This happened similarly on individual updates via the new Pricing Matrix editor.
Correction: Fixed.
Complaint: Purchasers noted that when reporting an Exception on Part Purchase Orders, the PO status would not update.
Correction: Fixed. PO Status is now automatically refreshed when reporting an Exception on a PO or any of the PO's associated Vouchers.
Complaint: Fleet Managers noted that when printing a Machine “Internal Asset Report”, the Machine's ID appeared to be missing or incorrect.
Correction: Fixed report to show the proper Machine ID.
Complaint: Service Managers complained that when printing a Work Order Worksheet PDF, sometimes the Jobs would be listed out of order.
Correction: Fixed.
Complaint: Salespeople were unable to deliver Invoices because the "Credit Auth" payment type was applied to Multi-Pay Sale.
Correction: Disabled "Credit Auth" payment type in the Multi-Pay workflow to allow invoices to close properly.
Complaint: When updating Work Order Statuses, the updated status would sometimes disappear from existing Work Orders that had that status set.
Correction: Fixed.
February 12th, 2025 Release Notes
Learn More at Flyntlok Dealer Management System
Check out our Flyntlok YouTube channel for more highlights of the application!
Opportunity
Users who administer their company’s Shopify store requested that sale prices in Flyntlok for Machines listed on Shopify be reflected there.
Solution
Sales on Machines in Flyntlok are now automatically applied (or unapplied when removed) in Shopify as well. Sale prices are reflected in Shopify with a struck-through price.

Opportunity
Managers mentioned that Machine data coming from their Hitachi telematics integrations were updating Machines that they did not want to be automatically updated.
Solution
For companies with Hitachi telematics enabled, there is now an option to opt out of automatic updates per Machine. To toggle this feature, click on the “Opt Out of Telematics” button found on Machine Dashboard’s “Current Location” section.
Opportunity
Service Managers requested the ability to send email CCs internally when emailing Machine Deficiencies.
Solution
You can now choose to CC others from your company when emailing Machine Deficiencies.

Opportunity
Purchasers who buy Sublet Items will change the sublet cost on Purchase Orders often, but this would also change the Item’s cost for the rest of the system. They requested a behavior change so that the Sublet cost on the Purchase Order would not change the Item’s cost overall, just the cost on the Purchase Order.
Solution
Changing the cost of a Sublet Item on a Purchase Order will no longer update the item’s cost that you see on the Item Dashboard. Cost changes for non-sublet items will still update the item’s cost, which will be reflected on the Item Dashboard.
Complaint: Service Managers reported that Work Orders with multiple Warranty Invoices were displaying only one Invoice in the banner on the Work Order Dashboard once the Work Order had been invoiced.
Correction: Banner now shows all Warranty Invoices.
Complaint: Parts Receivers reported that updating the cost of an Item on Part Purchase Orders did not update the list price of that item as they would expect.
Correction: Fixed.
Complaint: Service Managers reported that Work Orders were scheduled with incorrect times when Scheduled at the same time as the creation of the WO.
Correction: Fixed.
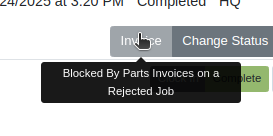
Complaint: Users reported that Work Orders with Internal Parts Orders on rejected jobs would not transition to “Invoice” status. Instead of displaying a message explaining the issue, the invoice button remained active but unresponsive.
Correction: The “Invoice” button is now properly grayed out when invoicing is blocked due to parts on a rejected job. Additionally, a tooltip message will appear, informing users that invoicing is blocked.
Complaint: Users reported that certain parts were incorrectly displaying an “Alternates” indicator on search, even when no alternate parts were available, causing confusion.
Correction: Fixed.
Complaint: Salespeople reported that non-taxable items were being taxed on split invoices.
Correction: Fixed. If an item is non-taxable, it will not be taxed on a split invoice.
Complaint: Receivers reported issues allocating fees on Machine Vouchers; the fees would not be applied as expected if there were machines with a base cost of $0 on the voucher.
Correction: Fixed.
Complaint: Inventory Managers noted that when updating the “Auto-Sync” options for Shopify-connected items, the Item would sometimes not push the changes to their Shopify store.
Correction: Fixed. While editing an item, clicking the “Save” button in the Shopify Settings area will now apply the Auto-Sync settings change without requiring the user to also click on the Item’s main “Save” button.
Complaint: Salespeople reported that they were sometimes unable to Process Sales Orders that contained an Item with a Core.
Correction: Added an indicator to Core items to show when there may not be enough QOH to fulfill the line.

Complaint: Service Writers mentioned that when editing Labor lines on Work Order Dashboard, they would get an error and were unable to save any changes.
Correction: Fixed an issue that caused an error when editing Labor that did not have a “clock out time” set.
Complaint: Salespeople reported that when emailing an invoice to a customer, some characters would appear incorrectly.
Correction: Fixed an issue that caused some special characters and accented letters to appear malformed on Flyntlok-sent emails when viewed in Microsoft Outlook.
Complaint: Service Managers using the Job Calendar Scheduler noticed that the scheduled Technicians were being assigned to the Job, but not the Work Order.
Correction: Fixed. Technicians assigned work from the Job Calendar Scheduler will also be assigned to the Work Order.
Complaint: Managers doing Inventory Counts reported they were unable to edit a count’s quantity if the number was too large, and they would get an error saying invalid quantity.
Correction: Fixed.
Complaint: When updating the Start and End date of a scheduled Work Order in the Service Scheduler, the changes would sometimes fail to persist. This occurred because there was no validation to ensure the Start date was earlier than the End date.
Correction: Added validation to ensure the Start date always precedes the End date. (Feels like we fixed something similar last release, don’t it? Well, we did. You are a careful reader if you noticed that.)
Complaint: Sometimes the “Date Start” and “Date End” in the “All Work Orders” report were not reflecting the dates set on the Work Order correctly and were off by one day.
Correction: Fixed.
Complaint: Users were unable to invoice Work Orders when there are Rejected Parts Invoices on a Rejected Job. Previously, they were able to do this, but the new restriction has unintentionally blocked this workflow.
Correction: Fixed.
Complaint: Machine Purchase Order Vouchers were sometimes posting to QuickBooks with a negative amount when the Voucher total added up to $0.
Correction: Fixed. This was due to a rounding error, which calculated the sum to be a very small negative number instead of exactly $0.
February 12th, 2025 Release Notes
Learn More at Flyntlok Dealer Management System
Check out our Flyntlok YouTube channel for more highlights of the application!
If you are an old-school user of Internet Explorer still, please note that Flyntlok will no longer support that browser (which was end-of-lifed by Microsoft in June, 2022). If you use Flyntlok with IE, you need to switch to Chrome, Firefox, or Edge.
Opportunity
Salespeople have requested a streamlined way to register newly sold Stihl Machines.
Solution
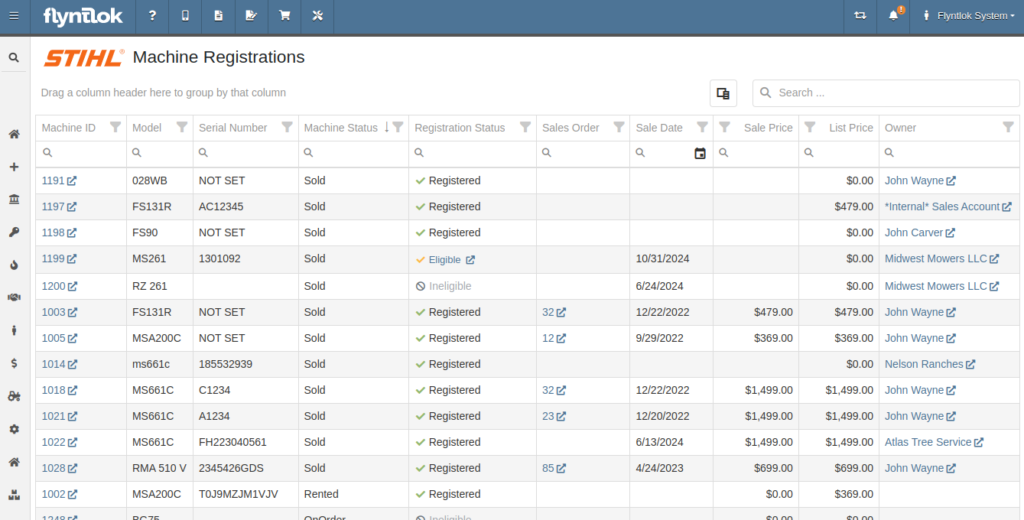
Flyntlok now has a new page for viewing Stihl Machines and their registration status. If a Machine has not been registered and is still eligible for registration, you can open the Register Stihl Machine form from this page to quickly register that Machine.
This is our first pass on this page and in a few weeks you'll get the ability to register these in bulk. Help further shape its future by letting us know if you have any feedback.
N.B. Please note that we are still backfilling registration data for your existing Stihl Machines.
Opportunity
Just because a salesperson isn’t at their computer doesn’t mean they aren’t actively selling! Salespeople expressed the need for the ability to create CRM Leads through our Mobile site, enabling them to capture vital customer and potential sales information efficiently while away from their desktops. ABC: Always Be Closing!
Solution
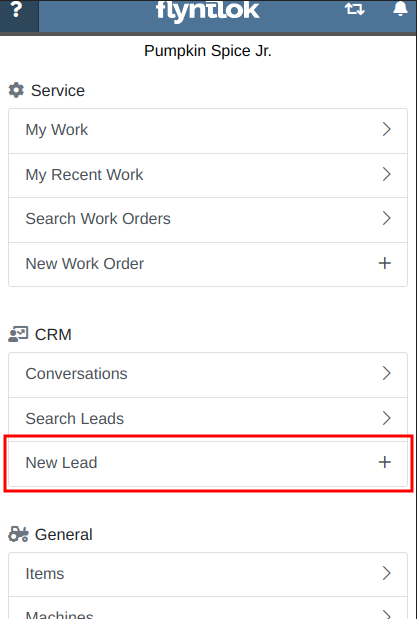
Users can now create CRM Leads directly on their Mobile! This new feature can be accessed by tapping on “New Lead”, located in the updated mobile layout, which now includes a dedicated CRM section.
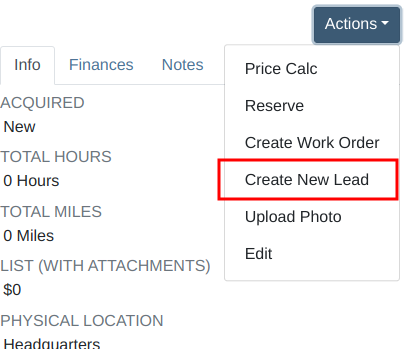
Additionally, users can create new leads directly from the Mobile Machine Dashboard via the Actions dropdown:
Opportunity
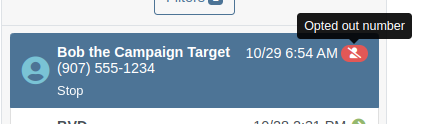
Salespeople managing their SMS conversations requested the ability to hide conversations where the recipient opted out of receiving text messages.
Solution
Conversations where the recipient opted out of receiving text messages will now be filtered from the SMS conversation list by default. If you still wish to view those conversations, a new filter has been added to the SMS Inbox to show conversations with recipients that have opted out.
Opportunity
Managers reported that Users would frequently create duplicate Customers when building new Rental Contracts and Work Orders.
Solution
When creating a Customer from the New Rental and New Work Order pages, existing Customers sharing a similar name with the new Customer will appear under the Name field. Selecting a possible duplicate will set it as the Customer on the Work Order or Rental Contract.

Opportunity
Managers requested the ability to load additional conversations in their SMS Inbox after they had scrolled to the bottom.
Solution
Added infinite scrolling to the SMS Inbox conversation list. Scrolling to the bottom of the list will load more conversations that fit the current filter set. Additionally, conversations with recent messages will now automatically move to the top of the list without needing to reload the page.
Opportunity
Flyntlok customers using Sage Intacct have requested Inventory reports for their company similar to Flyntlok’s existing Inventory reports for QuickBooks Online.
Solution
You can now opt in to receive two of Flyntlok’s nightly Inventory reports – an Inventory valuation and an Inventory reconciliation report – now with account data from Sage Intacct. Reach out to your friendly Flyntlok Consultant if you are interested in receiving these reports.
Opportunity
Managers have requested the ability to embed a QR code onto printed pick lists. This enhancement would allow staff to quickly access Sales Orders by simply scanning the code, streamlining the workflow and reducing manual entry.
Solution
We have introduced an option to include a QR code on the pick list PDF.

To enable this feature, navigate to Flyntlok Settings and check the box labeled “Show QR Code on Pick List PDF”.

Opportunity
Accountants requested that Shopify gift cards post to their own payment type in Flyntlok.
Solution
Added integration with Shopify to post gift cards to a specific payment type. If you would like to set up this integration, please contact your friendly Flyntlok Consultant and they will be happy to help.
Opportunity
Service Managers requested an option to select the “Allow Inventory Restock on WO Parts” box by default when generating a return Invoice.
Solution
Added a setting under Sales called “Allow Inventory Restock Parts by Default.” Enabling this setting will select the checkbox automatically.

Opportunity
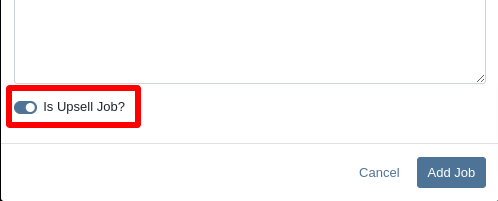
Service Managers requested the ability to select the “Upsell Job” slider by default when a Technician adds a new Job to a Work Order.
Solution
Added a setting under Service called “Technicians Automatically Upsell Jobs”. Enabling this setting will select the slider automatically when a User with the Technician role is creating a Job.
Opportunity
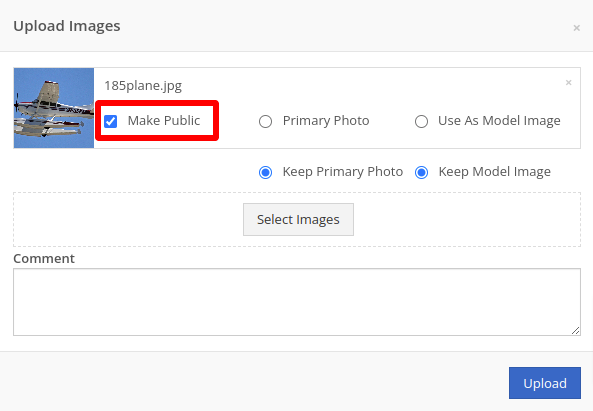
Sales Managers requested an option to select the “Make Public” box by default when uploading an image on a Machine.
Solution
Added a setting under Company called “Make Uploaded Images Public by Default.” Enabling this setting will select the checkbox automatically.
Opportunity
Rental Managers reported frequently entering the incorrect end date when creating Invoices for Rental Contracts in advance.
Solution
When creating an Invoice for an open Rental Contract before the Contract’s estimated end date, Flyntlok now assumes you want to end the billing period on the Contract’s estimated end date. You can still freely change the billing period’s end date before creating the Invoice.
Complaint: Sales Managers reported that the “Multi Pay” option on the Customer dashboard was sometimes incorrectly creating refunds for split Invoices.
Correction: Fixed. Multi Pay will now correctly take into account the Item costs on split Invoices.
Complaint: Parts Managers mentioned that even though they had an Item linked to Shopify, the "In Shopify" badge on the Flyntlok Item Dashboard would sometimes incorrectly display that the Item was not linked.
Correction: Fixed.
Complaint: Purchasers and Receiving Clerks reported that when substituting an Item on a Purchase Order for another Item that had a Core, the Core Item was not being included on the PO.
Correction: Fixed. Items configured with Cores should now be attached when substituting in or out.
Complaint: Service Writers reported that on Work Orders, when the option to notify Customers by SMS is enabled, the option to notify the Customer when changing statuses was not checked.
Correction: Fixed.
Complaint: Searching for a Contact to send a Work Order Estimate would only show a list of phone numbers, not the Contact’s name.
Correction: Fixed. Additionally, the pop-up to send a Work Order Estimate via SMS now automatically pulls in Contacts linked to the Customer on the Work Order as default options.
Complaint: Parts Managers noticed that updating an Item’s Department or Division would not update the Item’s list price properly based on the appropriate pricing matrix.
Correction: Fixed.
Complaint: Service Managers noticed tax calculations were off on Work Orders where customers had rejected quotes for parts.
Correction: Fixed. The tax calculation has been updated to ignore parts on rejected part requests.
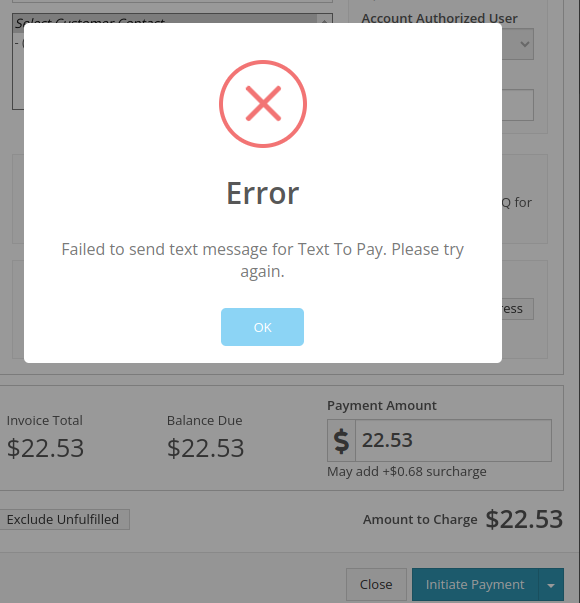
Complaint: Salespeople noticed that sometimes sending a “Text To Pay” on an Invoice would silently fail to send a text message to the customer.
Correction: Fixed. In the future, if a text message fails to be sent, Flyntlok will pop up an error message to let you know.
Complaint: Managers reported that applying a filter to the Expected Revenue column on the Leads grid was not correctly excluding values.
Correction: Fixed.
Complaint: Rental Clerks reported that they were unable to collect a signature using their Credit Card Machines.
Correction: Fixed.
Complaint: Service Managers noted that sometimes when editing the Complaint, Cause, or Correction on a Work Order’s Job, pressing Cancel would still save the edits.
Correction: Fixed. There was some auto-saving going on that we addressed.
Complaint: Salespersons mentioned that on Point of Sale, they were sometimes unable to edit the Inbound Shipping price.
Correction: Fixed.
Complaint: Inventory Managers reported that they were able to cancel a Parts Receiving Voucher while their location had an Inventory Sprint in progress. This action should have been prevented.
Correction: Fixed.
Complaint: Technicians mentioned that when looking up Alternates for Items on Work Order Dashboard, the quantity on hand was not showing.
Correction: Fixed.

Complaint: Inventory Managers noted that they were able to continue to receive parts on a Voucher when the Voucher was closed. The user had a tab open with the Voucher in an “Open” status, but it was closed on another tab or device.
Correction: Fixed. We check the status of the Voucher before allowing a user to save edits to make sure it’s in a valid state.
Complaint: Service Managers reported that Jobs created from the New Work Order page would not have any tag number.
Correction: Fixed. Jobs added on a New Work Order will now be set to the Work Order’s Tag Number.
Complaint: Salespeople reported that Invoice payment lines sometimes displayed the incorrect date that the payment was processed.
Correction: Fixed.
Complaint: Managers reported that searching “w?” with a Work Order Tag Number was returning many unrelated results.
Correction: Fixed. Work Order Tag Numbers now search using an exact match on the searchbar input.
October 23rd, 2024 Release Notes
Learn More at Flyntlok Dealer Management System
Check out our Flyntlok YouTube channel for more highlights of the application!
Opportunity
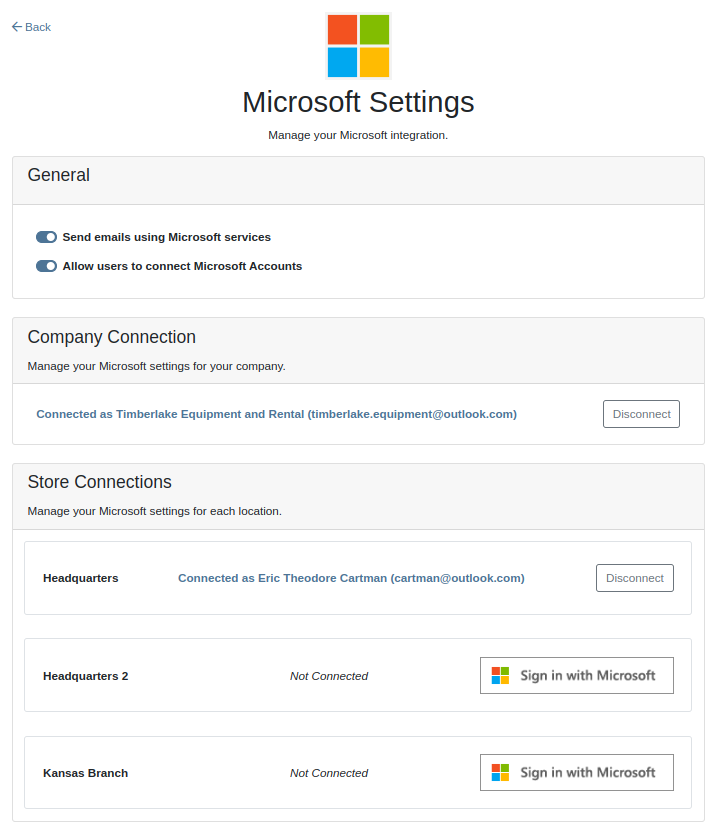
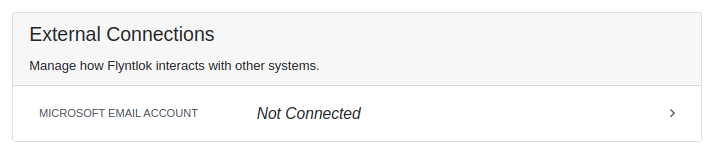
Flyntlok users previously faced limitations with our Microsoft email integration, as it only supported configuration at a company level and for a single email account. This made managing communication with customers challenging, especially when replies and conversation threads needed to be organized among various employees and store locations. Users required the ability to connect multiple Microsoft email accounts at both user and store location levels to improve efficiency and communication management.
Solution
Flyntlok now supports the connection of multiple Microsoft email accounts at both user and store location levels, in addition to the corporate account. This enhancement allows for more flexible and efficient email communication directly from Flyntlok.
Key Features


Integration Setup:
To connect Microsoft email accounts to store locations follow this steps:
To connect a Microsoft email account to a user’s profile follow this steps:
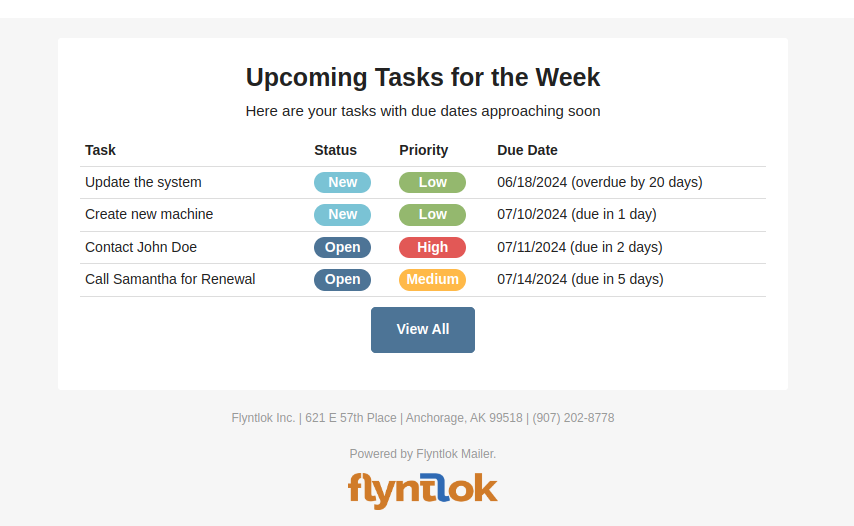
Opportunity: It can be oh-so-hard to remember all the tasks that are due and need immediate attention! There is no way currently to receive reminders about tasks that are due soon without going to the tasks grid and checking it yourself. (Sometimes you need to create a task to remind yourself to review your tasks.) There is a need to receive reminders about due tasks so that important work is not missed.
Solution: We have added a new notification for “Due Task Reminders” which can be enabled by navigating to Preferences -> Notifications -> CRM

If this notification is turned on, Flyntlok will send a report about all the tasks assigned to you that are due within the next week at the end of each day. This will help users to stay up to date on their progress and avoid missing out on important tasks. Based on the selected medium (Email, SMS or notification) the notification may look slightly different.

Opportunity
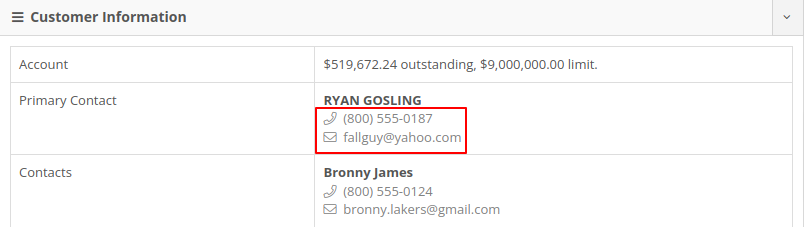
Users managing contacts on the Customer Dashboard have requested the ability to click to call/email their contacts listed in the Customer Information panel.
Solution
The Customer Dashboard has been updated to have links for calling and emailing in the Contact and Primary Contact sections. By clicking on a listed phone number or email address, a phone call or email can be initiated right from the Customer Dashboard.
Opportunity
Users managing customers’ saved credit cards have requested an indicator on the Customer Dashboard that displays if a customer has credit cards on file.
Solution
The summary section of the Customer Dashboard has been updated to display the status of a customer’s saved credit cards. The icon will indicate if all credit cards are valid, if any card has expired, or if a customer has no credit cards.


Opportunity
The current implementation of the “Parts Used” modal on the desktop-version of Flyntlok supports marking parts that have already been requested as “Used”. This multiple-step process requires technicians to request parts first and then navigate back to log the quantities used, which can be cumbersome. There is a need to streamline this process to improve efficiency and reduce the number of steps required.
Solution
The “Parts Used” modal on the desktop-version of Flyntlok has been updated to allow technicians to add and mark additional used parts directly within the same step. This feature simplifies the parts management process, reducing the number of clicks and streamlining the workflow for technicians.(N.B. This feature already existed in the mobile version of Flyntlok)
Key Features:
Inventory Management Details:
How to add an additional used part:
1. Click “Edit Parts” in the “Parts” section of the job page.

2. Click “Add Parts” in the modal to open the parts searcher

3. Search for a part and select it.

4. Set the used quantity for the selected part
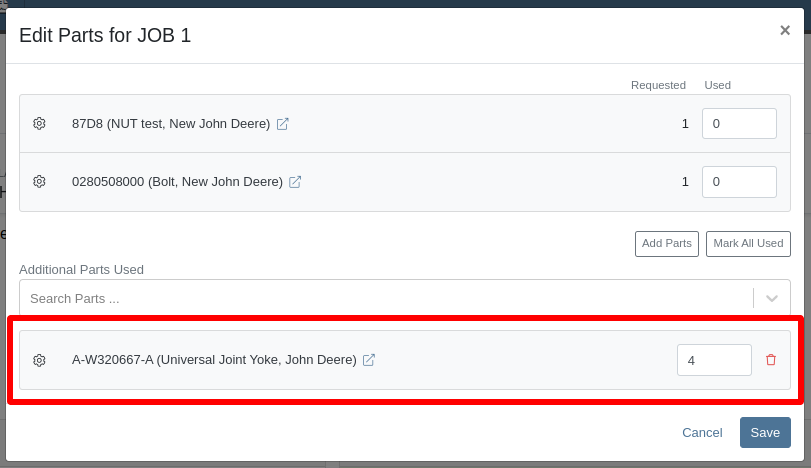
5. Repeat steps 3 - 4 to add more parts.
6. Click "Save" to finalize.
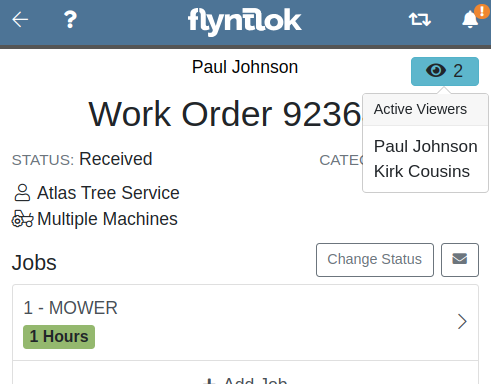
Opportunity: Technicians often face workflow conflicts when multiple users inadvertently work on the same Work Order simultaneously. This can lead to inefficiencies and errors. By providing real-time visibility of users currently viewing a Work Order, Flyntlok can significantly improve coordination and prevent such conflicts.
Solution: The Activity panel on the Work Order Dashboard has been updated to display the users who are currently viewing the same Work Order. Flyntlok does not prevent two people from editing the same Work Order, but the system will alert you to other simultaneously viewing users.

The Active Viewer list applies to users viewing the Work Order across both Mobile and Desktop platforms.
Opportunity: Service managers have requested the ability to view a Work Order’s status on the Job Service Scheduler. This would enable Service Managers to better organize their jobs table, streamlining the job scheduling process.
Solution: We added a new column for the Work Order status on the Job Service Scheduler. The column can be sorted and filtered as well.

Opportunity: Service Managers have requested the ability to force a machine down on Work Order creation. This way the machine’s status will be set to ‘Down’, regardless if work has started on it.
Solution: We have added this as a setting in Flyntlok Settings. This setting can be found under the Service section, titled “Force Down Machine on Work Order Creation''. With this option enabled, checking ‘Force Down’ on the New Work Order page will update the machine's status to ‘Down’ when the Work Order is created.
Opportunity
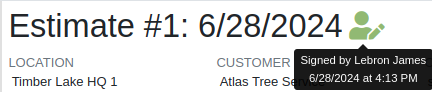
Service Managers would like to see who signed a Work Order Estimate and when they signed it. Previously, a green icon with a message ‘Customer Review Complete’ would be the only indicator that an estimate was signed.
Solution
We have updated the displayed text for the green icon to show when an estimate was approved and who signed off on it.
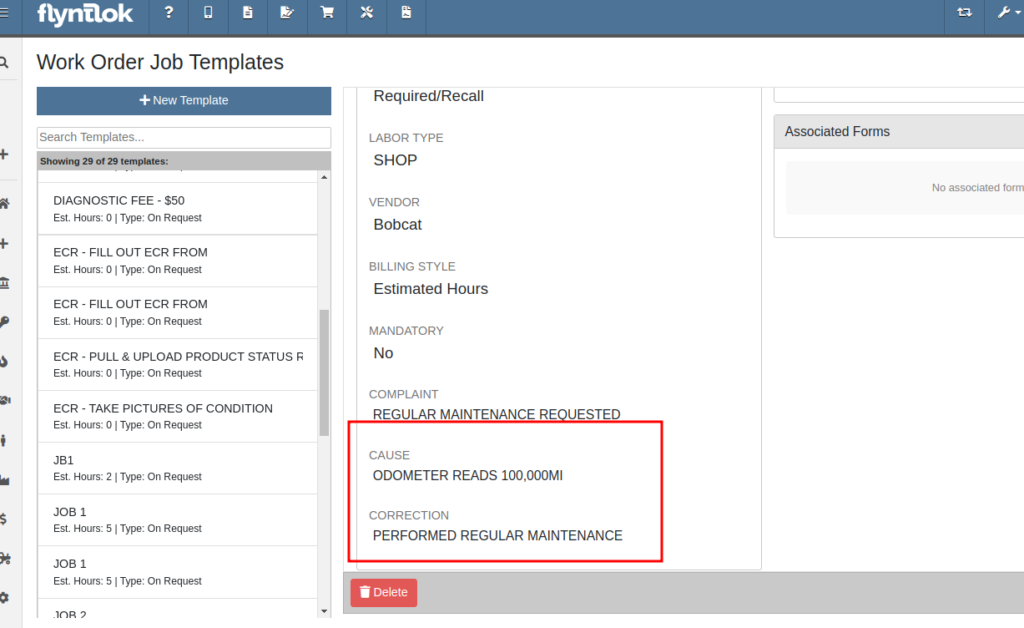
Opportunity: Managers requested the ability to save Cause and Correction to Work Order Job Templates. One example for needing this is to make these Job fields populate exactly as needed for Warranty work, eliminating the variability of a technician’s entries.
Solution: Users are now able to add and edit Cause and Correction on the Work Order Job Templates page. These fields will populate on the Job when added via Work Order creation or Work Order Dashboard.
Opportunity: Service Managers would like to see a customer’s Primary Contact on their Work Order print out, regardless of the contact that is set on the Work Order.
Solution: We have updated the Work Order print out to display the customer’s Primary Contact in the ‘Bill To’ section. If the Primary Contact is the same contact that was selected on the Work Order, the print out will appear the same as before.

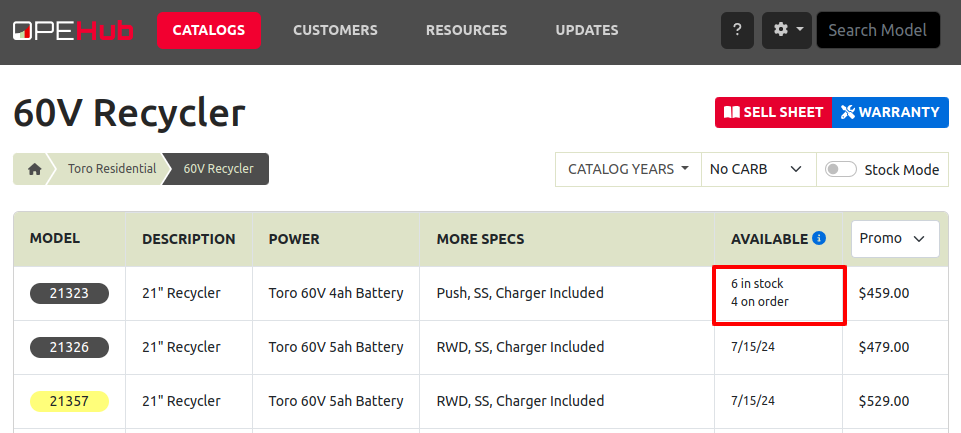
Opportunity: Salespeople at Toro dealers have requested the ability to access real-time inventory data from Flyntlok within OPEHub. (OPEHub is a third party quoting and reference sales tool used by Toro dealers. If you are a Toro dealer and are interested in OPEHub, please contact them at drew@opehub.com.)
Solution: We have implemented an integration for OPEHub that allows users to view the inventory details of specific models from Flyntlok.
Integration Setup
To connect OPEHub to Flyntlok follow this steps:
1. Access the Integrations Page within Flyntlok.
2. Choose the location you want to connect to OPEHub.
3. Generate a token by clicking the "Request New Token" button. This will populate the Access Token field.
4. Click on the “Copy Access Token” button to copy the Access Token.
5. Link your Vendors to OPEHub supported Manufacturers

6. Connect to OPEHub

Opportunity:
Service Technicians and Managers have requested the ability to assign classes to a Model when creating a new Machine with a new Model. Doing this currently requires that the user first create the Machine, then go to the Machine Dashboard, then click on the Model Editor, and then finally set the Primary and Secondary Class options there. Being able to do this at the Machine creation step would save the user time (and clicks!) for shops who require classification of Models.
Solution:
We have added Model Primary Class and Model Secondary Class fields to Machine creation on these pages:
A new "Model Details" section will show after typing in a new Model name and choosing to create it. The selected Class options will be applied to the Model immediately when created.

Opportunity: Users creating models would like to be redirected to their new model on creation from the Add a New Model page.
Solution: We have updated the Add New Model page to redirect to the newly created model. This should streamline model editing after creation for things like Rental or Maintenance Schedules which cannot be set until a model is created.
Opportunity: Users managing machines would like to see the model’s horsepower on the Machine Dashboard. This information can be useful to salespeople who want to get more machine information at a glance.
Solution: The Machine Dashboard has been updated to display the horsepower of a machine’s model. This value must be edited at the model level, but will display on any machines of the model.

Opportunity: Managers requested the ability for drivers to upload pictures for pickups and drop-offs. This is intended to facilitate the documentation of machine conditions and improve transparency and accountability during the moving process.
Solution:
Mobile "My Trips" View: Users can now upload pictures directly from their mobile devices via the "My Trips" section. Uploaded images will be displayed in a gallery-like format, providing a visual record of machine conditions at pickup and drop-off. To upload a picture, click on the "Upload" button in the Images section:

Desktop Moves Dashboard: Users can manage the files when viewing Moves on desktop. Additionally, other accepted file types (such as PDF) can be attached.

Opportunity: Users have requested the ability to change a Reservation’s “Is Open Ended” field after the reservation has been created.
Solution: Implemented an editor for “Is Open Ended” on the machine Reservation dashboard page.
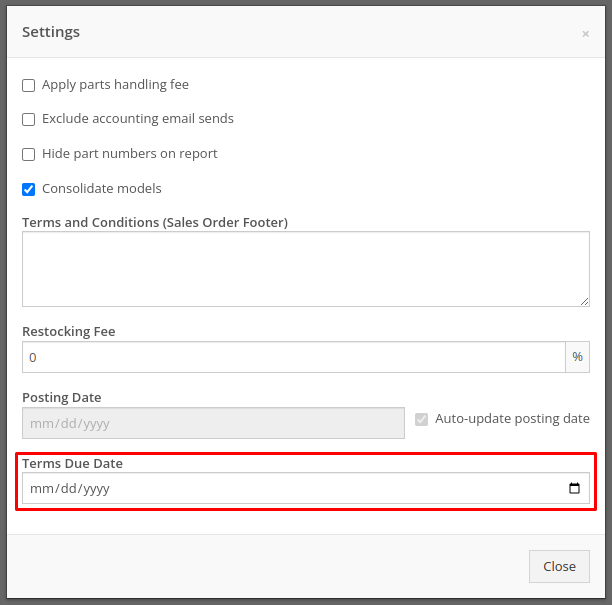
Opportunity: Salespeople have requested the ability to adjust the Due Date of an Invoice from Flyntlok and have that feed to QuickBooks Online.
Solution: We’ve added a new field called “Terms Due Date” to the Invoice. When posted as an Invoice to QuickBooks Online, any date set here will become the QuickBooks Online Inovice’s Due Date. You can find this new field on the Point of Sale by opening the Details panel and clicking the Settings button in the top right corner.
Complaint: Service managers noticed their Upcoming Maintenance page was blank and would not load their Maintenance Schedules.
Correction: Fixed.
Complaint: Service Managers noticed labor lines on the Work Order that were not associated with jobs would intermittently disappear on non-segmented Work Orders.
Correction: Fixed.
Complaint: Users creating items with alternates/supersessions noticed that the alternates/supersessions would not be saved once the item was created. Because of this, they would then have to edit the item after creation to update the alternates/supersessions.
Correction: Fixed. Alternates and supersessions are now properly saved on item creation.
Complaint: Service Managers noticed taxes were being shown on Work Orders for internal customers. These customers should have been recognized as tax exempt on the Work Order, like they are on Sales Orders.
Correction: Fixed. Internal customers on Work Orders are now properly recognized as tax exempt, and the Work Order will correctly display no taxes.
Complaint: Receivers noticed serial numbers and received dates for machines on Machine Purchase Orders would disappear if an associated Fee-Only Voucher was canceled. This logic was intended to reset machine data when a Machine Receiving Voucher got canceled.
Correction: Fixed. Machine data will no longer be reset if a Fee-Only Voucher is canceled.
Complaint: Service Managers noted that they were not able to access videos that Technicians had uploaded to Work Orders.
Correction: An issue was identified where many large files on Work Orders were not downloadable by users. This issue has been resolved.
Complaint: Service Managers noticed that when Sales Orders were linked to Work Orders via the “Link SO as Internal Parts WO” widget, they were not showing on the linked Work Order’s dashboard.
Correction: Fixed, Sales Orders linked to Work Orders via the widget will now be shown when viewing the Work Order.
Complaint: Salespeople reported that initiating a Text-2-Pay payment would not move the invoice forward from “Draft” status.
Correction: Fixed.
Complaint: Users noted that when clicking on the email link on a Customer’s dashboard, it would only ever try to send emails to the customer’s default contact email rather than the selected recipient.
Correction: Fixed, all email links on a Customer’s dashboard will now try to send a new email to the address displayed in the link.
Complaint: When changing the Customer from the Point of Sale, users reported not being shown the new customer’s warning note as a popup.
Correction: Fixed.
Complaint: When requesting a customer’s signature on a Work Order Estimate via SMS, users reported not being shown the selected Customer’s phone numbers by default. They had to do a name or number search instead of being at least shown that Customer’s related contacts.
Correction: Fixed.
Complaint: Salespeople have requested all available columns on the Leads list be visible on the All Leads spreadsheet export.
Correction: Fixed.
Complaint: Users noticed that the Work Order system would sometimes allow them to check out an already Invoiced Work Order.
Correction: Fixed.
Complaint: Receivers were unable to receive items where the quantities had decimals on the item (some items are not always received in whole numbers).
Correction: Fixed.
Complaint: Service users noted that when viewing "My Trips" on mobile, the wrong Pickup Address would sometimes be displayed.
Correction: Fixed.
Learn More at Flyntlok Dealer Management System
Check out our Flyntlok YouTube channel for more highlights of the application!
Opportunity
Bobcat dealers expressed a need to access real-time inventory data within Bobcat OPC from Flyntlok and to efficiently manage pick lists created within OPC between the two systems.
Solution
To address this need, we have integrated Bobcat OPC with Flyntlok, providing two key capabilities:
Real-time Inventory Access
Dealers can now view inventory details from Flyntylok such as bin locations, quantities on hand (QOH), quantities on order (O/O), and pricing directly within the Bobcat OPC. To view the inventory details of the parts within the Bobcat OPC go to “Parts Catalog” and select a part you want to view. The opened modal will include the “DMS Availability” section populated with inventory data from Flyntlok.

The inventory data can also be viewed from within the pick list on the Bobcat OPC.

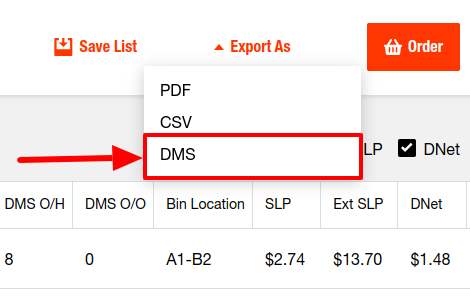
Pick lists Export
Dealers can export pick lists created in Bobcat OPC to Flyntlok, allowing for easy creation of draft Sales Orders or Internal Parts Orders. To export a pick list from Bobcat OPC to Flyntlok, while in the pick list on Bobcat OPC, click “Export As” and select “DMS” from the dropdown.
To view the exported pick lists back in Flyntlok, open the left sidebar, navigate to the “Parts” section, and click on the “Bobcat OPC Pick List” link.
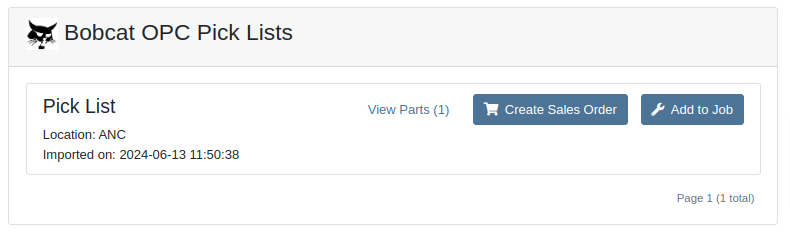
On this page, you can view the list of parts on the pick list by clicking on the “View Parts” button.

To create a draft Sales Order, click the “Create Sales Order” button and follow the prompt.

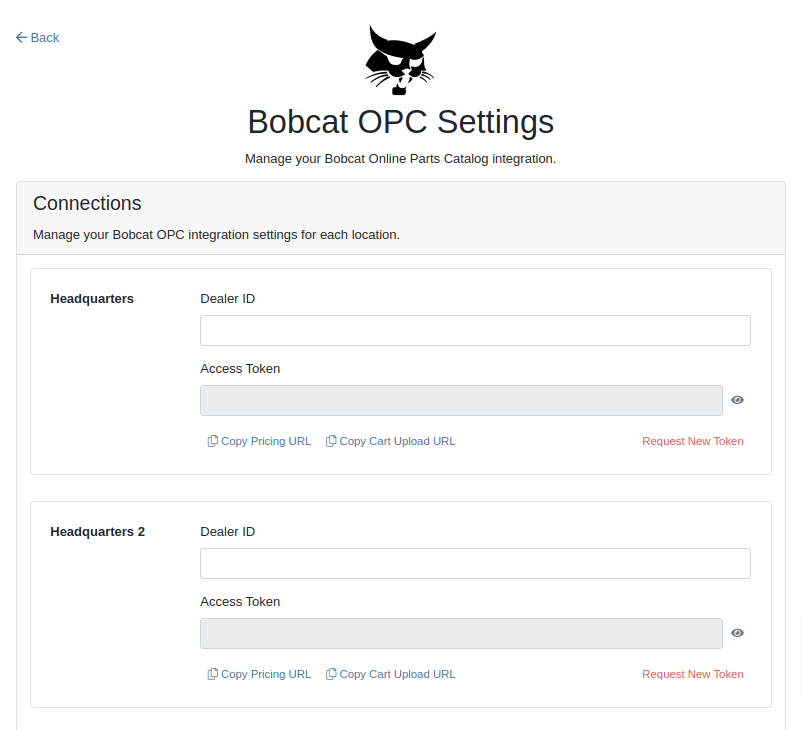
Integration Setup
To connect Bobcat OPC to Flyntlok follow these steps:
1. Access the Integrations Page within Flyntlok

2. Choose the location you want to connect to Bobcat OPC.
3. Generate token
4. Click on the “Copy Pricing URL” button to copy the Pricing URL.
5. Click on the “Copy Cart Upload URL” button to copy the Cart Upload URL.
6. Log into your Bobcat Account at https://dealer.bobcat.com/.
7. Click on “Bobcat Parts” under the “Parts” section.

8. Select Organization/Location. Use the location for the token you generated in step 3.
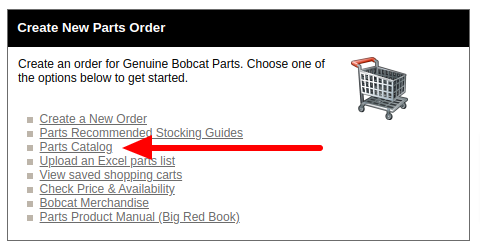
9. Under the “Create New Parts Order” section, click on the “Part Catalog” link.
/images/image9.png)
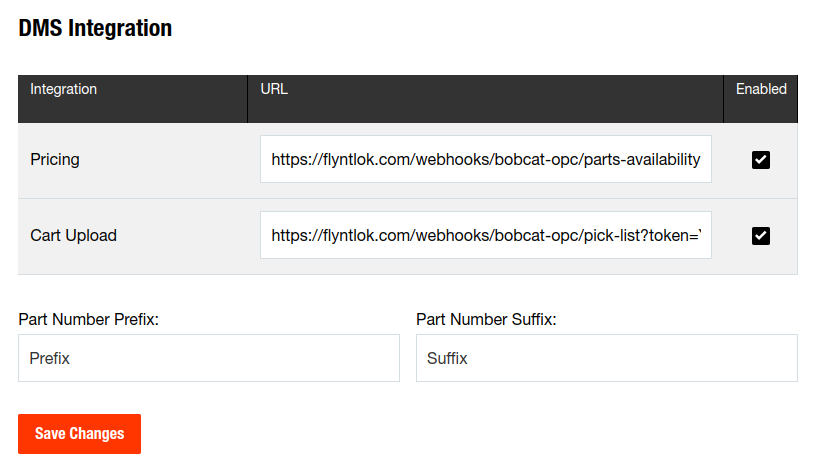
10. Open the “Settings” in Bobcat OPC and navigate to the "DMS Integration" section.
11. Provide the URL from step 4 to the “Pricing” field and enable it.
12. Provide the URL from step 5 to the “Cart Upload” field and enable it.
13. Click on the “Save Changes” button to persist your settings.
14. Repeat steps from 2 to 13 for each location you want to connect to Bobcat OPC.
Opportunity
Salespeople, who make use of the automated workflow tool Zapier, have expressed an interest in automating the process of lead creation in Flyntlok by integrating these two wicked cool products.
Solution
To address this need, an app was created in Zapier that integrates with Flyntlok. This app allows users to automate the creation of leads in Flyntlok through various triggers and actions within Zapier.

The following fields are exposed to Zapier via our interface:
Contact your friendly Flyntlok consultant if you would like to integrate us with your Zapier implementation.
Opportunity: Salespeople requested the ability to see the quantity on hand (QOH) directly on a Quote. Currently, users must approve or modify the quote to view QOH, leading to potential miscommunication about stock availability.
Solution: We added the display of QOH on the item lines within the Quote. This change will enable salespeople to accurately inform customers about stock availability without needing to approve or modify the quote.

Opportunity: Sales Managers have requested the ability to apply discounts to items based on their original list price, not the current displayed price. Otherwise, if the customer already has a discount in place, this would apply a discount to a discount (which is awesome for your customers, but not for you!).
Solution: Flyntlok introduced an option to apply discounts to each line item based on their original list price, ensuring each discount is calculated correctly from the list price rather than compounding discounts. This option is available only if the tenant is configured to calculate discounts line-by-line.
The "Apply Discount" form will now include two options for discount application:

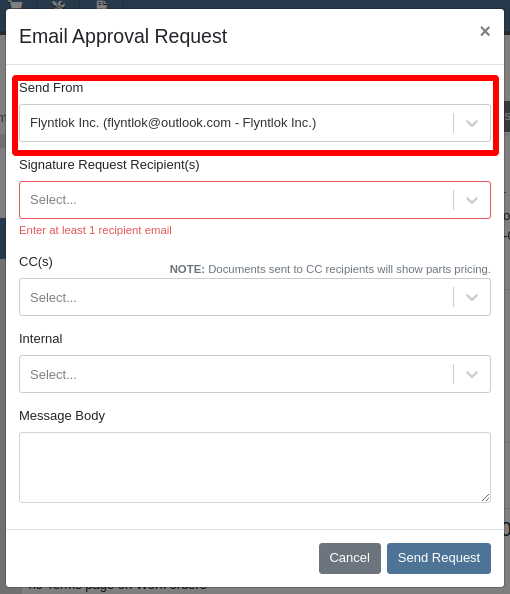
Opportunity: Salespeople requested that when processing a Sales Order for an “Account Customer”, they would like to be able to more easily track if a signature had been collected on a Sales Order.
Solution: We have introduced a new option to display a warning when attempting to process a Sales Order. This prompt will show up when clicking on "Apply Payment & Process" if the Customer is an Account Customer, and their signature has not yet been collected.

It will also show a message by the Process button:
![]()
The warnings can be enabled via the Wrench Icon -> Flyntlok Settings

To further improve visibility, we have added a "Signed" badge at the bottom of the page. This feature is enabled for all standard Sales Orders.

Opportunity: Salespeople requested support for our more streamlined “Pay & Process” workflow when requesting payments via Text-2-Pay.
Solution: You can now select “Initiate Payment & Process” when requesting payments via Text-2-Pay.
Opportunity: Service Managers have requested the ability to copy files from one Work Order or Job to another, especially when dealing with Warranty Work Orders, which might be split off from the original Work Order or onto new Jobs.
Solution: We have introduced a dialogue box that allows users to copy both Work Order-level files and Job-level files to other Work Orders and Jobs as desired.
Click on the transfer icon on the file line:

To transfer a file from one Job to another the form requires the user to select a Work Order and a Job. Users also have an option to keep the original file.

Opportunity: Service Managers requested the ability to set a customer-pre-approved dollar amount on a work order and to be informed when this amount is exceeded by the projected or actual cost of the work order.
Solution: Users can now choose to apply a work order pre-approved amount when creating a work order.

Once on the work order dashboard, this will be visible in General section of the page. It can also be edited here.
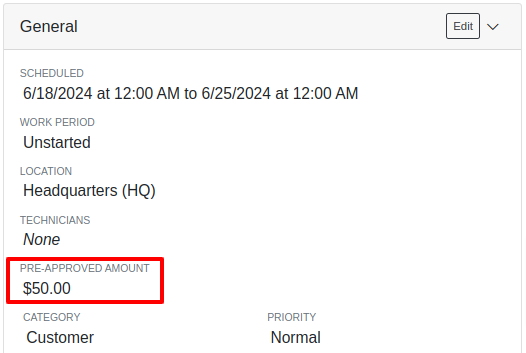
If, for any reason, the actual or projected cost of the work order exceeds this amount, a red banner will appear on the top of the work order dashboard.
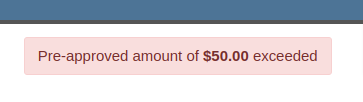
Anyone who is signed up to be notified when this happens will receive a notification.
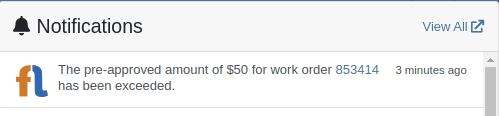
Once the costs are equal to or below the pre-approved amount, the banner will disappear.
Additionally, users can set a default pre-approved amount on the customer edit page.

This amount will be automatically applied to work orders for this customer unless it is overridden at the time of creation.
Opportunity: Receiving Managers requested that the “Responsible Locations” of machines automatically update when the location on a Machine Receiving Voucher is changed.
Solution: Flyntlok introduced a prompt that appears when the location on a Machine Receiving Voucher is modified. This prompt asks users if they want to update the physical locations of the machines to match the updated location on the voucher.

Opportunity: Salespeople requested the ability to view and edit a Machine's comments from the mobile view.
Solution: We now show the Machine comments on our Mobile Machine Dashboard. It is editable by clicking "Edit" on the page.
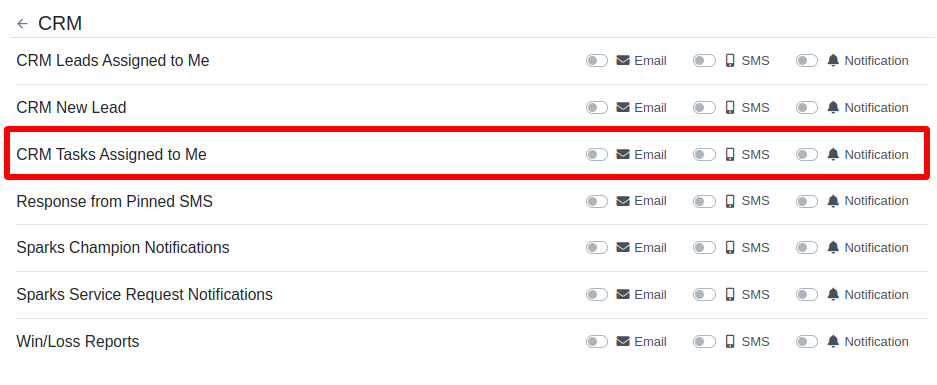
Opportunity: Sales Managers expressed the need for Task related notifications so that users are made aware when a task has been assigned to them.
Solution: Users are now able to receive notifications when they are assigned to a Task, either as the primary or secondary person on the task.
How to Enable Notifications:
Complaint: When printing out or emailing a Work Order the tax amount is not included in the total.
Correction: Fixed.
Complaint: Users reported errors when an Item was set as a Kit sub-item of itself.
Correction: We no longer allow a user to set an Item that is a Kit to be its own sub-item. Waaay too circular…
Complaint: Users reported not being able to apply an above-cost discount to some parts orders.
Correction: Fixed.
Complaint: Users reported that processing a Job that didn’t have any Parts Orders would not mark the job as “Approved”.
Correction: Fixed.
Complaint: Users reported that if you clicked into the Quantity or Fulfilled Quantity fields on the Point of Sale, the cursor would get placed at the end of the number. So if you wanted to change the value, it required that you highlight/select the whole field value first. This issue was both error prone and required extra clicks.
Correction: Fixed. If you click into either of the Quantity fields, we highlight/select the existing value so that if you type in a new value it will overwrite the previous value.
Complaint: Users reported that all Flyntlok journal entries were taking a very long time to process.
Correction: Fixed.
Complaint: Users reported that the incoming call page would crash when receiving calls from some numbers.
Correction: Fixed.
Complaint: Salespeople reported that they would accidentally change the payment amount with the mouse scroller.
Correction: Scrolling with the mouse in the payment field has been disabled.
Complaint: After accepting a Quote, users reported seeing the cost of the Quote’s Model lines change.
Correction: Fixed.
Complaint: Users reported being shown non-sellable machines when associating machines to model lines on the Point of Sale.
Correction: Fixed.
Complaint: Users reported discount structures not being correctly applied to Kits on the Point of Sale.
Correction: Fixed.
Complaint: When editing an Item Purchase Order, a shipping method would be chosen by default. However, users could not change the default that was being selected, and they may not have realized a shipping method was being chosen automatically.
Correction: Fixed. The shipping method selector now displays a prompt to select a shipping method if one is not set, making it more obvious when a shipping method has not been chosen.
Complaint: Users, particularly those in the Northeast of the US, but ultimately any real basketball fan, have complained about the fact that the Boston Celtics have not won the championship since 2008. This has been particularly frustrating some years because they clearly had the better team, especially in 2023.
Correction: Fixed. Flyntlok made sure that the most talented NBA team in recent history (probably since '86 Celts) won the championship this year in an epic manner and clearly illustrated to all of North America that they are the best team in the league. Our Boston office is currently coordinating the Duck Boat parade with city officials.

Learn More at Flyntlok Dealer Management System
Check out our Flyntlok YouTube channel for more highlights of the application!
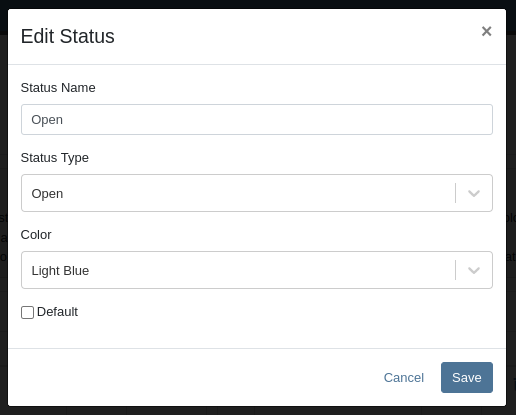
Opportunity
Salespeople have expressed interest in being able to customize the list of statuses they are able to assign to a Lead, which would allow companies to tailor their Lead process to fit their individual needs.
Solution
We have created a new settings page for CRM that can be accessed by those with administrator accounts via the Admin Settings page. Users can add a new status using a button at the top of the Lead Statuses tab and edit individual statuses by clicking on an individual status badge. Either of these actions will open a modal that will allow the user to edit a status’s name, type, badge color, and default status.
Users can also choose a status to be the default for all new Leads by clicking the checkbox next to a status name in the Status Pipeline columns. Statuses can be deleted as long as they are not currently set as the default. Deleted statuses will be visible on leads already using them, but will no longer be available as status options for newer leads.
Drag and drop the statuses within type columns to reorder how they show up in Lead status edit menus across Flyntlok. Within the Status field dropdown on a Lead, the statuses will be ordered first by the New values, then the Open, then Closed, and within those levels they will be sorted as ordered within those stages in the settings page.


A new column called status type has been added to the All Leads table which is hidden by default and can be added to the grid from the column chooser. As the name suggests this column contains the type of the status which is one of NEW, OPEN or CLOSED. You can create custom saved grid views using this field, such as "All New and Open" leads, or "All Closed Leads".

Opportunity
Dealers that make use of texting within the context of CRM asked for the ability to block texts from certain phone numbers because they were receiving a high volume of spam.
Solution
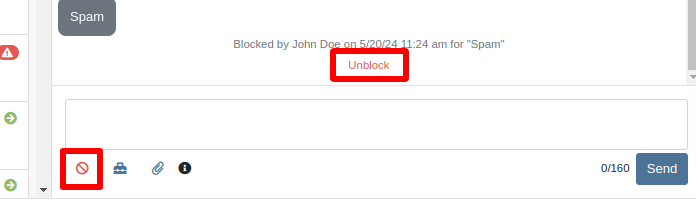
Users can now add numbers to a “Block List”. Texts from these numbers will automatically be filtered from the list of conversations, but can be viewed by toggling a filter.
To block a phone number click on the “Block” button on the left side of the footer:
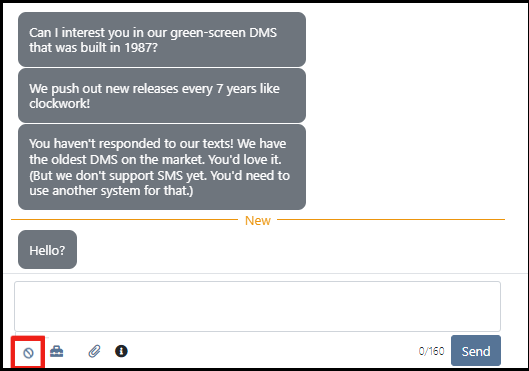
Once clicked it will open a modal where users can provide a reason for the block:

To see blocked phone numbers toggle the filter “Include Blocked Numbers”:
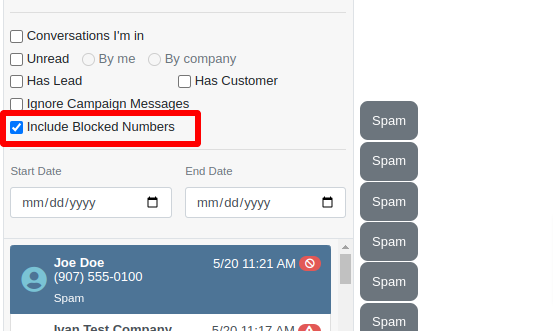
To unblock the phone number click on either “Unblock” text in the middle of the conversation or unblock button on the left side of the footer:
Opportunity
Hitachi dealerships have requested the ability to track telematics data for their Hitachi machines, for use in service, rental, and sales workflows.
Solution
We have created a link between Flyntlok and Hitachi to receive Hitachi telematics data in Flyntlok. Once connected, tenants will be able to track the last known location, miles, and hours data for any associated machines within Flyntlok.
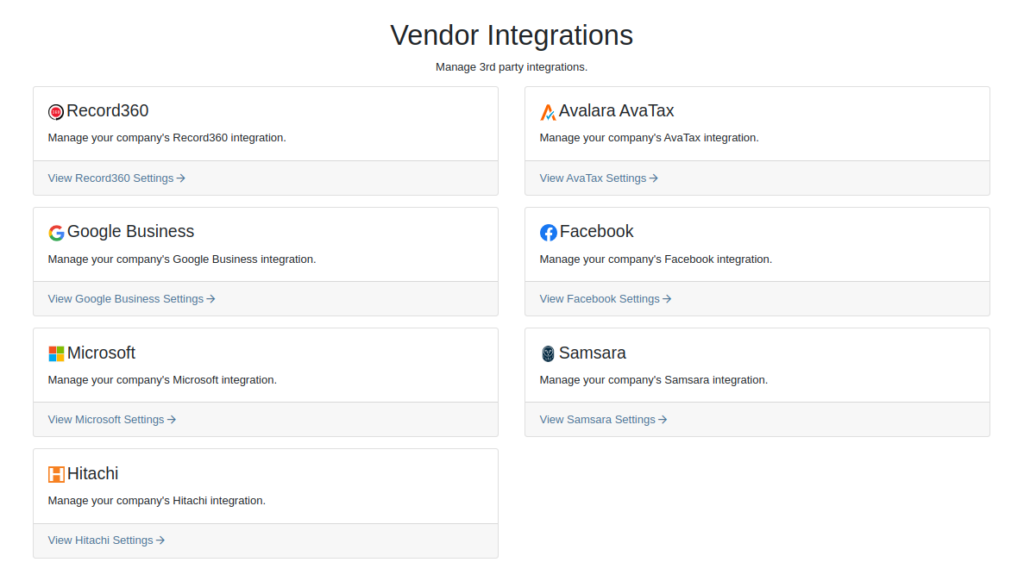
We have added a Hitachi settings page to the “Integrations'' hub page, reachable through Editors(wrench) > Editors > Integrations > Hitachi. This page allows administrators to connect their company’s Hitachi account to Flyntlok using their credentials. Simply provide your username and password and click “Submit Credentials'' to do so.
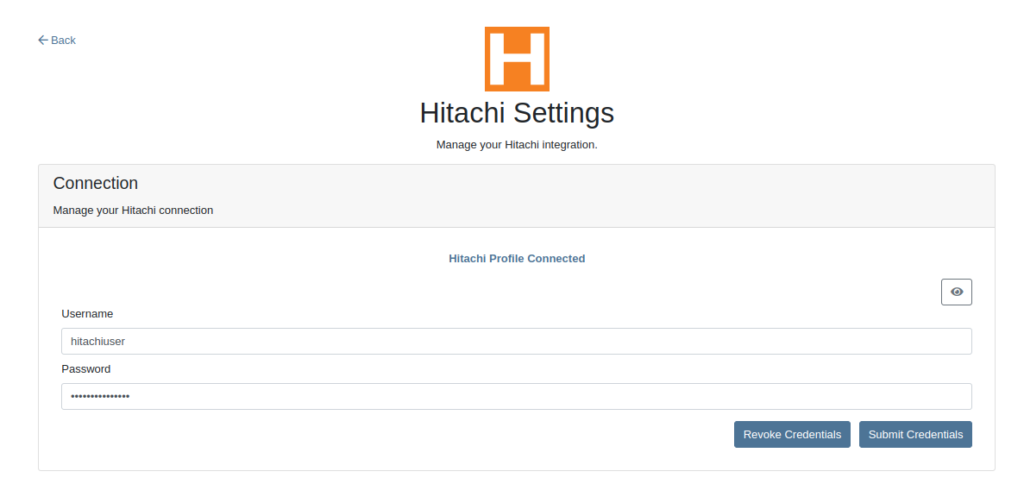
Once connected, Flyntlok will daily ingest machine miles, hours, and last known location data from Hitachi for the machines with matching serial numbers. The data is updated automatically and can be viewed on the machine’s dashboard.

Opportunity
Users requested the addition of an "Engine Make" field on the machine dashboard.
Solution
Added the "Engine Make" field to the machine dashboard.
Opportunity
Rental Managers requested that notes from rental-contract-related Reservations be added to the Rental Contracts on creation.
Solution
Notes and comments from Rental Reservations are copied over to generated Rental Contracts.
Opportunity
Salespeople asked that the available QOH shown for models on the invoice page only reflect the in-store quantity and not the amount “On Order”.
Solution
The on-order quantity was separated from the available QOH and is now displayed in separate badge details.

Opportunity
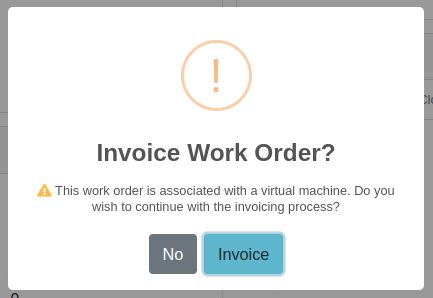
Service Managers requested a warning to be displayed when invoicing a Work Order with a Virtual Machine.
Solution
Added an option to display a warning when invoicing a Work Order with a Virtual Machine.
Opportunity
Service Managers expressed the need to see warning notes on the Work Order creation page, not just the Sales Order page.
Solution
Added customer warning notes to the Work Order creation page. Warning notes are now visible while searching for the customer and after selecting the customer.

Opportunity
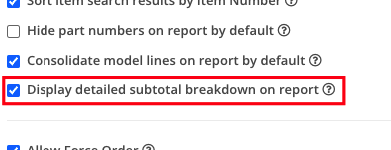
Service Managers requested the ability to display separate subtotals for labor and parts on Work Order Invoices and Quote Reports.
Solution
Added a setting to display separate subtotals for labor and parts on both Work Order Invoices and Quote Reports.
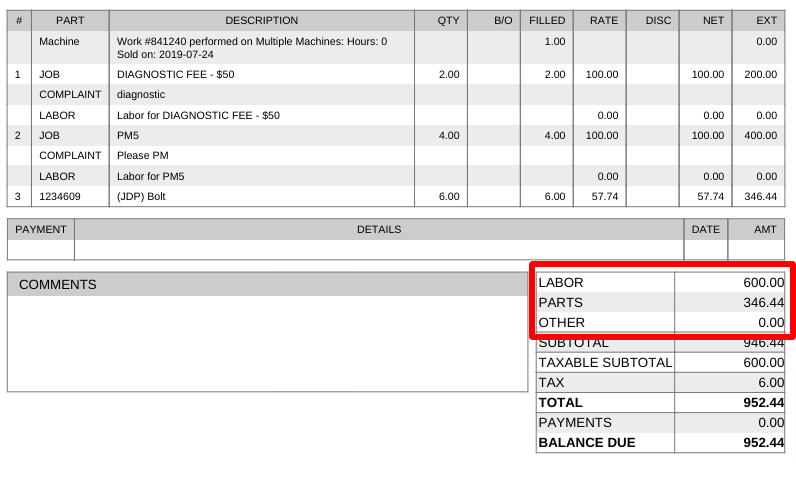
To enable the setting, open the wrench menu at the top of the screen and go to "Flyntlok" → "Flyntlok Settings". You can find this setting in the "Sales" section as a toggle called "Display detailed subtotal breakdown on report".
Complaint: Customers using Sage Intacct reported that some entries were posted multiple times. This issue occurred when multiple users initiated postings simultaneously, causing collisions and duplication of entries.
Cause/Correction: To prevent collisions and duplications, posting to Sage Intacct is now limited to one process at a time.
Complaint: Salespeople reported discrepancies in the final price shown on the Sales Order Report. When a Sales Order uses the “Consolidated Model Lines” setting and it includes the same models with different prices, the report mistakenly consolidates them, displaying the same price and leading to inaccurate calculations.
Cause/Correction: The model-consolidation was revised to ensure model lines are separated/distinct by both model and price, preventing mispricing and ensuring accurate reports.
Complaint: Salespeople noted that the links to quotes in the Quotes Expiration Notifications were not working.
Cause/Correction: Fixed.
Complaint: Users reported issues with payments for invoices from QuickBooks Online not syncing to Flyntlok consistently. Invoices in QuickBooks Online were being marked as paid, but this was not being reflected in Flyntlok.
Cause/Correction: Fixed.
Complaint: Sales managers requested that users not be able to change the customer on a paid invoice to an “Internal Customer”.
Cause/Correction: If any invoice has been paid for by an actual customer, the invoice’s customer cannot be changed to an “Internal Customer”.
Learn More at Flyntlok Dealer Management System
Check out our Flyntlok YouTube channel for more highlights of the application!
Opportunity:
Flyntlok users would like a way to better manage Work Orders that contain Warranty Jobs. It would save time if users could invoice both Warranty related and Non-Warranty Jobs on the same WO because currently, Flyntlok requires two separate Work Orders.
Solution:
We have added a new setting that your Administrator can set which will then create multiple invoices for each Work Order that contains Warranty and non-Warranty related Jobs. We have also added a new field on the Job level called Warranty Customer which will default to the Vendor of the Machine associated with that job. If a WO has multiple Warranty jobs associated with different Vendors, Flyntlok will generate a separate invoice for each of the different Vendors. The invoice for the final Customer will show zero cost for any Warranty related jobs.

To relate a Vendor to a Warranty Customer, we have added a new field to the Customer edit page where you can specify the Vendors related to a Warranty Customer. (A Warranty Customer is a customer record in Flyntlok to which you would invoice work completed on a Warranty for a Vendor.) You can only set Warranty Vendors if the Customer type is set to Warranty.

Opportunity:
Service managers have requested the ability for techs to be able to switch users from within the Mobile View on a single shared device. Currently, Flyntlok allows only administrators the ability to switch between alternate users' Flyntlok profiles within the company and only when in the Desktop View.
Solution:
We have added the Switch User feature to the Mobile view. You will now see the Switch User icon  in the top right corner of the Mobile View's home page, and we will display the name of the now-current user below the navbar, making it clear who is logged in. This is a client-based setting. Please reach out to the Flyntlok support team if you would like this set up!
Opportunity:
Service managers have also requested the ability for technicians to create new Work Orders directly from the Mobile View on a single shared device. Currently, the new Work Order button of the Mobile View takes you to the Desktop Work Order creation page.
Solution:
We have created a mobile version of the Work Order creation page.
Opportunity:
Flyntlok Purchasing Managers would like the ability to combine Special Orders along with regular Stock Orders when using the Flyntlok Draft Stock Order page. This will save time by allowing users to combine these orders with fewer steps than before. There is currently no way to combine quantities from the Draft Stock Order.
Solution:
We have added a column that will display the Special Order amount that is contained on a Special Order PO located next to the recommended quantity, in addition to the existing Order Qty field. If the user clicks on the drop-down arrow on the part, under the “Open Special Orders” there is a “Merge” button that allows for the combining of the Special Order with this Stock Order. Flyntlok then “reserves” the Special Order quantity.


Opportunity:
Flyntlok users have requested a centralized Purchasing Report that shows the value of demanded items with the ability to generate a purchase order based on the demand.
Solution:
We have added a new "Purchasing Hub" report that will summarize the value of demanded Special Order and Stock Order items by Vendor or Distributor. From the report, you will be able to generate a Draft Purchase Order to purchase the Special Order items, Stock Order items, and any other items under that Vendor or Distributor.

Flyntlok Administrators will have the option to add this new report to the Left-Hand Navigation Menu by navigating to the "Admin Editor Wrench"  icon in the upper right corner of the home screen, then select the "Navigation" option from the drop-down. The Purchasing Hub report can be added to either the Parts or Purchasing tabs of the Navigation Menu.

Opportunity:
Flyntlok users would like to specify whether a contact can be included in email or SMS text messages directly from the Contact's Dashboard. Currently, if the contact is not set up to allow SMS/email correspondence, users will have to navigate to the Customer Dashboard to edit this setting.
Solution:
We have added the "allow email/text" flag to the Customer Contact Dashboard.


Opportunity:
Salespeople have requested the ability to edit a Machine directly from a Sales Order. Currently, when a Machine is added to a new Sales Order, Flyntlok supplies a link to the Machine's Dashboard. However, there is no option to click on a link that brings users straight to the Edit Machine Information page.
Solution:
We have added a new  icon to the Machine item line in the Point of Sale, which will redirect users to the machine edit page when selected. This will save users extra clicks!

Opportunity:
In the original Payments screen, Flyntlok offered an "Apply and Process" option that would auto-order the associated Sales Order, removing the additional step of manually clicking the Order button after processing payment. The new and updated payment screen lacked this "Apply and Process" option. ( This new payments screen is only currently only available to users of the new Clover Payment devices. If you wish to upgrade your payment devices, please reach out to your friendly Flyntlok consultant or a Gravity Payments representative.)
Solution:
We have added the "Apply and Process" option to the new Payments screen.

Opportunity:
Salespeople have requested that the payment date displayed on the item line in the Sales Order be added to PDFs generated from the Point Of Sale.
Solution:
We have added the payment date to the details of the payment lines on the PDF copy.
Note- This will not backfill on existing payment lines.

Opportunity:
Flyntlok users have requested Machines that have been set with a Primary or Secondary class have this information displayed within the Machine's Dashboard. This information is also displayed within the information display of a Machine when adding to a Work Order.
Solution:
We have added a new "Class" section to the Machine's Dashboard and to the information display of a machine on the Work Order creation page.


Opportunity:
Salespeople have requested an indicator of Stale Parts be added to the item searcher of the Point of Sale.
Solution:
We have added a Stale parts indicator to the item searcher results. If there is QOH of an item at a different location, Flyntlok will show an asterisk in the QOH box of the searcher to indicate that the item is on hand at another location. If there is QOH in another location and the part is stale, it will indicate as such by red text and the asterisk. Hovering over the QOH box will show the status and the QOH in alternate company locations

Complaint:
The Item Dashboard was displaying incorrect On-Order Quantities when there were still Receiving Quantities on open Voucher/Purchase Orders. The On-Order Quantity shouldn't include Received Quantities, even if the Voucher/PO was not closed.
Cause/Correction:
On-Order Quantities now reflect Received Quantities regardless of the status of the PO.
Complaint:
Users could reverse a Sales Order while it was still posting to QBO.
Cause/Correction:
Fixed. Our development team was able to update the QBO settings to block a reversal if the transaction is still processing.
Complaint:
Flyntlok users have been experiencing an issue where the printed invoice of a split Sales Order did match the invoice on the Flyntlok screen.
Cause/Correction:
Fixed. This issue was caused when one of the split invoices was deleted. In that instance, the master invoice was not removing the details from the deleted invoice. The printed master invoice will no longer include the deleted split invoice details.
Complaint:
Flyntlok should display a warning message to users when attempting to create a new Machine if the Serial Number is associated with another Machine in your inventory. Currently, this message is only displayed when creating new Machines via the Left-Hand Navigation's “New Tab.” Flyntlok users have requested this message also be displayed when using the Machine Quick-Create functions from the Point of Sale and the Work Order creation page.
Cause/Correction:
We have added a Duplicate Serial Number warning to the machine quick create features.

Complaint:
Flyntlok users were able save the Model without a Make.
Cause/Correction:
The Make field is now required when creating/saving a Model.
Learn More at Flyntlok Dealer Management System
Check out our Flyntlok YouTube channel for more highlights of the application!
We have added a new setting to the purchase order receiving voucher, allowing users to mark an item voucher as paid via credit card. You will now see an"Already Paid" Checkbox in the in Voucher Details section of the receiving voucher. When the box is checked, you can use the dropdown populated with a list of accounts to select the checking or credit card account this was paid with.
When this box is checked and an account is selected, Flyntlok will create a JE, instead of a Bill, to record the transaction.
We have added a new icon to the machine's dashboard. Displayed in the corner of images which are publicly available.

We have added an option to print a thermal ticket from the work order system. This option is under the main actions dropdown

When changing the status of a Work order Flyntlok requires you to log a reason for the change, this log is now visible from the mobile view. Similar to the desktop view these logs will be available under the activity section.
We have added the list price, cost, and minimum list to the machine's mobile view.

We have added a minimum order field to a vendor. This will allow you to set a minimum dollar amount for creating stock orders.

When set, the minimum dollar amount will be shown on the vendor dashboard. You will also see a warning message displayed on the vendor's stock ordering page, alerting you if you are below the minimum amount.

To set the minimum amount, you will navigate to the vendor's dashboard and select the Actions button. Actions->Edit

We now allow you to update a customer tax rules from the POS, as well as store them as the default set for all locations. Previously, this action could only be taken if a customer did not have rules applied to them.
You can now select between 4 different ways to apply damage waiver charges to rental contracts by default. These values can always be overridden on a per contract basis.
Never charge a damage waiver by default
Always charge a damage waiver by default
Charge a damage waiver if they are a cash customer
Charge a damage waiver if they do not have valid insurance on file
Last Release Notes
Learn More at Flyntlok Dealer Management System
Check out our Flyntlok YouTube channel for more highlights of the application!
The Point Of Sale (POS) allows a user-friendly way to create Sales Orders (SO), quotes, and other internal documents. It offers a large range of customizable features that expedite and improve customer experience. These features include texting customers when parts arrive, sending out customer experience surveys, emailing customer invoices, and more.
Users can access the POS from the Quick Searcher by searching for a Sale Order. You can also click the Sales Order number wherever found in Flyntlok.
The most common way a user can create a Sales Order is by clicking the Shopping Cart icon located in the Top Menu Bar.
The other ways users can create a Sales Order:
Once arrived, a dashboard appears which includes blue tabs labeled:
The blue Customer tab is the initial tab opened when creating a new Sales Order. This tab prompts users to fill in Customer, Contact, Machine, and other general information. Head to the Customer article for further information.
The Shipping tab includes the ability to create, edit, and view customer Shipping Addresses, and designate inbound and outbound Shipping Methods. Head to the Shipping tab article for further information.

The Details tab includes Customer Purchase Order, public and private message fields, and other actions and settings. Head to the Details article for further information.

The Payment tab give you options to take Payment, Quote, Copy and more. Head to the Payment or Actions article for further information.

The Activity tab includes a Note Section, SMS options, and a link to the Sales Order Audit Logs. Head to the Activity article for further information
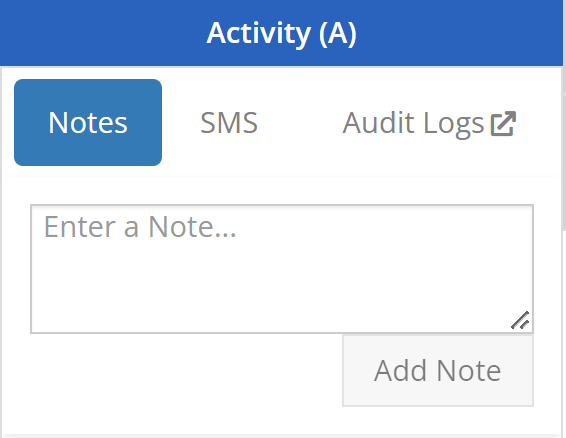
Clicking below the prompted Customer tab into the center of the POS or clicking above the Shipping, Detail, or Payment tabs, will reveal the Item Search Bar, Item Line Details, and other Sales Order Features. Go to the Item Search Bar article for further information on the following Look-up functions.
For further information on looking-up and entering Items in the Point of Sale, go to the Item Search Bar article.
![]()
In the homepage of your POS, users can access all necessary Sales Order Actions. Many of these features are displayed by relatable icons in the top right corner of the POS and include:
For further information on Point-of-Sale Actions, go to the Actions Articles.

By searching or scanning, items are added to the Sales Order. In each item line, users can:
Above the Shipping tab, users may view the status, the Sales Order number, view Downstream Operations, as well as choose to Delete or Order. Also, above the Activity tab, badges describe additional context of the Sale Order and Customer. For further information on Line Items, go to the Line Items article.

For further information on POS Hotkeys, go to the Hotkeys article.
Settings for the Point of Sale can be found underneath Editors (Wrench) -> Point of Sale. These settings allow users to adjust:
For further information on Point-of-Sale Administration, go to the Point-of-Sale Administration article.