Opportunity
Bobcat dealers expressed a need to access real-time inventory data within Bobcat OPC from Flyntlok and to efficiently manage pick lists created within OPC between the two systems.
Solution
To address this need, we have integrated Bobcat OPC with Flyntlok, providing two key capabilities:
Real-time Inventory Access
Dealers can now view inventory details from Flyntylok such as bin locations, quantities on hand (QOH), quantities on order (O/O), and pricing directly within the Bobcat OPC. To view the inventory details of the parts within the Bobcat OPC go to “Parts Catalog” and select a part you want to view. The opened modal will include the “DMS Availability” section populated with inventory data from Flyntlok.

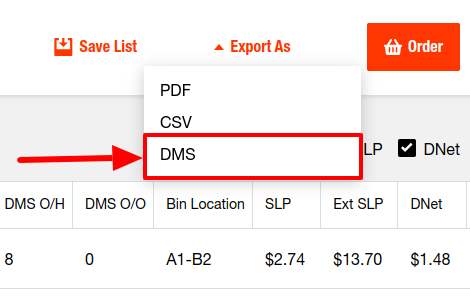
The inventory data can also be viewed from within the pick list on the Bobcat OPC.

Pick lists Export
Dealers can export pick lists created in Bobcat OPC to Flyntlok, allowing for easy creation of draft Sales Orders or Internal Parts Orders. To export a pick list from Bobcat OPC to Flyntlok, while in the pick list on Bobcat OPC, click “Export As” and select “DMS” from the dropdown.
To view the exported pick lists back in Flyntlok, open the left sidebar, navigate to the “Parts” section, and click on the “Bobcat OPC Pick List” link.
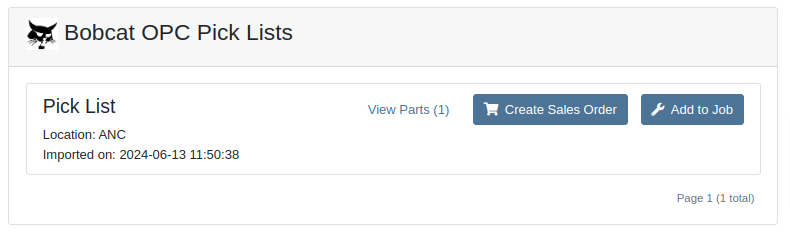
On this page, you can view the list of parts on the pick list by clicking on the “View Parts” button.

To create a draft Sales Order, click the “Create Sales Order” button and follow the prompt.

Integration Setup
To connect Bobcat OPC to Flyntlok follow these steps:
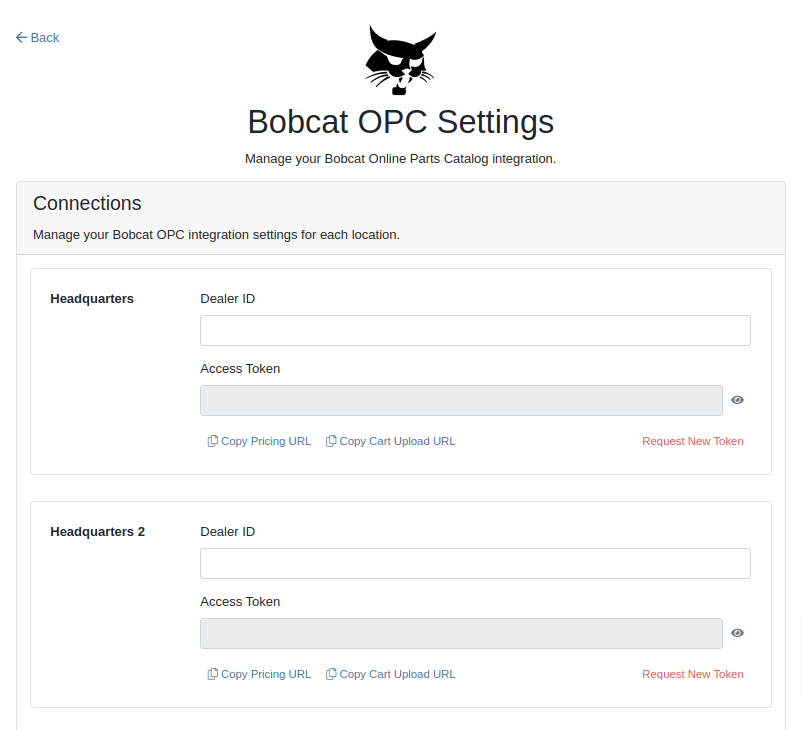
1. Access the Integrations Page within Flyntlok

2. Choose the location you want to connect to Bobcat OPC.
3. Generate token
4. Click on the “Copy Pricing URL” button to copy the Pricing URL.
5. Click on the “Copy Cart Upload URL” button to copy the Cart Upload URL.
6. Log into your Bobcat Account at https://dealer.bobcat.com/.
7. Click on “Bobcat Parts” under the “Parts” section.

8. Select Organization/Location. Use the location for the token you generated in step 3.
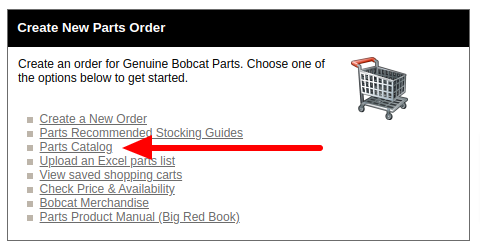
9. Under the “Create New Parts Order” section, click on the “Part Catalog” link.
/images/image9.png)
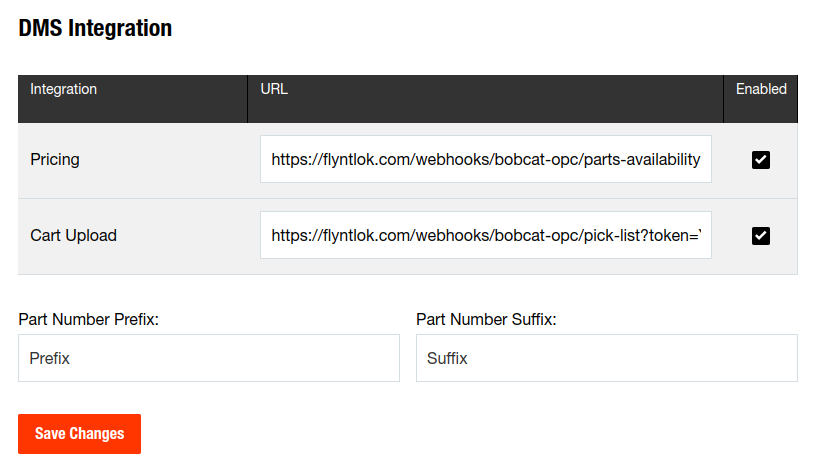
10. Open the “Settings” in Bobcat OPC and navigate to the "DMS Integration" section.
11. Provide the URL from step 4 to the “Pricing” field and enable it.
12. Provide the URL from step 5 to the “Cart Upload” field and enable it.
13. Click on the “Save Changes” button to persist your settings.
14. Repeat steps from 2 to 13 for each location you want to connect to Bobcat OPC.
Opportunity
Salespeople, who make use of the automated workflow tool Zapier, have expressed an interest in automating the process of lead creation in Flyntlok by integrating these two wicked cool products.
Solution
To address this need, an app was created in Zapier that integrates with Flyntlok. This app allows users to automate the creation of leads in Flyntlok through various triggers and actions within Zapier.

The following fields are exposed to Zapier via our interface:
Contact your friendly Flyntlok consultant if you would like to integrate us with your Zapier implementation.
Opportunity: Salespeople requested the ability to see the quantity on hand (QOH) directly on a Quote. Currently, users must approve or modify the quote to view QOH, leading to potential miscommunication about stock availability.
Solution: We added the display of QOH on the item lines within the Quote. This change will enable salespeople to accurately inform customers about stock availability without needing to approve or modify the quote.

Opportunity: Sales Managers have requested the ability to apply discounts to items based on their original list price, not the current displayed price. Otherwise, if the customer already has a discount in place, this would apply a discount to a discount (which is awesome for your customers, but not for you!).
Solution: Flyntlok introduced an option to apply discounts to each line item based on their original list price, ensuring each discount is calculated correctly from the list price rather than compounding discounts. This option is available only if the tenant is configured to calculate discounts line-by-line.
The "Apply Discount" form will now include two options for discount application:

Opportunity: Salespeople requested that when processing a Sales Order for an “Account Customer”, they would like to be able to more easily track if a signature had been collected on a Sales Order.
Solution: We have introduced a new option to display a warning when attempting to process a Sales Order. This prompt will show up when clicking on "Apply Payment & Process" if the Customer is an Account Customer, and their signature has not yet been collected.

It will also show a message by the Process button:
![]()
The warnings can be enabled via the Wrench Icon -> Flyntlok Settings

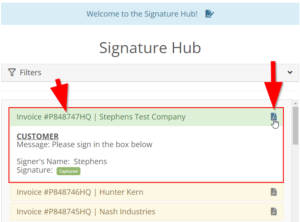
To further improve visibility, we have added a "Signed" badge at the bottom of the page. This feature is enabled for all standard Sales Orders.

Opportunity: Salespeople requested support for our more streamlined “Pay & Process” workflow when requesting payments via Text-2-Pay.
Solution: You can now select “Initiate Payment & Process” when requesting payments via Text-2-Pay.
Opportunity: Service Managers have requested the ability to copy files from one Work Order or Job to another, especially when dealing with Warranty Work Orders, which might be split off from the original Work Order or onto new Jobs.
Solution: We have introduced a dialogue box that allows users to copy both Work Order-level files and Job-level files to other Work Orders and Jobs as desired.
Click on the transfer icon on the file line:

To transfer a file from one Job to another the form requires the user to select a Work Order and a Job. Users also have an option to keep the original file.

Opportunity: Service Managers requested the ability to set a customer-pre-approved dollar amount on a work order and to be informed when this amount is exceeded by the projected or actual cost of the work order.
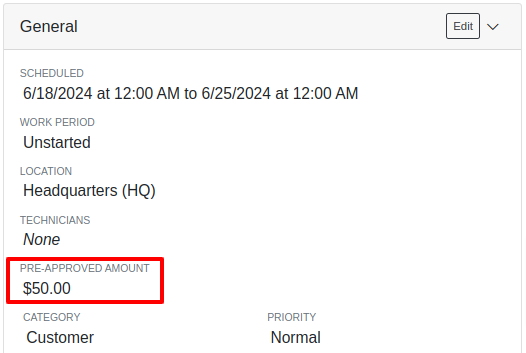
Solution: Users can now choose to apply a work order pre-approved amount when creating a work order.

Once on the work order dashboard, this will be visible in General section of the page. It can also be edited here.
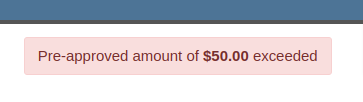
If, for any reason, the actual or projected cost of the work order exceeds this amount, a red banner will appear on the top of the work order dashboard.
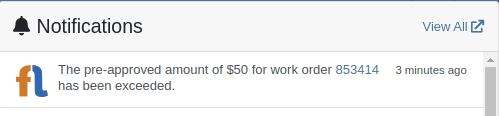
Anyone who is signed up to be notified when this happens will receive a notification.
Once the costs are equal to or below the pre-approved amount, the banner will disappear.
Additionally, users can set a default pre-approved amount on the customer edit page.

This amount will be automatically applied to work orders for this customer unless it is overridden at the time of creation.
Opportunity: Receiving Managers requested that the “Responsible Locations” of machines automatically update when the location on a Machine Receiving Voucher is changed.
Solution: Flyntlok introduced a prompt that appears when the location on a Machine Receiving Voucher is modified. This prompt asks users if they want to update the physical locations of the machines to match the updated location on the voucher.

Opportunity: Salespeople requested the ability to view and edit a Machine's comments from the mobile view.
Solution: We now show the Machine comments on our Mobile Machine Dashboard. It is editable by clicking "Edit" on the page.
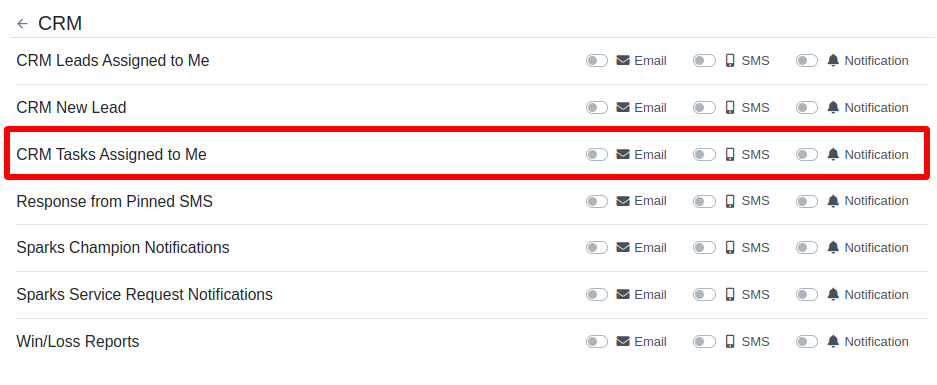
Opportunity: Sales Managers expressed the need for Task related notifications so that users are made aware when a task has been assigned to them.
Solution: Users are now able to receive notifications when they are assigned to a Task, either as the primary or secondary person on the task.
How to Enable Notifications:
Complaint: When printing out or emailing a Work Order the tax amount is not included in the total.
Correction: Fixed.
Complaint: Users reported errors when an Item was set as a Kit sub-item of itself.
Correction: We no longer allow a user to set an Item that is a Kit to be its own sub-item. Waaay too circular…
Complaint: Users reported not being able to apply an above-cost discount to some parts orders.
Correction: Fixed.
Complaint: Users reported that processing a Job that didn’t have any Parts Orders would not mark the job as “Approved”.
Correction: Fixed.
Complaint: Users reported that if you clicked into the Quantity or Fulfilled Quantity fields on the Point of Sale, the cursor would get placed at the end of the number. So if you wanted to change the value, it required that you highlight/select the whole field value first. This issue was both error prone and required extra clicks.
Correction: Fixed. If you click into either of the Quantity fields, we highlight/select the existing value so that if you type in a new value it will overwrite the previous value.
Complaint: Users reported that all Flyntlok journal entries were taking a very long time to process.
Correction: Fixed.
Complaint: Users reported that the incoming call page would crash when receiving calls from some numbers.
Correction: Fixed.
Complaint: Salespeople reported that they would accidentally change the payment amount with the mouse scroller.
Correction: Scrolling with the mouse in the payment field has been disabled.
Complaint: After accepting a Quote, users reported seeing the cost of the Quote’s Model lines change.
Correction: Fixed.
Complaint: Users reported being shown non-sellable machines when associating machines to model lines on the Point of Sale.
Correction: Fixed.
Complaint: Users reported discount structures not being correctly applied to Kits on the Point of Sale.
Correction: Fixed.
Complaint: When editing an Item Purchase Order, a shipping method would be chosen by default. However, users could not change the default that was being selected, and they may not have realized a shipping method was being chosen automatically.
Correction: Fixed. The shipping method selector now displays a prompt to select a shipping method if one is not set, making it more obvious when a shipping method has not been chosen.
Complaint: Users, particularly those in the Northeast of the US, but ultimately any real basketball fan, have complained about the fact that the Boston Celtics have not won the championship since 2008. This has been particularly frustrating some years because they clearly had the better team, especially in 2023.
Correction: Fixed. Flyntlok made sure that the most talented NBA team in recent history (probably since '86 Celts) won the championship this year in an epic manner and clearly illustrated to all of North America that they are the best team in the league. Our Boston office is currently coordinating the Duck Boat parade with city officials.

Learn More at Flyntlok Dealer Management System
Check out our Flyntlok YouTube channel for more highlights of the application!
Opportunity:
Salespeople have requested the ability to set up a temporary discount on an item for a customer so that each time that customer buys that item there is a default discounting rate set. This will save users time from having to re-add the discount from the Point of Sale and serve as a reminder that the customer has that discount available.
Solution:
We have added a new "Item Discounts" module to the Customer Dashboard that will allow users to add and edit individual item discounts and set a specific expiration date for the discount. This new module will be found in the Action Buttons drop-down menu.

We have also updated the discount structure of the Point of Sale to incorporate the Customer Item discounts so that you can save a new discount directly from this screen. When adjusting/discounting the list price of a line item from the POS, Flyntlok will now give users the option to save that discount to the customer. Item discounts saved via the POS will then populate the "Item discounts" module of the Customers Dashboard.

Opportunity:
Flynlok offers users an option to email a "Signature Request" or "Lease Agreement" to customer contacts to confirm the rates and values of a Rental Contact. Currently, the email sent out is including our Flyntlok logo and mailing address. Because this can be confusing to recipients that are unaware of Flyntlok, our users have requested to have their actual company logo and address information added instead of Flyntlok's.
Solution:
We have added a new option to upload a custom Company Logo image on the Flyntlok Settings page.

To set a custom Company logo that will display on the Rental Signature Requests and Lease Agreement Emails, you will navigate to the "Admin Editor Wrench"  icon in the upper right corner of the home screen and select the "Flyntlok Settings" option from the drop-down menu. From the "Flyntlok Settings" page select the "Company Logo" link and upload a custom Company image from your device. Once uploaded this image will be displayed on the Rental Signature Request and Lease Agreement Emails.

Opportunity:
We recently released a new feature that allows users to merge open Special Ordered quantities into an existing Purchase Order. The issue is when multiple Special Orders are merged into the same PO they are combined into one line item. This makes it unclear that the remaining quantity from the original Purchase Order is not related to the Special Order. It was also not possible for multiple Special Orders to be merged into the same PO for the same item. Flyntlok users have requested that merged Special Orders populate the PO in individual line items.
Solution:
We have updated the Special Order merge functionality so that when merging a Special Order (or Orders) into an existing Purchase Order, the PO will display each Special Order as individual line items distinct from the original PO quantity.


Opportunity:
Flyntlok now offers Users the ability to merge open Special Orders with regular Stock Orders when using the Flyntlok Draft Stock Order page. Purchasing Managers have requested a more obvious indicator when an item has open Special Orders available to merge with Purchase Orders.
Solution:
We have added a new " Has Mergeable PO" icon to the Special Orders column of the Draft Stock Order page. This new icon will be displayed with open Special Orders quantity only when there are available PO's to merge the Special Order quantity into.

Opportunity:
Salespeople would like to see how many days or months an individual open Lead has been active. Flyntlok currently displays the Lead creation date on the Leads report but does not calculate a day's active "age".
Solution:
We have added a new "Age" field to the All Leads report which will display the individual Leads' age by days based on the creation date.

Opportunity:
Flyntlok offers customers the ability to have a "Text Us" widget on their company website, which allows potential customers to submit inquiries to the company. Flyntlok then takes these incoming messages and generates a new CRM Lead for this potential customer. Salespeople have requested that the associated location and department be added to the new Lead's name.
Solution:
If you have Branch Locations and Department fields set up on the "Text Us" widget, Flyntlok will now apply this information to the new Lead's name.


Opportunity:
Flyntlok offers users multiple different ways to edit and document the mileage from a Machine's odometer through the course of a Service Work Order. Users have requested a new report that will display a history of mileage logs for a specific piece of equipment.
Solution:
We have added a new "Mileage History" section to the Machine Dashboard which will display all Work Order check-in mileage logs as well as any edits to the Miles field of the Machines edit page. This new section will display the ten most recent entries as well as a link that will redirect users to an alternate view that will display ALL mileage logs for that Machine. Flyntlok will display the date, the mileage, and the user's name that performed the logging.

Opportunity:
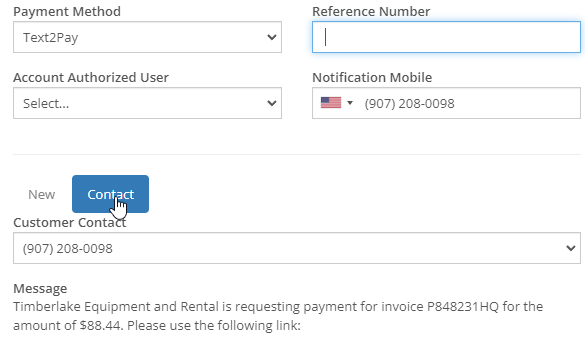
Sales Managers using the new Gravity Payments emergepay system have requested billing address fields be added to the Text2Pay payment type. Gravity Payments offers additional discounts for enabling fraud protection steps, such as billing address fields, on the Text2Pay payment option. Flyntlok currently does not provide the billing address details over to Gravity for address verification.
Solution:
We have added the billing address details to the Text2Pay settings. Default billing information (pulled from the Customer's Dashboard) will auto-populate into the payment system when the Text2Pay option is selected, but Users will also have the option to edit this new field. N.B. Editing the address fields here does not update the original contact record.

Opportunity:
Rental managers in Anchorage, Alaska would like the option to apply a Municipality-specific tax charge on the rental of motor vehicles. Anchorage requires the collection of an 8% tax on the rental of motor vehicles with a 30-day cap of $240 for trucks, vans, and RVs or a $120 cap on all other motor vehicles.
Solution:
We have added a“Charge Municipality of Anchorage Tax” field to the Model Dashboard's edit page, which allows users to associate the specific MOA tax charge to all Machines of that particular model. We have also added a new “Charge Municipality of Anchorage Tax” check-box on a Rental Contract, that when selected, will charge the specific tax rate on the Rental Contract. This box is auto-selected when a contract is created but can be overridden by the user.


Complaint:
Flyntlok users were experiencing an issue when trying to email Sales Order PDF documents to customers where the contact record contained an email address but no contact name. In this scenario, the Flyntlok user received an error and the email was not sent.
Cause/Correction:
Fixed.
Complaint:
Flyntlok users were having an issue when trying to manually type in the start date of a Rental Contract, rather than using the date picker. In this scenario, the page would error out and users were then redirected to an error page.
Cause/Correction:
Fixed. Flyntlok users will be able to type out dates without having to break the keyboard stride.
Complaint:
Users were experiencing issues where sold Machines were able to be added to a Rental Contract via the "Actions" button of the Machines Dashboard.
Cause/Correction:
Fixed. We have removed the ability to select the "Rental Contact" button from the Machines Dashboard when the machine is in a "Sold" status.

Complaint:
When an item's description is lengthy, the generated PDF document from the Point of Sale moves the entire item line to a new page, creating an awkward formatting issue. Flyntlok users have requested that the unnecessary extra spacing be removed from PDF documents generated from the POS.
Cause/Correction:
We have updated the Point of Sale PDF allowing item descriptions to be broken up between two pages.
Complaint:
Users reported an issue when they were adding an Item onto an existing Sales Order where that Item already had previously been added to the SO and where they merged the two line items into one. In this scenario, the Purchase Plan would only account for the original Line Items' order quantity and did not reflect the updated merged quantities.
Cause/Correction:
Fixed. Purchase Plans will respect the combined quantity set from the Point of Sale.

Complaint:
Service Managers were experiencing an issue when applying a deposit to a Service Work Order where, the deposit was not auto-populating onto the final invoice.
Cause/Correction:
Fixed. The deposit will auto-populate on the final invoice.
Complaint:
Users were experiencing an issue when trying to invoice a Work Order with both Warranty jobs and Customer jobs. The customer invoice that was generated displayed costs on items associated with Warranty jobs when they should show up as $0.
Cause/Correction:
Fixed. All the warranty jobs, parts, and labor are included on the customer bill at $0 cost and $0 list.
Complaint:
Rental Managers were experiencing an issue when closing a Rental Contract, where the Contract had been fully paid for on a previous invoice including all fees and charges, Flyntlok was still generating a final invoice for $0.00.
Cause/Correction:
Fixed. Flyntlok will close the Rental Contract and no additional invoice will be generated.

Complaint:
Users were running into an issue when attempting to see how many of a certain Machine Model their company has sold, from the Sold Machines report. The report was excluding results due to a max capacity set at 15,000 results per page.
Cause/Correction:
We have increased the results limit of the Sold Machines report to 25,000.
(And kudos to you folks for selling more than 15,000 machines.)
Complaint:
Salespeople were having issues with Customer Sparks Orders not displaying the Stock available to transfer from other branch locations.
Cause/Correction:
Fixed. Spark Orders will display available stock from other branch locations. This information will be indicated by the (*) icon in the item line's QOH box.
Complaint:
Ok, bear with us here as this is a confusing bug: If a user took a Deposit (e.g. $50) on a Work Order then the Customer has a balance of $50 (since the WO is still in progress). Then you later go and sell a part to the Customer for $30 and you apply the payment using the “Deposit” payment type. The balance for the Customer should now be $20 since you just used part of their earlier Deposit for this sale. Later you go and finalize the invoice for that original $50 Work Order. The Customer should only have a balance of $20 now, but the invoice for the Work Order was still showing the original $50 deposit. Later you find out the Customer owes you $30!
Cause/Correction:
Fixed. The Work Order will now know if the deposit was partially (or completely) used on a separate transaction.
Complaint:
Service Managers were seeing a discrepancy between the timestamps displayed on the service technicians' "Timecard" Report and the actual Work Order.
Cause/Correction:
Fixed. We have addressed a timezone error on the "Timecard" report. Flynlok was incorrectly displaying clock-in/out times in the Alaska standard time zone regardless of the company location.
(Lesson learned: World does not revolve around Alaska.)
Complaint:
Flyntlok users were receiving an "Error Sending Message, Contact Flyntlok for Assistance" notification when attempting to send an SMS text message from the CRM Hub when there is an invalid phone number.
Cause/Correction:
We have updated the message displayed when attempting to send SMS messages with invalid phone numbers. (N.B. Flyntlok does not know if the number used is in service or is capable of receiving SMS messages, simply that the number/format was not valid.)

August 2nd, 2023 Release Notes
Learn More at Flyntlok Dealer Management System
Check out our Flyntlok YouTube channel for more highlights of the application!
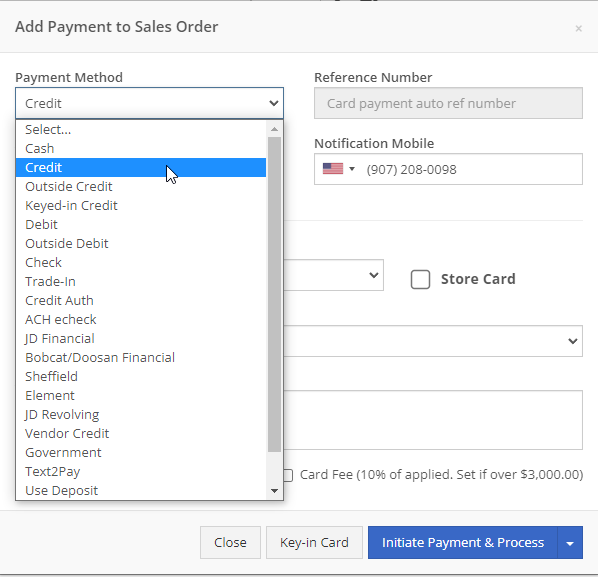
The blue Payment Tab (3), accessible at the bottom of the Point Of Sale or by pressing the hotkey 3 when on the Point Of Sale homepage, allows users to access all necessary payment options in order to complete the Sale Order. Payment options include Cash, Credit, Debit, Check, Trade-in, Text2Pay, Use Deposit, Cash on Acct, and multiple other payment methods. The tab also allows users to create Quotes, or make Copies of the SO.

Users can add payment with cash by clicking the cash button, or pressing C, on the Payment tab.


Users can add payment with pre-saved Credit Cards by clicking the Credit Card button, or pressing R, on the Payment tab.

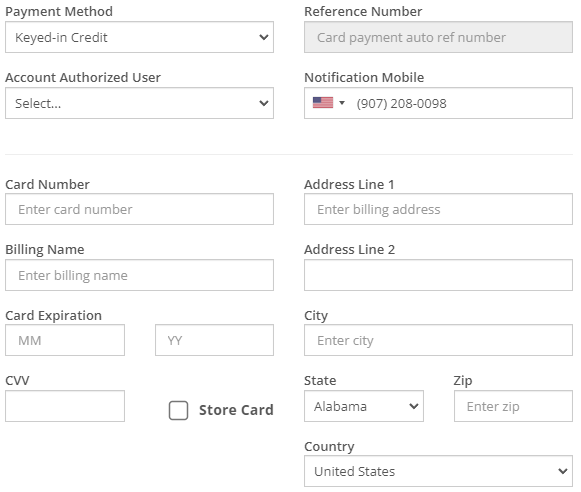
Users can add payment by manually entering a credit card using the Keyed-in Credit button, or by pressing K, on the Payment tab.

Users can add payment using debit by clicking the Debit button, or by pressing D, on the Payment tab.


Users can add payment using check by clicking the Check button on the Payment tab


Users can add payment using Trade-In by clicking the Trade-In button on the Payment tab.


Users can add payment using Text2Pay by clicking the Text2Pay button on the Payment tab.

Users can add payment using a deposit by clicking the Use Deposit button on the Payment tab

Users can add payment using Cash on Account by clicking the Cash on Account button on the Payment tab.

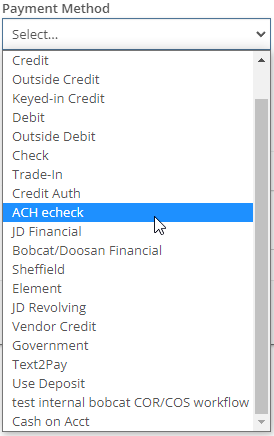
Users can add other methods of payment by clicking the Other button on the Payment tab.
 Other payment methods include but are not limited to Outside Debit, ACH check, JD Financial, Bobcat/Doosan Financial, Sheffield, Element, JD Revolving, Vendor Credit, and Government.
Users can create quotes by clicking the Quote button on the Payment tab.

Users can Reprint a Sales Order they wish to Reprint by following these steps:


Users can Reverse a Sales Order they wish to Reverse by following these steps:

Users can create a new Return Order from the Sales Order they wish to make the Return Updated Trade-In from by following these steps:

Users can create copies of a SO by clicking the Copy button on the Payment tab. After clicking, the page redirects to a copy of the Sale Order in a new page.

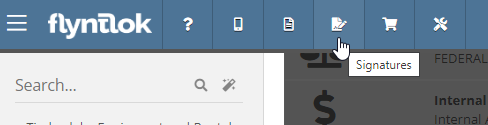
Users can have their customers electronically sign an invoice by clicking the signature hub icon.
Check out the latest updates to the Flyntlok Equipment Dealer Management System.
We added an easier way for your customers to pay. Send bills to your customers via SMS! This allows customers to pay before they enter your dealership. Saving time for both customers and employees behind the counter. Here is how it works:
Create a sales order like you normally would

Then, add a payment. If your business is using Text2Pay you will see a new option:

A payment modal will appear. You can either send the payment request to a new phone number, or pick a number out of the contacts. Lastly, add the amount that you are requesting from the customer.


The customer will receive a text asking for payment

Then, once the customer clicks the link, they will be prompted to add a credit card to pay their bill!

We have continued to work on the integration with Decisiv. We have supported some communication between the two systems in the past. Now the communication is bidirectional and completely automatic. If you make the following updates in Flyntlok, they will reflect in Decisv.
If your location has Decisiv enabled, you will see the below tab on work orders.

Similar to custom machine ID's we now support custom sales order ID's. You could use this feature to easily differentiate between part and work order sales. We can also add a location identifier, which would make it easy to identify which location a sales order was created at. If you are interested in implementing this feature please reach out to the consulting team and they will set you up!
Here is an example of a parts invoice with a location code:

Here is the same example but with part shortened to:

October 6th, 2021 Release Notes
Learn More at Flyntlok Dealer Management System
Check out our Flyntlok YouTube channel for more highlights of the application!