Opportunity
Technicians needed a way to quickly identify the owner of a machine when printing Work Order worksheets tied to the “Cost of Sale” Invoice.
Solution
We've updated the Work Order Worksheet PDF to include the information of “Cost of Sale” Customer.
Opportunity
When using the "Collect Signature" feature on the Rental Dashboard, users had to select the device every time. They requested a way to configure a default device.
Solution
We have updated the Collect Signature feature to auto-select the last used device.
Opportunity
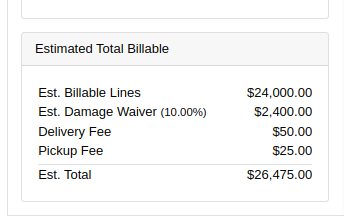
Users struggled to provide quick and accurate verbal estimates for Rental Contracts because the "Estimated Billable Total" on the Rental Dashboard excluded known additional charges, such as Pickup and Delivery fees. This lack of visibility could lead to confusion, underquoting, or the need for follow-up clarifications with customers.
Solution
The "Estimated Billable Total" has been enhanced to now include Pickup, Delivery, and Damage Waiver charges. This more comprehensive total is displayed prominently at the top of the Rental Dashboard, along with a detailed breakdown section. This update gives users greater confidence in providing quick, all-inclusive estimates to customers, improving both transparency and customer experience.

Opportunity
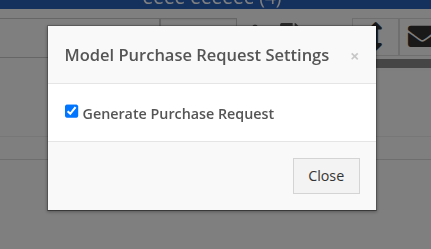
Salespeople previously had limited flexibility when setting the "Generate Purchase Request" option during the Model configuration process. If this setting was selected incorrectly, they had to restart the entire configuration from scratch. This wasted time and increased the risk of errors. The setting also couldn’t be changed after reversing or reprocessing a Sales Order or when duplicating a Quote, adding further friction to the sales workflow.
Solution
We’ve introduced the ability to modify the "Generate Purchase Request" setting while the Sales Order is still in Draft status. When adding a Model to a Sales Order, an icon will appear near the Quantity field, indicating whether a Purchase Request will be generated for that line.
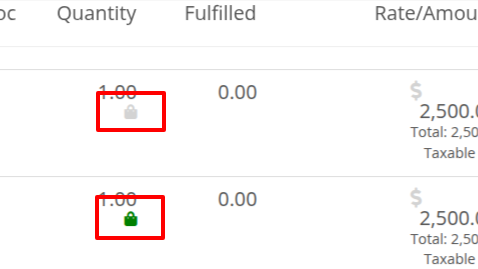
Salespeople can click this icon to easily open the Model Purchase Request Settings dialog and make any necessary adjustments. This should eliminate the need for users to reconfigure from scratch.
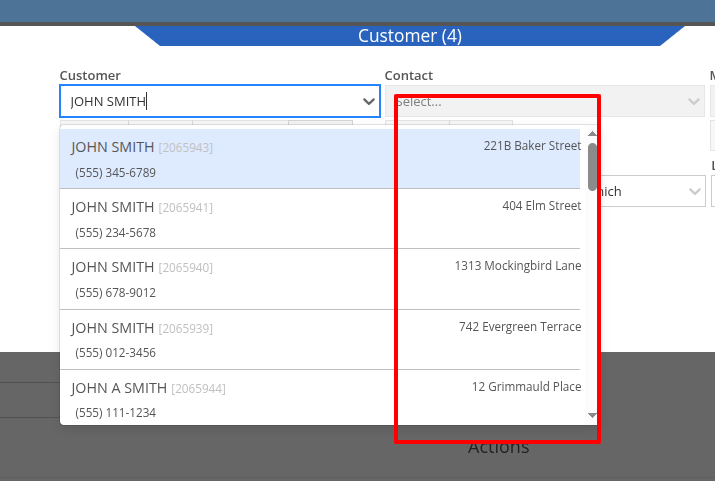
Opportunity
Salespeople often encounter difficulty identifying the correct Customer when multiple records share the same or similar names. This can lead to confusion, delays at the Point of Sale, and potential errors in selecting the wrong Customer profile.
Solution
To make it easier to distinguish between Customers, we’ve added address details to the Customer search results on the Point of Sale page. This additional context helps salespeople quickly and confidently identify the correct Customer, which should speed up the checkout process!
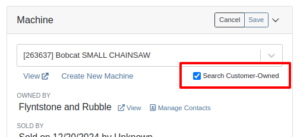
Opportunity
Service Writers reported that when changing the Machine on the Work Order Dashboard's "Info" tab, the searcher displayed all company Machines instead of filtering to only those owned by the Customer. This behavior was inconsistent with other Work Order pages, and made it harder to quickly find the correct Machine.
Solution
The Machine searcher on Work Order Dashboard now defaults to showing only Customer-owned Machines. For flexibility, a checkbox has been added to allow searching across all Machines when needed.
Opportunity
Rental and Sales teams using Sage Intacct have needed a more consistent and hands-off way to ensure the correct income items are used when invoicing Machines or Rentals.
Solution
Flyntlok will now automatically apply the income items to Machine sales and Rentals for Sage-integrated tenants. We've added two new settings: “Default Sage Machine Income” and “Default Sage Machine Rental Income”. To configure them, go to Flyntlok Settings and find them under the Sage Intacct section.
Complaint: When adding a new line to a Sales Order, the item would sometimes appear in random positions—top, middle, or bottom—causing confusion and inconsistent workflows.
Correction: Fixed.
Complaint: When applying a discount to an entire Sales Order, the shipping line was also discounted—but this discount wasn’t visible on the Sales Order screen, only on the printed Invoice, causing confusion.
Correction: We now display the discount on the shipping line directly within the sales order UI, making it consistent with the printed version.
Complaint: Managers reported that the All Contracts report was showing the incorrect timezone under the Last Updated column.
Correction: Fixed.
Complaint: Parts managers reported that the Pick List printout on a Work Order could display Parts requested from a deleted Parts Invoice.
Correction: Fixed. This printout now correctly only shows parts from active Invoices.
Complaint: Salespeople reported that changing the postal code on an existing Customer did not update the city and state for the address.
Correction: Fixed.
Complaint: A job marked as “Rejected” did not show its rejected status in the mobile view, leading to confusion for mobile users.
Correction: The job approval status, including "Rejected", now correctly appears in the mobile view to match the desktop display.
Complaint: Managers reported that the “Date Sold” field was unable to be cleared out on the Machine edit page.
Correction: Fixed.
Complaint: Technicians reported that the “cause” and “correction” fields were missing when adding a Job on the mobile Work Order view.
Correction: Added these fields to the Add Job section. They can be manually entered, or will auto-fill when selecting a Work Order Job Template.
Complaint: Rental clerks noted that after sending an email from Rental Dashboard, the tab would sometimes close itself.
Correction: Fixed. This issue specifically affected Microsoft Edge users. (Editorial Note: Microsoft Edge specific features frequently cause weird and esoteric bugs in Flyntlok. Always making life difficult, eh Mr Gates?)
Complaint: Managers reported that on Machine Receiving Voucher, when changing adding or editing a Machine's PDI cost, the Machine's “List Price” was not re-calculating based on the updated Machine cost.
Correction: Fixed. Changing PDI now immediately refreshes the Machine's “Book Value”, which should result in the correct “List Price” calculation.
Complaint: The list of users available for manual clock-ins in ERP Work Orders included all users, including people no longer employed with the shop, making it difficult to locate current employees.
Correction: We’ve improved the Clock-Ins table in ERP Work Orders to display only active users when adding clock-ins manually. Additionally, you can now search for users by typing into the input fields.
Complaint: Parts Managers mentioned that when applying a text filter to a column on Receiving Voucher, it would persist across all other Vouchers. This would cause confusion, as a search query on one Voucher may not be relevant on others.
Correction: Fixed. Only column sizes and arrangement will be persisted.
Complaint: Managers editing the Contact name on the Manage Customer page noticed that sometimes the previous Contact’s last name would appear at the end of the name they just typed once they clicked save.
Correction: Fixed.
Complaint: Service Managers reported that “Move Requests” generated from Work Orders were not displaying whether they were “Delivery” or “Pickup” under the “Kind” column in the report.
Correction: Fixed.
Complaint: Service Managers reported that Work Orders generated from Service Requests were missing the default fees.
Correction: Fixed.
Complaint: Service Managers reported that Pickup and Delivery Requests generated from Work Orders were missing contact information for the customer.
Correction: Fixed.
Complaint: Sales Managers noted that when copying a Sales Order that was associated to a Lead, they were unable to track the newly created Sales Order from the original Lead.
Correction: When copying a Sales Order, it will now be associated to any Leads that were associated to the original Sales Order.
Complaint: Service Managers complained that Work Orders in "Invoiced" status were appearing on their Job Scheduler page's Job list.
Correction: Invoiced Work Orders are now excluded from this list by default.
Complaint: Rental Users reported that “Move Requests” created from a Rental Contract were not being canceled when the contract was either canceled or reverted to Draft status. This sometimes led to duplicate Move Requests being generated.
Correction: Fixed.
Complaint: Detroit, Boston, Chicago and the New York Rangers (the 4 US teams of the Original Six) will all miss the playoffs in the same year for the first time in NHL history.
Correction: N/A. Can only sadly shake your head.
Learn More at Flyntlok Dealer Management System
Check out our Flyntlok YouTube channel for more highlights of the application!
The blue Shipping Tab (1) allows users to create, edit, and view customer Shipping Addresses, choose Shipping Methods for outbound as well as inbound, choose if Drop Shipping, Ship, view Address Label, and Track. The Shipping Tab opens automatically when hotkey 1 is pressed on the Point Of Sale.
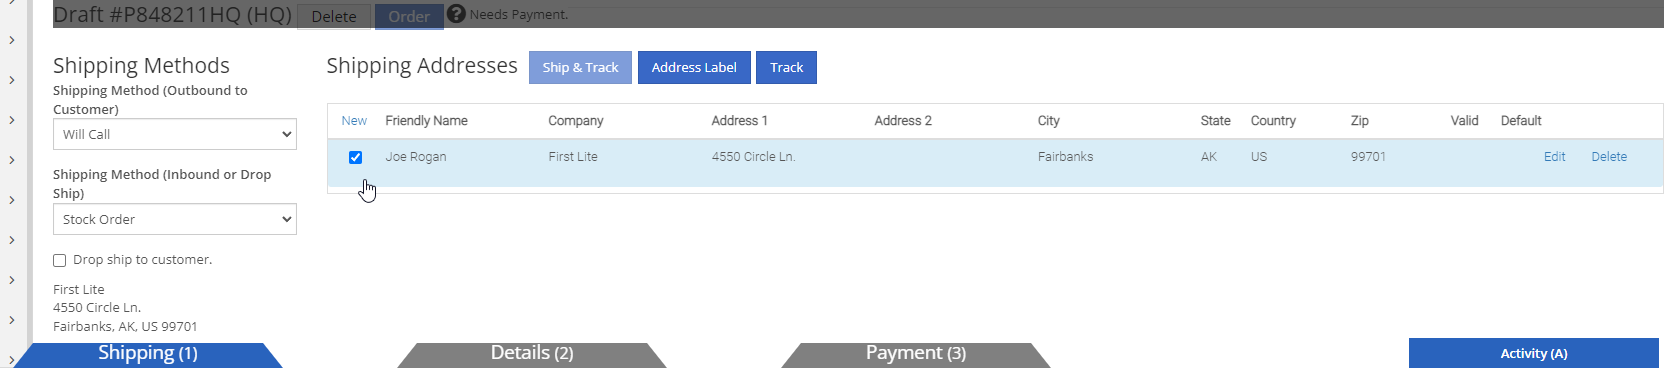
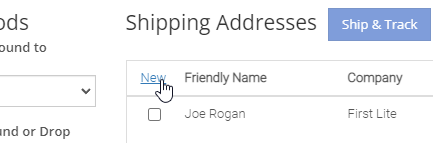
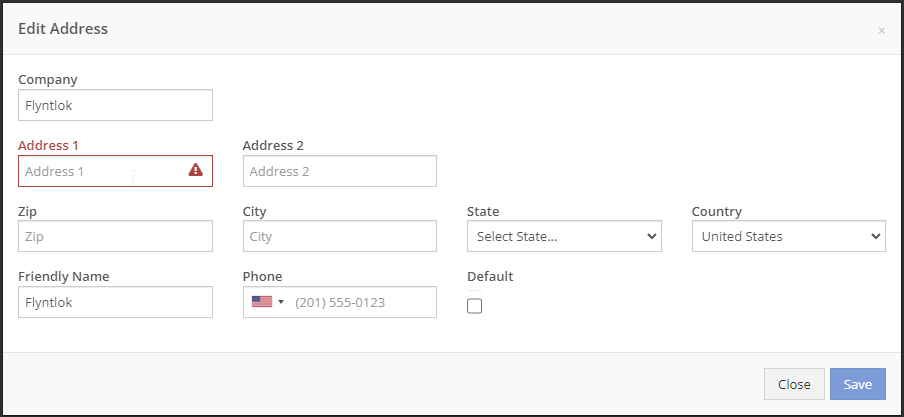
Users can add and enter addresses by clicking on the New link located in the top left corner of the shipping address table in the shipping tab. The Edit Address pop-up menu appears where all customer address information can be entered and saved. Newly created shipping addresses will appear as a new line in the shipping address table and are automatically saved in the customer’s files.
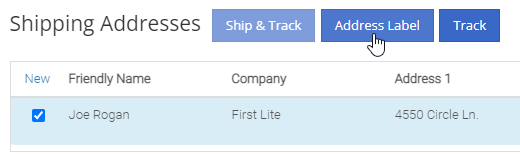
To select an address for a SO, click the check mark box to the left of the desired address. The selected address will then be highlighted blue.
To edit or delete an address, click Edit, or Delete on the far right of each address line in the shipping address table.
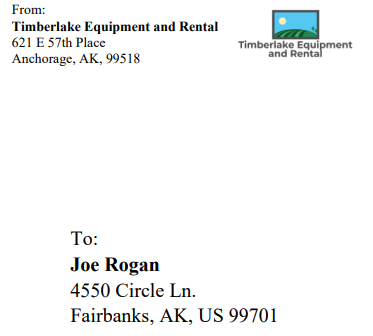
Users can make an Address Label by clicking the Address Label button located at the top of the Shipping Tab. A printable Address Label will automatically be created in a new page and will include the username, logo, and return shipping address at the top, and the customer shipping address in the middle.
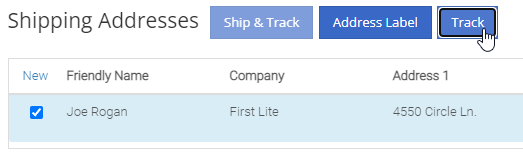
Users can track a shipment by clicking on the Track button at the top of the Shipping Tab. A separate page will appear asking for the Tracking Number along with the Carrier.
Once the Tracking Number and Carrier information is entered, press Get Tracking Info
![]()
![]()
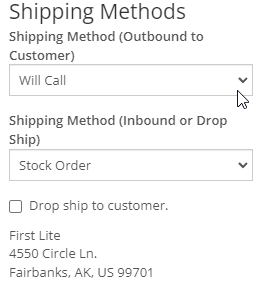
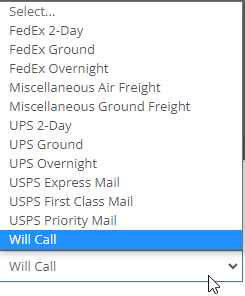
Users can change the outbound Shipping Method by selecting the desired shipping method in the tab down menu below Shipping Method (Outbound to Customer).
The Inbound Shipping Method or Drop Ship can be selected by selecting the desired shipping method in the tab down menu below Shipping Method (Inbound or Drop Ship). Check the Drop ship to customer Box if customer has agreed to accept shipping responsibility from the distributor or vendor to the customer's location.
The Point Of Sale (POS) allows a user-friendly way to create Sales Orders (SO), quotes, and other internal documents. It offers a large range of customizable features that expedite and improve customer experience. These features include texting customers when parts arrive, sending out customer experience surveys, emailing customer invoices, and more.
Users can access the POS from the Quick Searcher by searching for a Sale Order. You can also click the Sales Order number wherever found in Flyntlok.
The most common way a user can create a Sales Order is by clicking the Shopping Cart icon located in the Top Menu Bar.
The other ways users can create a Sales Order:
Once arrived, a dashboard appears which includes blue tabs labeled:
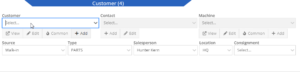
The blue Customer tab is the initial tab opened when creating a new Sales Order. This tab prompts users to fill in Customer, Contact, Machine, and other general information. Head to the Customer article for further information.
The Shipping tab includes the ability to create, edit, and view customer Shipping Addresses, and designate inbound and outbound Shipping Methods. Head to the Shipping tab article for further information.

The Details tab includes Customer Purchase Order, public and private message fields, and other actions and settings. Head to the Details article for further information.

The Payment tab give you options to take Payment, Quote, Copy and more. Head to the Payment or Actions article for further information.

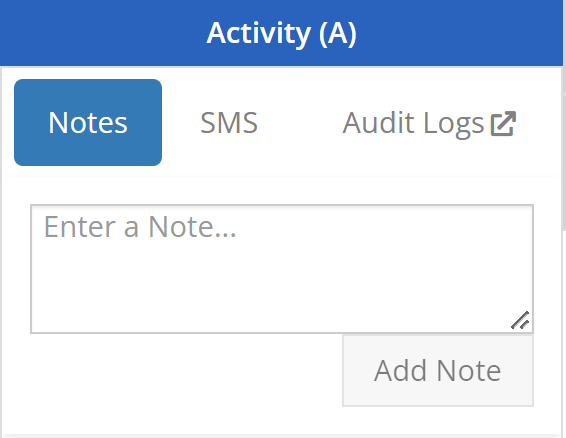
The Activity tab includes a Note Section, SMS options, and a link to the Sales Order Audit Logs. Head to the Activity article for further information
Clicking below the prompted Customer tab into the center of the POS or clicking above the Shipping, Detail, or Payment tabs, will reveal the Item Search Bar, Item Line Details, and other Sales Order Features. Go to the Item Search Bar article for further information on the following Look-up functions.
For further information on looking-up and entering Items in the Point of Sale, go to the Item Search Bar article.
![]()
In the homepage of your POS, users can access all necessary Sales Order Actions. Many of these features are displayed by relatable icons in the top right corner of the POS and include:
For further information on Point-of-Sale Actions, go to the Actions Articles.

By searching or scanning, items are added to the Sales Order. In each item line, users can:
Above the Shipping tab, users may view the status, the Sales Order number, view Downstream Operations, as well as choose to Delete or Order. Also, above the Activity tab, badges describe additional context of the Sale Order and Customer. For further information on Line Items, go to the Line Items article.

For further information on POS Hotkeys, go to the Hotkeys article.
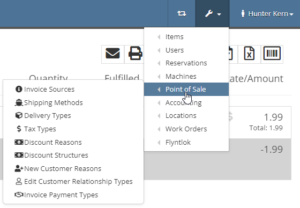
Settings for the Point of Sale can be found underneath Editors (Wrench) -> Point of Sale. These settings allow users to adjust:
For further information on Point-of-Sale Administration, go to the Point-of-Sale Administration article.