Payment Tab
The blue Payment Tab (3), accessible at the bottom of the Point Of Sale or by pressing the hotkey 3 when on the Point Of Sale homepage, allows users to access all necessary payment options in order to complete the Sale Order. Payment options include Cash, Credit, Debit, Check, Trade-in, Text2Pay, Use Deposit, Cash on Acct, and multiple other payment methods. The tab also allows users to create Quotes, or make Copies of the SO.
- Note that once the Order is processed, the blue Payment (3) tab is renamed to Actions (3)
- Also, after processing, there are limited functions in the Actions tab and only include Reprint, Reverse, Return, and Copy
- The Sale Order will need to be reversed first before changes with Payments are made

How to add payment with Cash
Users can add payment with cash by clicking the cash button, or pressing C, on the Payment tab.
- After clicking, a tab to add payment to sales order pops-up with cash selected as the payment method
- Fill the rest of the payment tab with the correct information such as the reference number, authorized user, mobile notification number, amount tendered, and amount applied to transaction
- Review the change due and then click apply payment or apply payment & process


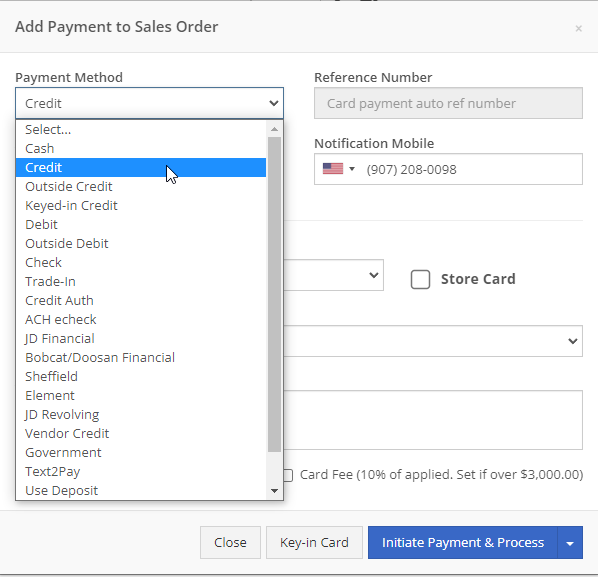
How to add payment with Credit Card
Users can add payment with pre-saved Credit Cards by clicking the Credit Card button, or pressing R, on the Payment tab.
- After clicking, a tab to Add Payment to a Sales Order pops-up with Credit as the selected payment method
- Fill the rest of the payment tab with the correct information such as the reference number, authorized user, mobile notification number, customer card, option for store card, credit machine, and amount applied to transaction
- Check the appropriate box if there is a card fee
- After entering and reviewing all credit card information, press initiate payment, or initiate payment & process
- If the credit card needs to be manually entered, click the Key-in Card button at the bottom of the pop-up menu
- Once Initiate Payment is clicked, the Gravity Payments credit card portal will populate creating a card token, and credit card information will be securely stored within Gravity Payments if Store Card was selected

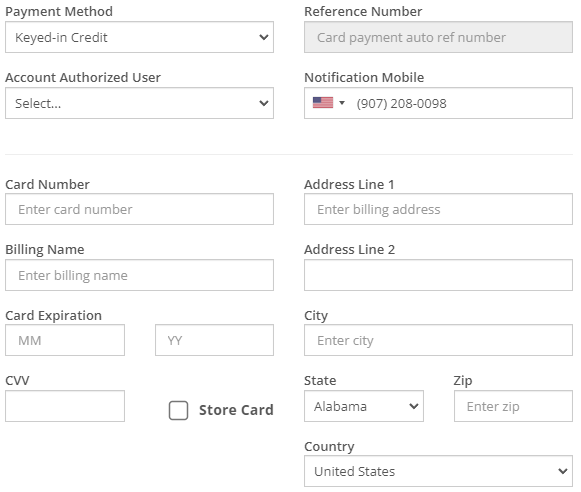
How to add payment with Keyed-in card
Users can add payment by manually entering a credit card using the Keyed-in Credit button, or by pressing K, on the Payment tab.
- After clicking, a tab to Add Payment to Sales Order pops-up with Keyed-in Credit as the selected payment method
- Fill the rest of the payment tab with the correct information such as the reference number, authorized user, mobile notification number, all credit card information, and amount applied to transaction
- To save the credit card information to the customer’s records, select the Store Card box
- The customer’s credit card information can now be seen on their customer dashboard
- Check the appropriate box if there is a card fee
- If a credit card machine is used, click the use machine button
- After reviewing, click the initiate payment & process button
- Once Initiate Payment is clicked, the Gravity Payments credit card portal will populate creating a card token, and credit card information will be securely stored within Gravity Payments if Store Card was selected

How to add payment with a Debit Card
Users can add payment using debit by clicking the Debit button, or by pressing D, on the Payment tab.
- After clicking, a tab to Add Payment to Sales Order pops-up with debit as the payment method that is selected
- Fill the rest of the payment tab with the correct information such as the reference number, authorized user, mobile notification number, credit machine, and amount applied to transaction
- Check the appropriate box if there is a card fee
- After reviewing, click the initiate payment & process button


How to add payment with Check
Users can add payment using check by clicking the Check button on the Payment tab
- After clicking, a tab to Add Payment to Sales Order pops-up with check as the payment method that is selected
- Fill the rest of the payment tab with the correct information such as the reference number, authorized user, mobile notification number, and Amount Applied to Transaction
- *NOTE* Flyntlok recommends entering the Check Number in the Reference Number field
- After reviewing, click the Apply Payment, or initiate payment & process button


How to add payment with Trade-In
Users can add payment using Trade-In by clicking the Trade-In button on the Payment tab.
- After clicking, a tab to Add Payment to Sales Order pops-up with Trade-In as the payment method that is selected
- Fill the rest of the payment tab with the correct information such as the reference number, authorized user, and mobile notification number
- Also, fill in the trade item information such as the Make, Model, Serial Number, Location, Acquisition Type, Date Manufactured, Previous Machine, Trade-in value(Amount applied to transaction), and Overallowance
- Overallowance is the margin between the trade in value and the actual cost of the machine
- The True Value, displayed in the bottom left of this tab, will take into account the Trade-in Value, as well as the Overallowance
- If there is a Payoff Amount on the Trade-In machine, i.g., if the customer has a lien remaining on the machine, then you can include the remaining balance owed in the Payoff Amount
- Also, enter the name and relevant information of who the debt on that machine is owed to in the Pay To section
- NOTE that the Payoff Amount will subtract from the value which the customer receives from trading in the machine on the Sale Order
- Review all amounts listed at the bottom of the Trade-In Payment tab including the Net Trade Value to Customer, the Net Machine Cost, Payoff Liability, and the Overallowance Expense
- After reviewing, click the Trade Machine, or Trade Machine & Process button


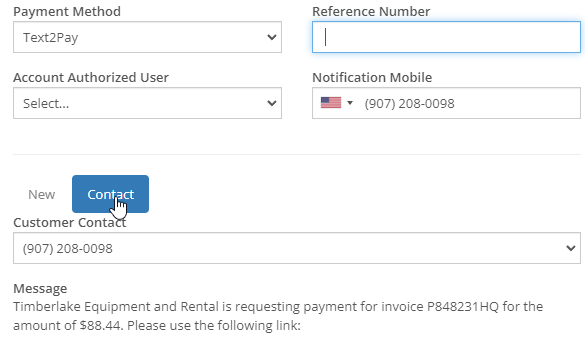
How to add payment with Text2Pay
Users can add payment using Text2Pay by clicking the Text2Pay button on the Payment tab.
- After clicking, a tab to Add Payment to Sales Order pops-up with Text2Pay as the payment method that is selected
- Fill the rest of the Text2Pay with the correct information such as the reference number, authorized user, mobile notification number, and either Contact Phone Number or pre-saved customer contact
- After reviewing the Amount Applied to Transaction, click the Sent Text Message, or Send Text Message & Process button
- A text, along with the displayed message, will be sent to the customer including the option to pay using an easy-to-use process on their mobile phone
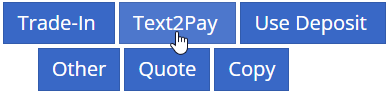
How to add payment with Use Deposit
Users can add payment using a deposit by clicking the Use Deposit button on the Payment tab
- After clicking, a tab to Add Payment to Sales Order pops-up with Use Deposit as the payment method that is selected
- Fill the rest of the payment tab with the correct information such as the reference number, authorized user, mobile notification number, and Amount Applied to Transaction
- After reviewing, click the Apply Payment, or Apply Payment & Process button

How to add payment with Cash on Account
Users can add payment using Cash on Account by clicking the Cash on Account button on the Payment tab.
- After clicking, a tab to Add Payment to Sales Order pops-up with Cash on Acct as the payment method that is selected
- Fill the rest of the payment tab with the correct information such as the reference number, authorized user, mobile notification number, and Amount Applied to Transaction
- After reviewing, click the Apply Payment, or Apply Payment & Process button

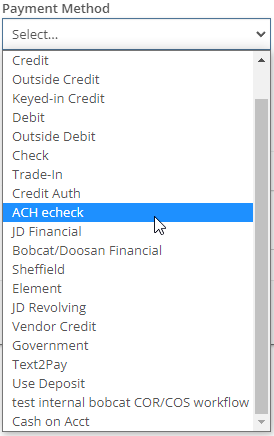
Other ways to add payment
Users can add other methods of payment by clicking the Other button on the Payment tab.
- After clicking, a tab to Add Payment to Sales Order pops-up without a preselected payment method
- Use the tabdown menu below Payment Method to filter and choose the desired payment method
- Fill the rest of the payment tab with the correct information such as the reference number, authorized user, mobile notification number, Amount Applied to Transaction and any other prompted payment information relevant to the chosen payment method
- After reviewing, click the Apply Payment, or Apply Payment & Process button
 Other payment methods include but are not limited to Outside Debit, ACH check, JD Financial, Bobcat/Doosan Financial, Sheffield, Element, JD Revolving, Vendor Credit, and Government.
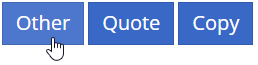
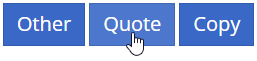
How to create a Quote
Users can create quotes by clicking the Quote button on the Payment tab.
- After clicking, a tab to Convert to Quote pops-up
- Enter the correct expiration date and click Submit
- After clicking Submit, the sales order will save as a quote
- As a quote, the blue Payment (3) has changed to an Actions (3) tab and only allows limited features, such as Reprint, Modify Quote, Reject, Accept, and Copy
- By clicking Modify Quote, the Quote will be converted back to a Sale Order
- By clicking accept or reject, the quote will either convert back to an accepted SO or be marked as a rejected quote
- NOTE that once the quote has been accepted, the Sale Order can-not be turned into a Quote again
How to Reprint a Sale Order
Users can Reprint a Sales Order they wish to Reprint by following these steps:
- Once when the Sale Order is in delivered status, open the Payment tab and click Reprint
- Once Reprint is clicked, a tab will pop-up asking to either email or print the Sale Order
- Click either of these two options to go to a new email or print page


How to Reverse a Sale Order
Users can Reverse a Sales Order they wish to Reverse by following these steps:
- Once when the Sale Order is in delivered status, open the Payment tab and click Reverse
- Once Reverse is clicked, a notification will confirm, and the page will be redirected to the Reversed Sale Order
- This new Sale Order will be changed to Draft status, ready to be edited and then pushed through again

How to create a Return
Users can create a new Return Order from the Sales Order they wish to make the Return Updated Trade-In from by following these steps:
- Once when the Sale Order is in delivered status, open the Payment tab and click Return
- Choose what percentage the restock fee, if you are wanting to charge the customer a certain percentage for the return, and press Return to confirm
- This will create a new return sales order, though with negative quantities, which means if inventory item, is returning to Quantity On Hand
- Click the X on unwanted items' item lines to delete them off of the Return Order
- Items and machines that are being sold to the customer can also be added to this Return Order, i.g., if parts or machines are being exchanged
- Then, choose how to give payment to the customer in the Payment tab and then click the order button to complete the return
- All items and machines from the machine automatically return to inventory
- NOTE, check returned machines to make sure that their machine dashboards display the appropriate status, i.g., Down/Available/Sold

How to create a copy of a Sale Order
Users can create copies of a SO by clicking the Copy button on the Payment tab. After clicking, the page redirects to a copy of the Sale Order in a new page.

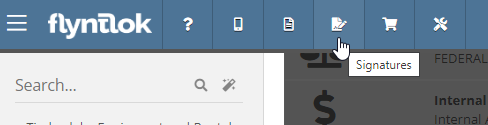
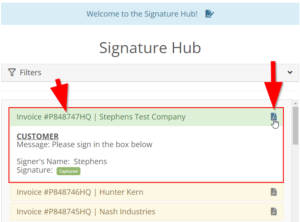
How to have a customer electronically sign an invoice?
Users can have their customers electronically sign an invoice by clicking the signature hub icon.
- After clicking, use the search bar to look up and select the customer’s name to open the signature box
- The customer can use the mouse, or other connected devices such as touch screens to sign their name
- Click the Page Icon in the top right to open up the external Sales Order sheet
Item Line
The Item Line allows users to effectively view part items and their locations, edit ordered quantities, edit fulfilled quantities, and edit amounts as well as check traceability, verify correct Item Numbers, report lost sales, remove items from SO entirely, and create/edit discounts for specific items. The Item Lines appear as rows in descending order by when they were added to the SO.
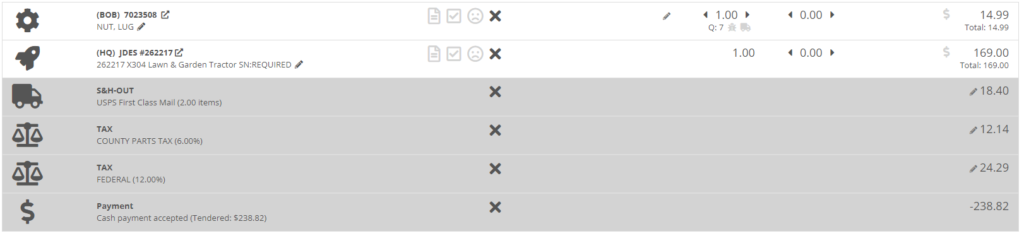
Gear, Rocket, Truck, Tax, Percentage and Money icons
The POS icons that appear in the left-hand column help signify what classification each Item Line is, and the different icons can be defined as follows:
 signifies the item line is a Part
 signifies the item line is a Machine
 signifies the item line is a Shipping and Handling (S&H) charge
 signifies the item line is an added Tax
 signifies the item line is an added Discount
 signifies the item line is a Payment
 signifies the item line is a Note
 signifies the item line is a Rental Contract
 signifies item line is a Work Order
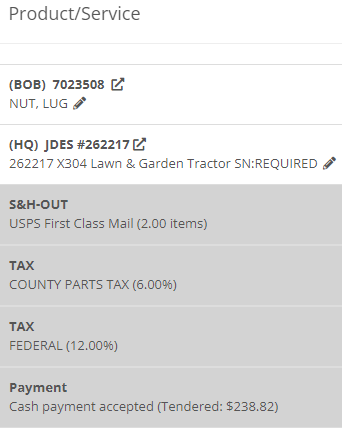
Product/Service column
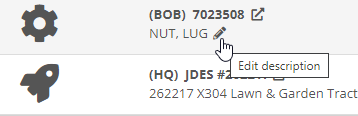
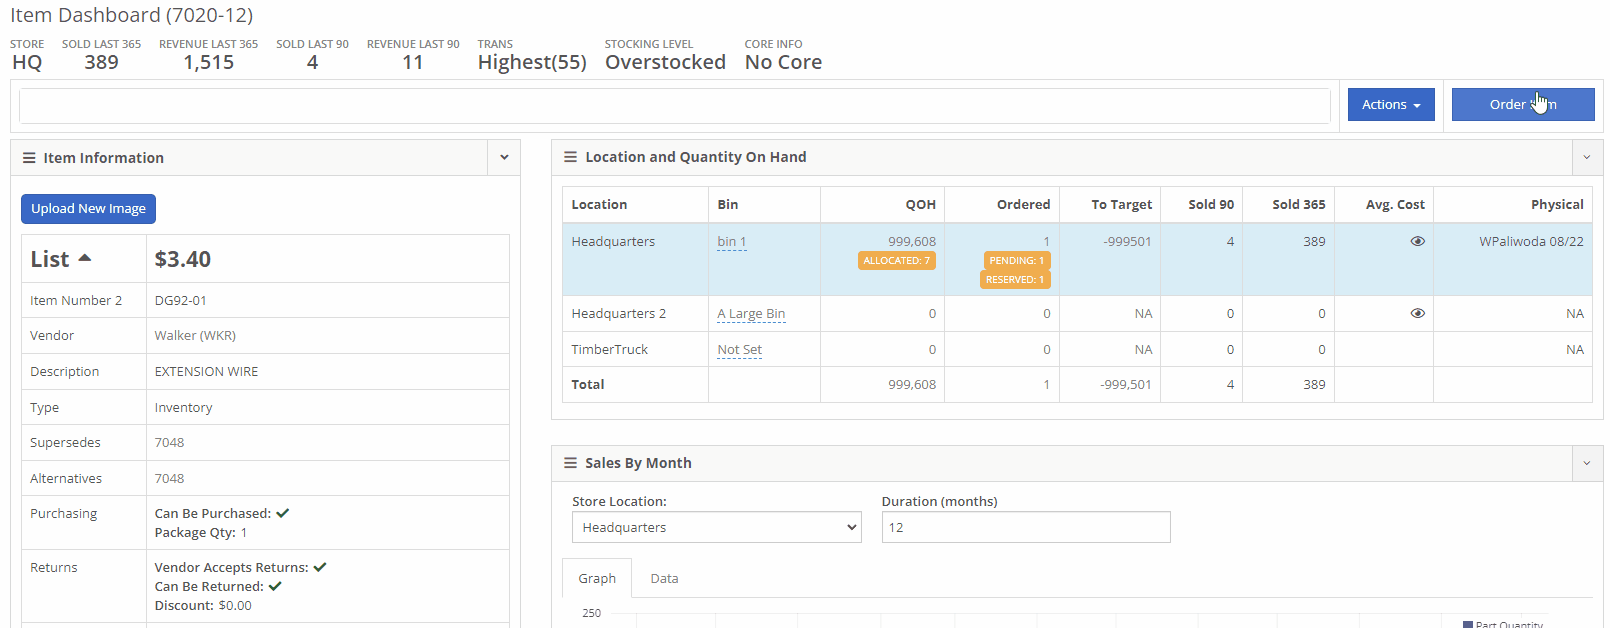
The Product/Service column allows users to view Item Number, Item Description, go to Item Dashboard, and change Item Description. The Item Description is listed underneath the Item Number in the Product/Service Column.
Click the Item Dashboard button located just right of the Item Number to open up the Item Dashboard in a new tab.

Click the Pencil icon to change the Item Description.
- Note that changing Item Description in the POS does not permanently change Item Description in the Item Dashboard.
- Tax Items will include their Tax Percentages in parentheses in its description
If Item has a Core, the Item Line will contain a Dirty Core option underneath the item description. Check the box if the Dirty Core has been returned. You can set the Core status of the Item when editing the Item's Dashboard.

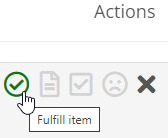
Actions column
The Actions column, located in the middle of the POS, allows users to check fulfillment status, fulfill item, check traceability, change status of item number verification, report lost sale, check if there is updated pricing, and remove item from the SO.
To fulfill all item quantities, check the green Circled Check Mark icon
- An unfilled Circled Check Mark signifies that the ordered quantities of that specific item are not fulfilled
- A filled in Circled Check Mark signifies that the ordered quantities of that specific item have been fulfilled
- An orange Circled Check Mark signifies that the ordered quantities of that specific item have been partially fulfilled
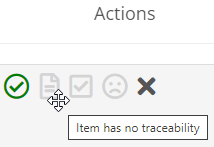

To check Traceability, click the Traceability icon  .
.
- Traceability feature is only enabled when item has traceability information
- This feature is specific to manufacturing ERP companies
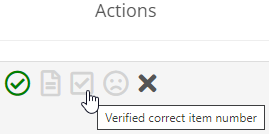
To change status of item number verification, click the Squared Check Mark icon.
- Once clicked, the Squared Check Mark icon
 will change to a Red Warning Sign
  to signify that the Item Number is not verified
- Most likely the customer submitted the Item Number if not verified
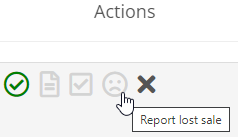
To Report Lost Sale, follow these steps:
- Click the Frowny Face icon
 to redirect to the Loss Report Form
- Fill in Loss Report Details with loss type, customer, reason, and estimation information
- Verify Item Details such as the Selected Item, Listed Price, and QOH
- Click Submit
To check Updated Pricing for an item that has changed pricing, a golden icon [picture of the icon] will appear in the action column. After clicking, an Update Pricing notification will pop-up and ask if a pricing update is applicable. If so, press the Send button and the item price will be updated appropriately.
To remove an item from the sale order, click the X, and the item line will disappear from the POS.
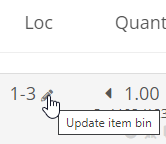
Location column
The Location column allows users to update or enter in an Item BIN, or a designated inventory storage location. To set the location, click the Pencil icon and type the BIN into the prompted text.
Quantity column
The Quantity column allows users to view and change Ordered Quantity, and view Quantity on Hand (available quantity), Quantity Consigned, Total Quantity, Dispute Quantity, and Request Transfer.
To change Ordered Quantity, use the arrows or click into the quantity number to manually type in the desired quantity. The QOH, or Available Quantity, is located directly below. Also, by clicking the Information icon, the QOH Breakdown Tab pops-up with the Quantity Available, Consigned Quantity, and Total Quantity.
To Dispute Quantity, click the Ladybug icon and enter the quantity that is actually on hand, not including ordered quantity.
- Notice that after disputing the quantity, the QOH will automatically be updated on the Sale Order, as well as on the Item Dashboard
To Request Transfer Quantity, click the Truck icon and fill out the Transfer This Item pop-up page. This page requires the Transfer Location, Transfer Quantity, Shipping Method, and if Drop shipped. Select either Transfer or Quick Transfer to finish the Transfer process.

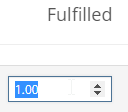
Fulfill column
The Fulfill column allows users to view and change fulfilled quantities. To change fulfilled quantity, either click into the Fulfilled Quantity number or click arrows to incrementally add or take away Fulfilled Quantity.

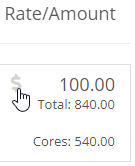
Rate/Amount column
The Rate/Amount column, located furthest right of the POS, allows users to view and change Item Prices, as well as add discounts to each Item Line separately. The top number of the Rate/Amount cell is the Item Price which takes into account the Item Discount. Just below, is the Total Item price which additionally takes into account the Quantity Ordered.
To add an Item Discount, click the Discount Line cell and fill out the Line Pricing pop-up menu and press Save. The Line Pricing pop-up menu requires Discount Percentage, Reason for discount, and will propagate the New Amount.
- After applying an Item Discount, the Money Icon in the Rate/Amount cell will fill green.

Point Of Sale Overview
The Point Of Sale (POS) allows a user-friendly way to create Sales Orders (SO), quotes, and other internal documents. It offers a large range of customizable features that expedite and improve customer experience. These features include texting customers when parts arrive, sending out customer experience surveys, emailing customer invoices, and more.
Getting to the POS
Users can access the POS from the Quick Searcher by searching for a Sale Order. You can also click the Sales Order number wherever found in Flyntlok.
Creating a Sales Order
The most common way a user can create a Sales Order is by clicking the Shopping Cart icon located in the Top Menu Bar.
The other ways users can create a Sales Order:
- In the left navigation, select New -> Sales Order
- From the Customer Dashboard -> Actions -> Sales Order
- The newly created Sales Order will have the customer assigned and default contact selected
- From the Item Dashboard -> Actions -> Sell Item
- A new Sales Order will be created with the item added
- From the Machine Dashboard -> Actions -> New Linked Sales Order
- Linked machine information will then auto-populate on the newly created Sales Order
POS Layout
Once arrived, a dashboard appears which includes blue tabs labeled:
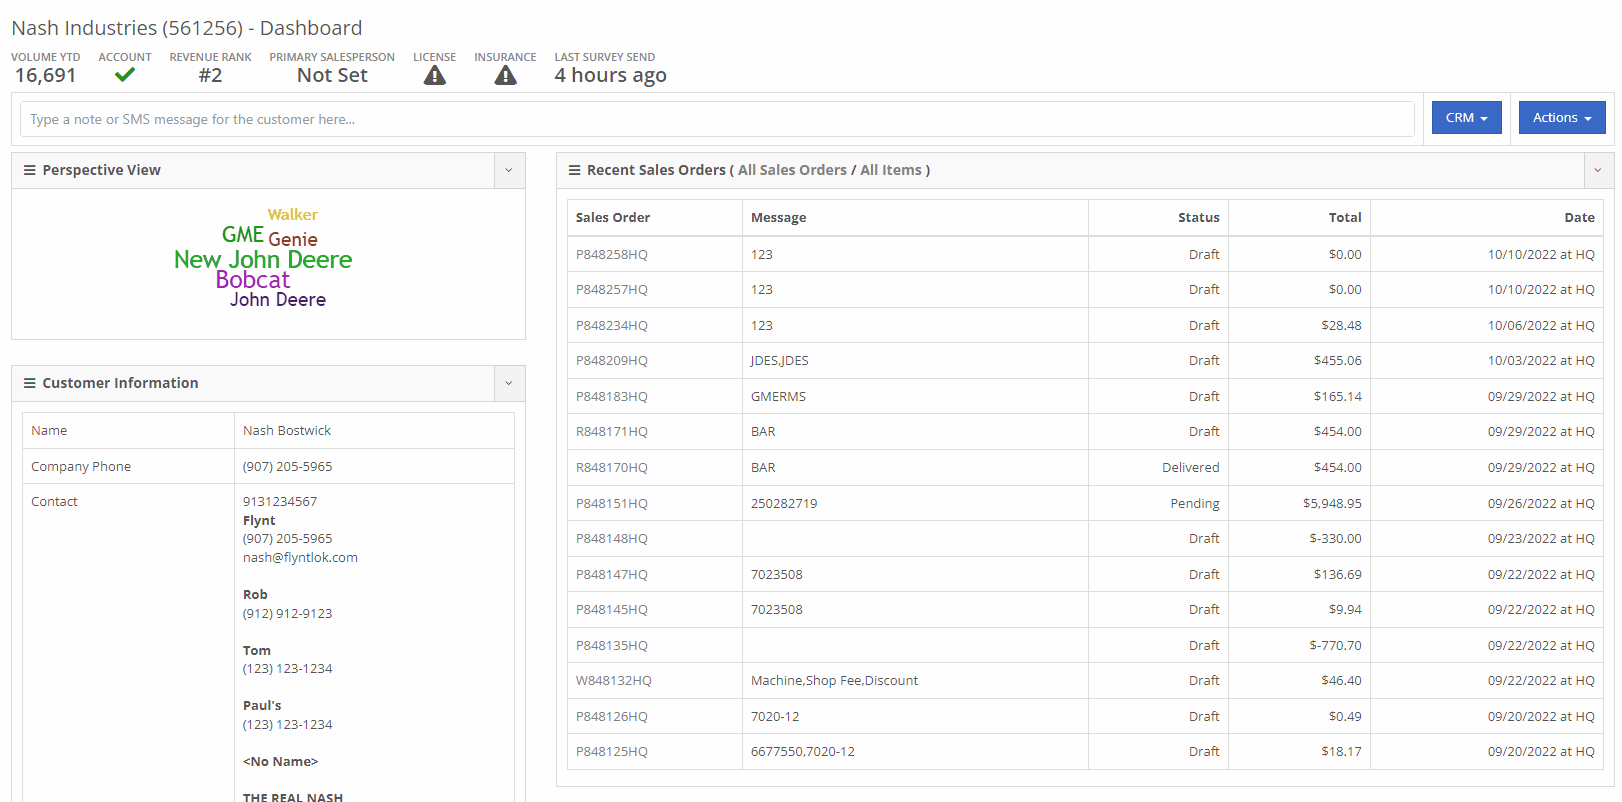
The blue Customer tab is the initial tab opened when creating a new Sales Order. This tab prompts users to fill in Customer, Contact, Machine, and other general information. Head to the Customer article for further information.
The Shipping tab includes the ability to create, edit, and view customer Shipping Addresses, and designate inbound and outbound Shipping Methods. Head to the Shipping tab article for further information.

The Details tab includes Customer Purchase Order, public and private message fields, and other actions and settings. Head to the Details article for further information.

The Payment tab give you options to take Payment, Quote, Copy and more. Head to the Payment or Actions article for further information.

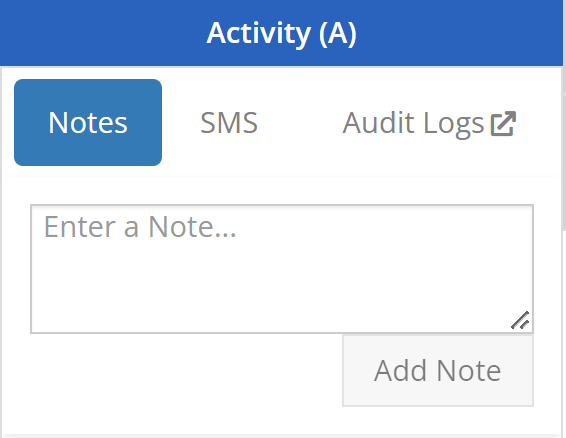
The Activity tab includes a Note Section, SMS options, and a link to the Sales Order Audit Logs. Head to the Activity article for further information
Clicking below the prompted Customer tab into the center of the POS or clicking above the Shipping, Detail, or Payment tabs, will reveal the Item Search Bar, Item Line Details, and other Sales Order Features. Go to the Item Search Bar article for further information on the following Look-up functions.
- Search Mode vs. Scan Mode
- Part Number Searcher
- Quantity editor
- Add a new item
- Import items from a file
For further information on looking-up and entering Items in the Point of Sale, go to the Item Search Bar article.

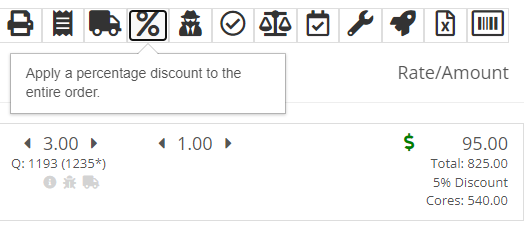
In the homepage of your POS, users can access all necessary Sales Order Actions. Many of these features are displayed by relatable icons in the top right corner of the POS and include:
- Reverse line-item order
- Email this Sales Order
- Print this Sales Order
- Print thermal receipt
- View packing slip
- Apply a percentage discount to the entire order
- View internal pricing information
- Fulfill all items as much as possible
- Modify tax rules
- Adjust payment posting dates
- Your most commonly sold items
- Sell a machine
- Export to Excel
- Create Label
For further information on Point-of-Sale Actions, go to the Actions Articles.

By searching or scanning, items are added to the Sales Order. In each item line, users can:
- Access Item Dashboard
- View/Edit line description
- Fulfill line
- Check traceability
- Verify the correct item number
- Report lost sale
- Remove item from a Sale Order
- Update item bin
- Change quantity
- View quantity on hand
- Override quantity on hand
- Fulfill quantity
- View/edit/discount line amount
Above the Shipping tab, users may view the status, the Sales Order number, view Downstream Operations, as well as choose to Delete or Order. Also, above the Activity tab, badges describe additional context of the Sale Order and Customer. For further information on Line Items, go to the Line Items article.

For further information on POS Hotkeys, go to the Hotkeys article.
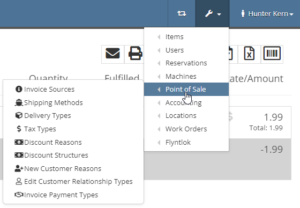
Settings for the Point of Sale can be found underneath Editors (Wrench) -> Point of Sale. These settings allow users to adjust:
- Customer relationship types
For further information on Point-of-Sale Administration, go to the Point-of-Sale Administration article.