How Can We Help?
Work Orders
This documentation is a one-stop shop for answers to all work order questions!
Creating Work Orders
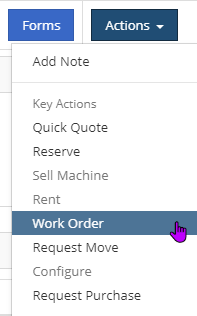
There are three ways that users can create work orders:
Left Hand Navigation
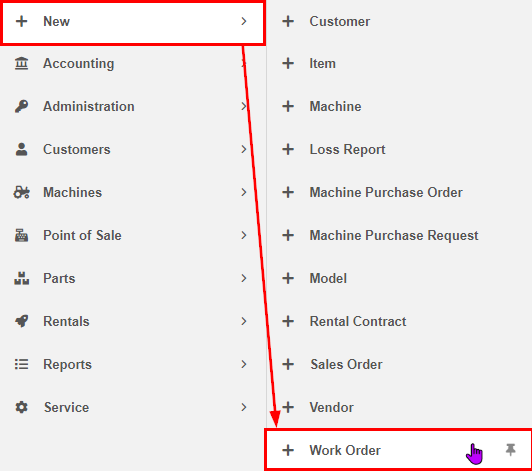
When on any page within Flyntlok, you will have your left-hand navigation bar. On this bar, you can quickly create a work order through the New tab and then selecting Work Order.
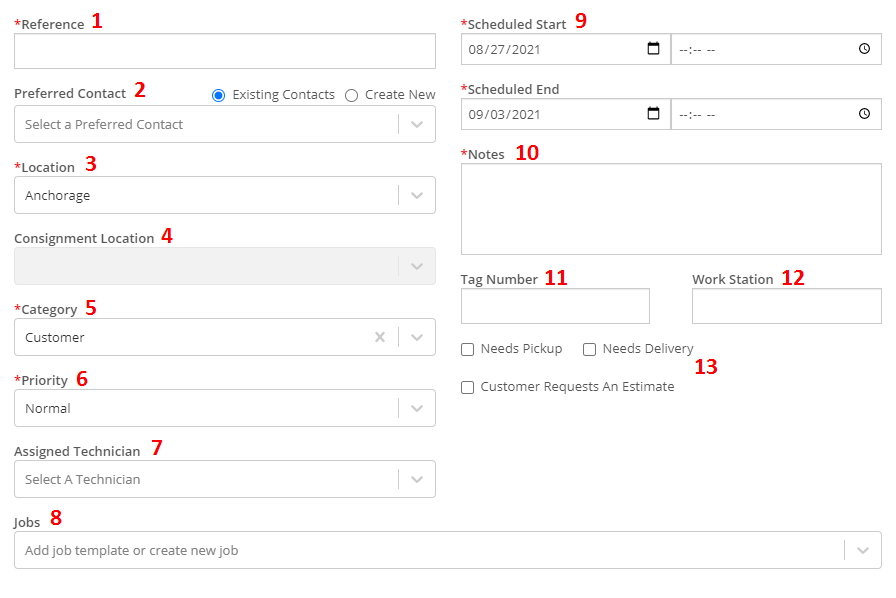
You will then see our work order creation form. Here is a list of all the fields, information about those fields, and if they are required for creation.
These are the top-level work order information fields:
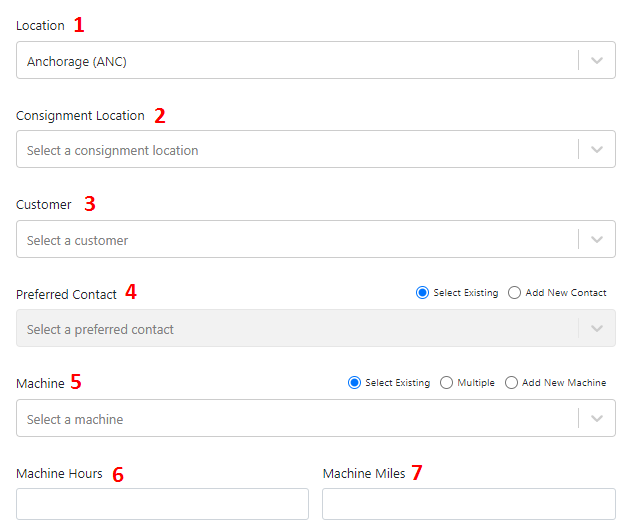
- (Required) The store location that the work is being performed at. This field is required and will default to your user profile's set location.
- If your company uses consignment locations, you can set the consignment location that the work order will default pull inventory from. If you want to pull inventory from the store or your company doesn't use consignment locations, you can leave this field untouched.
- (Required) The customer that the work is being performed for. If the work order is for warranty or an internal company cost, you will want to set that customer here, even if the machine is owned by a different customer.
- After setting a customer, you can set the preferred contact of that customer for the work order. This can be a pre-existing contact or a new contact.
- (Required) The machine that the work is being performed on. Your options are:
- Existing Machine: Assign a machine that already exists in Flyntlok
- Multiple: We assign the work order a Multiple Machines tag that allows you to assign a Flyntlok machine to each job of the work order.
- New Machine: If the machine doesn't already exist in Flyntlok, you can create it with the work order
- The machine hours that are currently on the machine.
- The current odometer reading of the machine.
Just below the top-level data of the work order, will be scheduling and job-specific data of the work order:
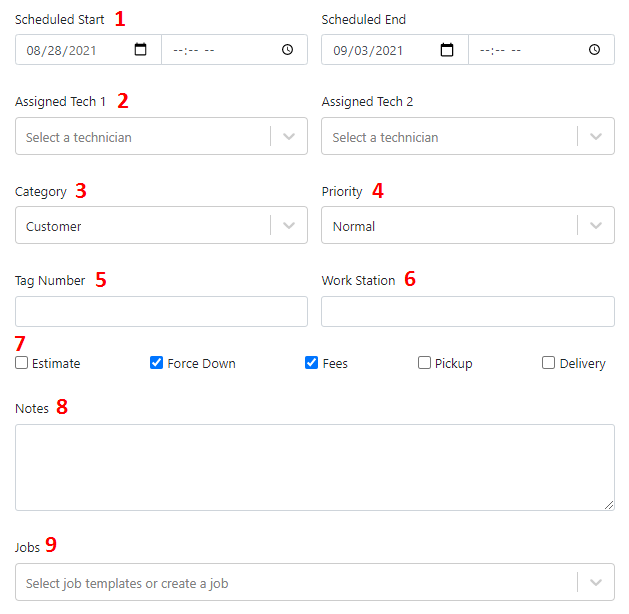
- (Required) The scheduled dates the work order will be worked on.
- Technicians assigned to do the work.
- (Required) Category to classify the work under. Your options are:
- Customer
- Warranty
- Rental
- Shop
- Fixed Assets
- Sales
- (Required) Priority of the work order.
- Tag number of the machine being worked on.
- Location at your store the machine will be located when it is being worked on.
- Checkboxes to determine miscellaneous fees and statuses that the work order will be created with.
- Estimate: We will create the work order in Estimate status to get the customer's approval.
- Force Down: Put the machine into a Down status while it is being worked on. This will prevent the machine from being sold and put on rentals while it is being worked on.
- Fees: Charge the customer shop and/or environmental fees.
- Pickup/Delivery: Charge the customer for picking up or returning their machine.
- (Required) Information about the work that will be done or that has been requested.
- Premade job templates can be added so the work order will be created with jobs.
Customer Dashboard
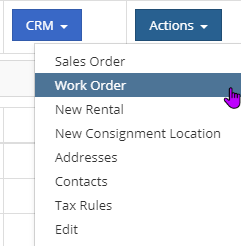
When on a customer's dashboard, clicking the Actions dropdown in the upper right will show a Work Order option. Clicking this will bring up the work order creation form with the customer pre-assigned.
Machine Dashboard
When on a machine's dashboard, clicking the Actions dropdown in the upper right will show a Work option. Clicking this will bring up the work order creation form with the machine pre-assigned, and if the machine is sold, the machine's owner as the customer of the work order.
When creating a work order from the customer or machine dashboard, the creation form will look a little different from the form explained above. Here is a list of all the fields, information about those fields, and if they are required.
- (Required) From the customer dashboard, this will be the reference box to the machine that will be worked on. From the machine dashboard, this will be prefilled with the machine that you are on.
- You can set the preferred contact of that customer for the work order. This can be a pre-existing contact or a new contact.
- (Required) The store location that the work is being performed at. This field is required and will default to your user profile's set location.
- If your company uses consignment locations, you can set the consignment location that the work order will default pull inventory from. If you want to pull inventory from the store or your company doesn't use consignment locations, you can leave this field untouched.
- (Required) Category to classify the work under. Your options are:
- Customer
- Warranty
- Rental
- Shop
- Fixed Assets
- Sales
- (Required) Priority of the work order.
- The primary technician assigned to do the work.
- Premade job templates can be added so the work order will be created with jobs.
- (Required) The scheduled dates the work order will be worked on.
- (Required) Information about the work that will be done or that has been requested.
- Tag number of the machine being worked on.
- Location at your store the machine will be located when it is being worked on.
- Checkboxes to determine miscellaneous fees and statuses that the work order will be created with.
- Pickup/Delivery: Charge the customer for picking up or returning their machine.
- Estimate: We will create the work order in Estimate status to get the customer's approval.
Work Order Dashboard
Once the work order is successfully created, you will be taken to the work order dashboard! The dashboard will contain all the information about the work order. This includes the jobs, parts, labor, files, etc.
Header Information
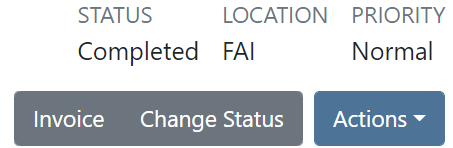
At the top of the work order, we will show you basic information about the work order:

- Unique work order identification number.
- Customer that work is being performed for.
- The machine that is being work on.
- Status of the work order.
- Location the work is being performed under.
- Priority of the work order.
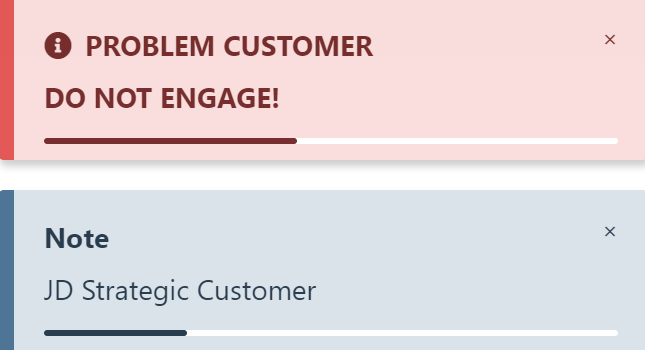
Customer Notes
Between the header work order information, if the customer has any notes set on their profile or is marked as a problem customer, you will receive notifying banners.
Actions
In the upper right of the work order dashboard, there is an Actions button. Clicking this will give you a drop-down of actions that can be performed for the work order.
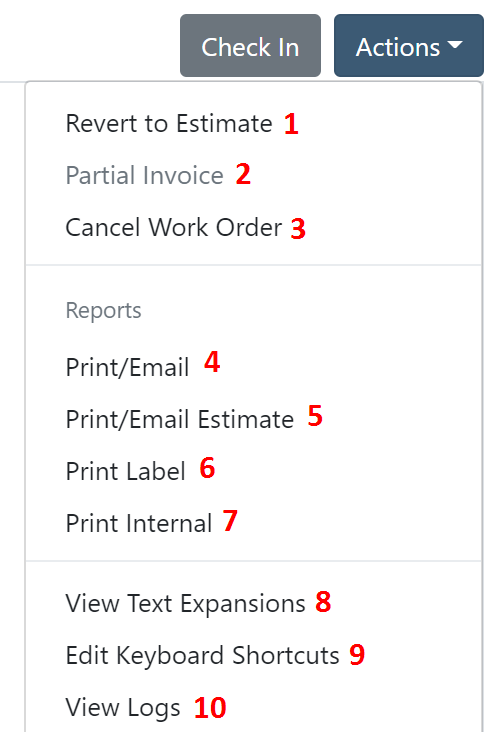
- Change the work order back to an estimate.
- We allow for the current work completed to be billed out to the customer without having to close out the work order.
- This will delete the work order.
- You will be taken to the work order PDF that you can then email to a customer or print off.
- You will be taken to the work order estimate PDF that you can then email to a customer or print off.
- You can print a label for the work order with a scannable QR code that will bring you to the work order on a mobile device.
- This will be an internal document that reflects the cost of each job along with your profit and margin of each job.
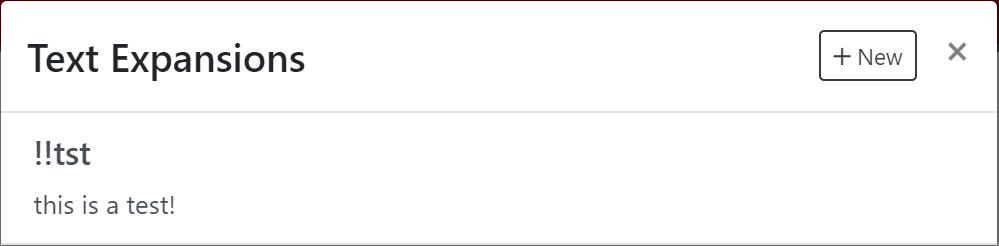
- A list of text expansion options. You will be able to add and remove the expansion shortcuts from here as well.
- You can set custom hotkeys that will perform certain actions on the work order.
- The audit logs of the work order to see all the actions taken on the work order.
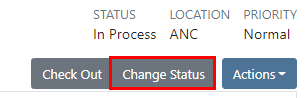
Work Order Status
You have the ability to put a work order into a different status than the typical flow that Flyntlok provides (New - > In Process -> Completed -> Invoiced). In the upper right, there will be a Change Status button.
Clicking this will bring up a box where you can choose the new status and input notes for the reasoning behind the status change.
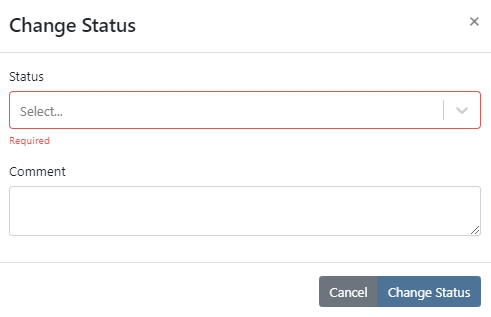
NOTE: Flyntlok can add as many different statuses that you require to keep the service department organized!
Hotkeys
Flyntlok supports custom hotkeys on the work order dashboard. Under the actions drop-down, you can select the Edit Keyboard Shortcuts. This will bring up a box with all the actions that can be configured to a hotkey.
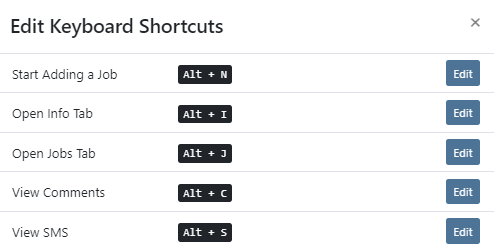
Clicking Edit on any of these lines will let you change the hotkey combination that you will use to quickly perform the action.
Info Tab
Informational Boxes
The info tab of the work order will hold all top-level information about the work order. From here you can edit that information or view all the data in one place. In the upper right of most of the boxes, there will be an edit button to edit the information in that box.
General
The general box will contain information about the work order that was configured at creation of the work order. Any of this data can be changed while the work order is still active.
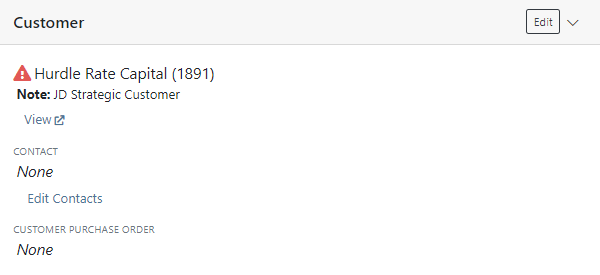
Customer
You have the ability to make changes to the customer or contact that was selected at work order creation. In this box, you can input the customer's purchase order number if they are able to provide you with one.
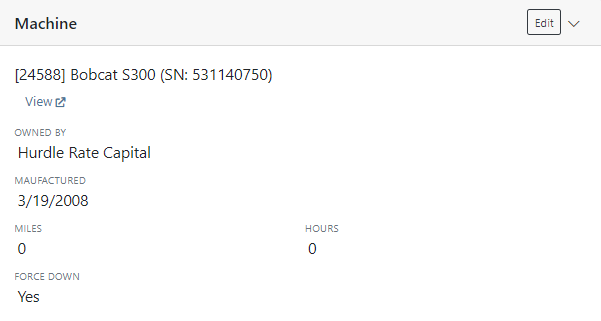
Machine
We show the machine that is being worked on and allow it to be changed if needed. We will also show the owner of the machine in the case that the customer of the work order is a warranty customer or another type of internal customer.
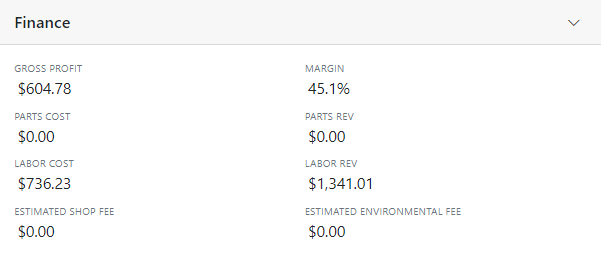
Finance
We report on the overall finances of the work order. This will help to give you an idea of your profit and margin on a work order before you dig into the granular data.
Files
All files that have been attached to any of the jobs on the work order will show in the files box. You can remove these files from here, but all files must be attached to a specific job.

Associated Forms
We will show any and all forms attached to a job.
Sent Emails
A full list of emails sent from the work order will show here. This will help to track the most recent version of the work order that the customer has seen.
Part Invoices
All parts invoices linked to any job on the work order will show with the status that they are currently in.
Work Order Invoices
This will contain the customer billed invoices of the work order, both rolled and final invoices.
Clocked In
All technicians that are currently clocked into the work order and what job they are clocked into will show in this box.
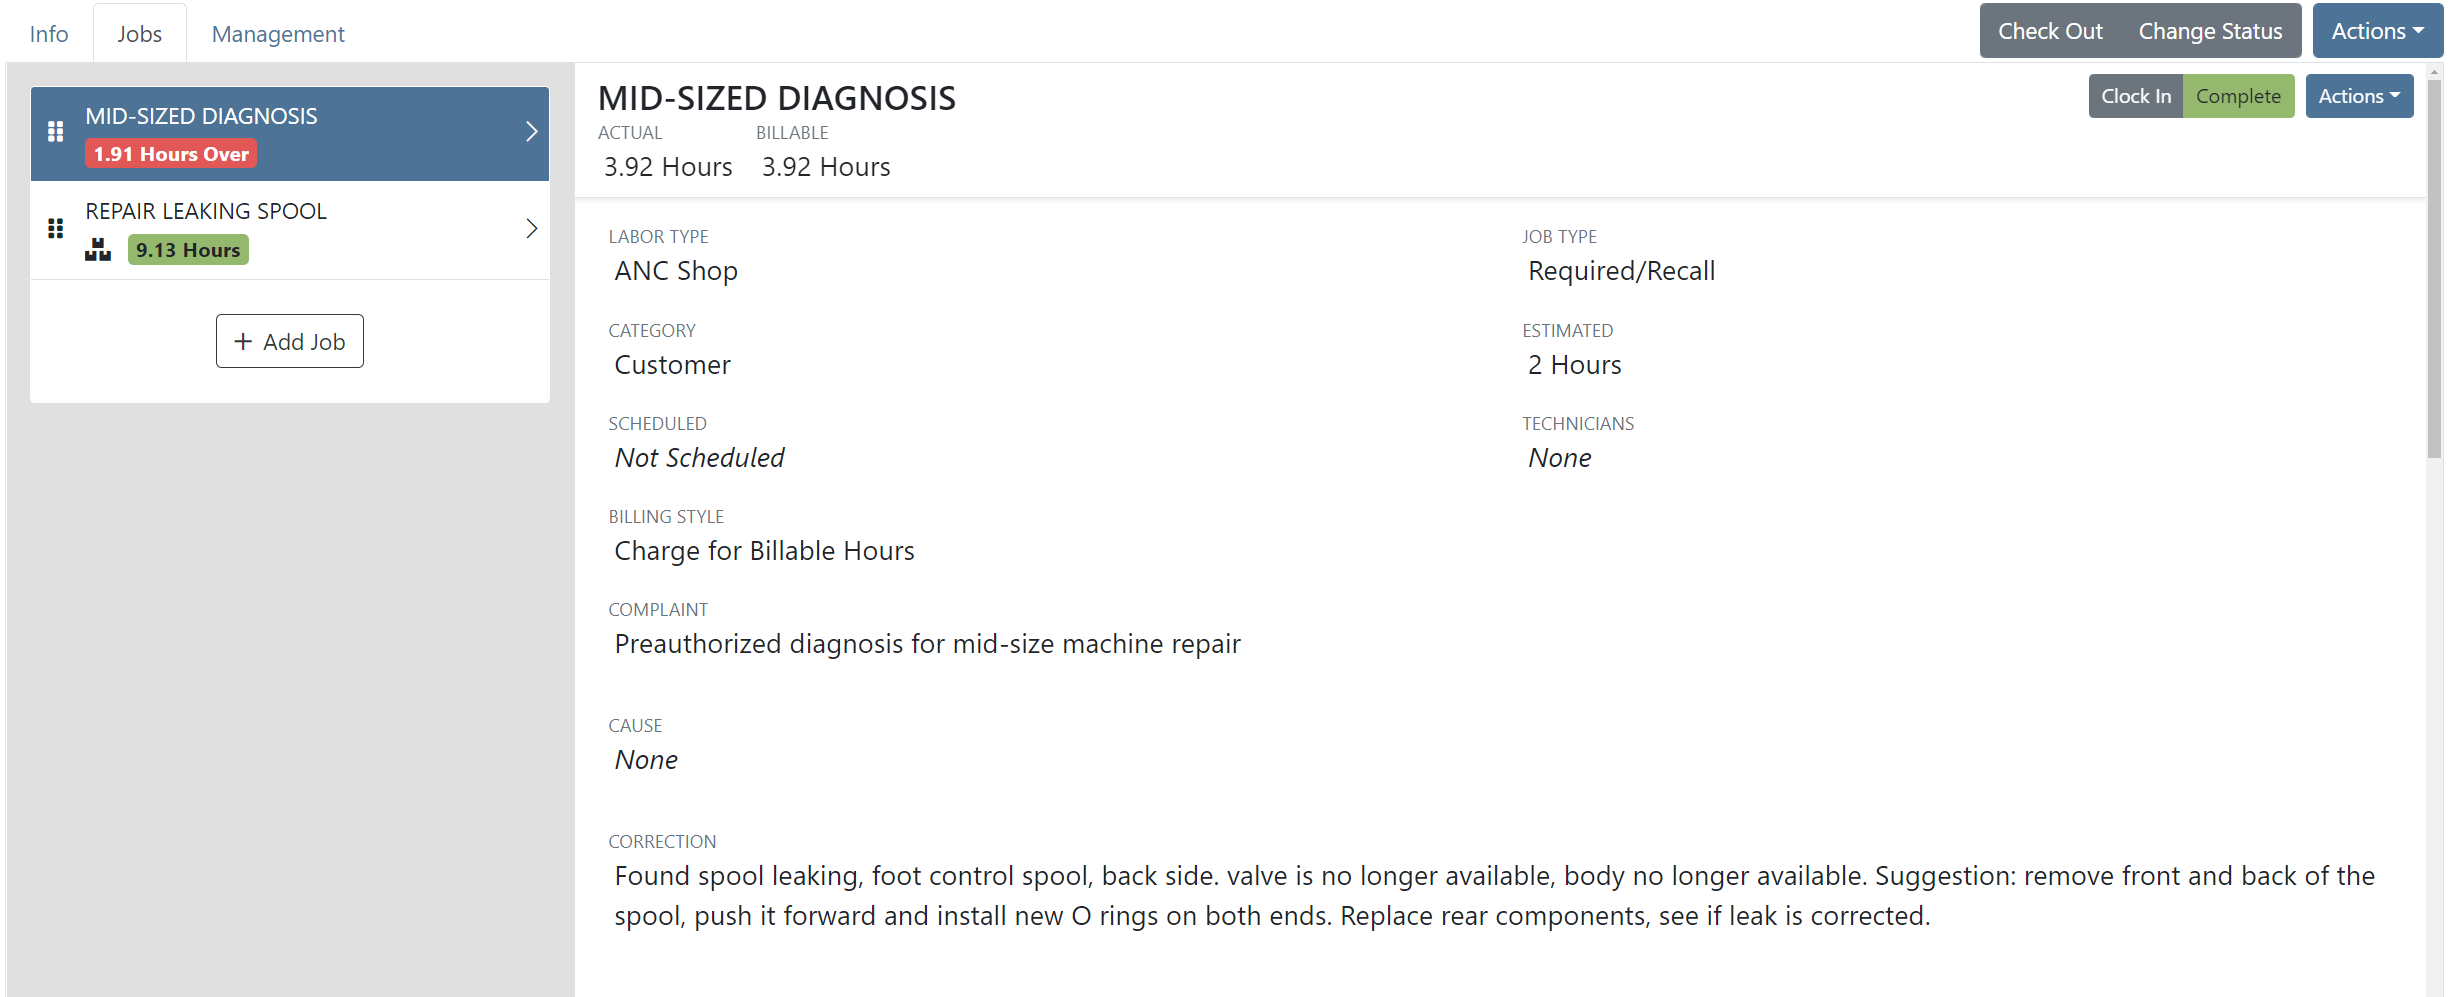
Jobs Tab
Within the jobs tab, you will see all the jobs that have been added to the work order, the status of those jobs, and any details about that job. On the left side of the screen, you will see the list of jobs being performed on the work order. On the right side, will be the selected jobs information.
Adding Jobs
At the bottom of the jobs list, there will be a button to add a job. Clicking that will bring up the following form to input the job data. This is the top half of the form:
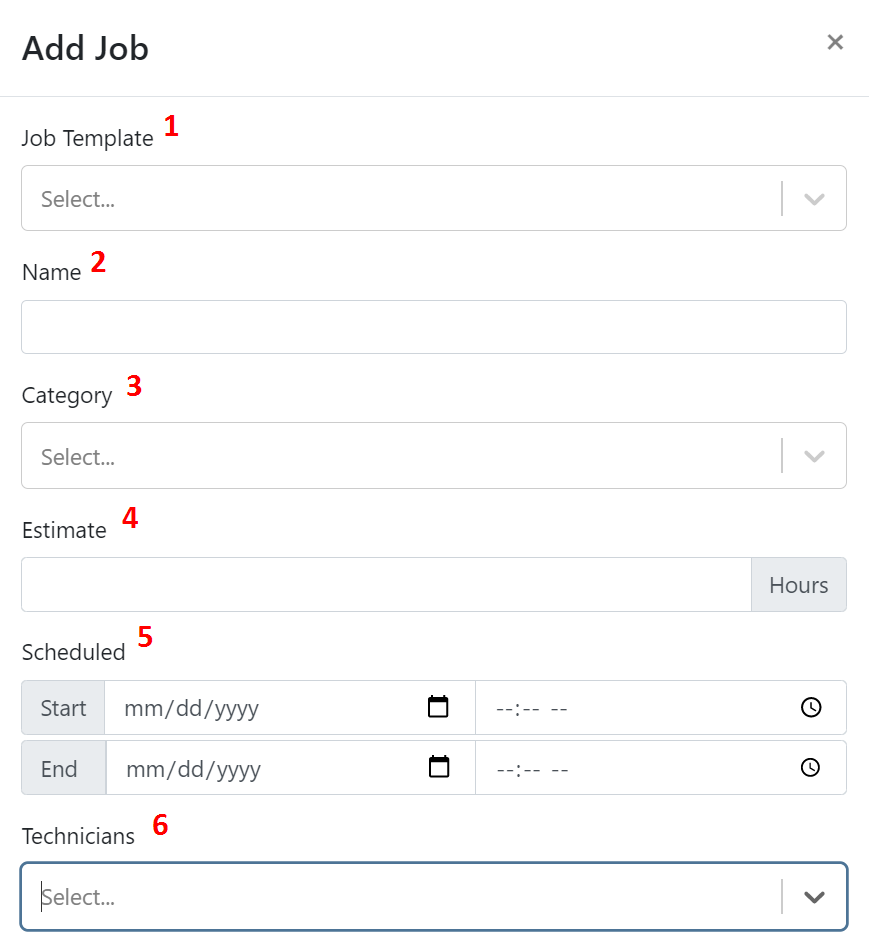
- If you have a template built out for the job you are trying to add, you can search for that template at the top. If there is no template, you can skip this field.
- (Required) The name of the job that is being added.
- (Required) The category that the job falls under
- (Required) The estimated number of hours to complete the job.
- Scheduled dates for the job the be performed.
- List of technicians that will work on the job. We will default this with the technicians assigned to the work order.
The bottom half of the form:
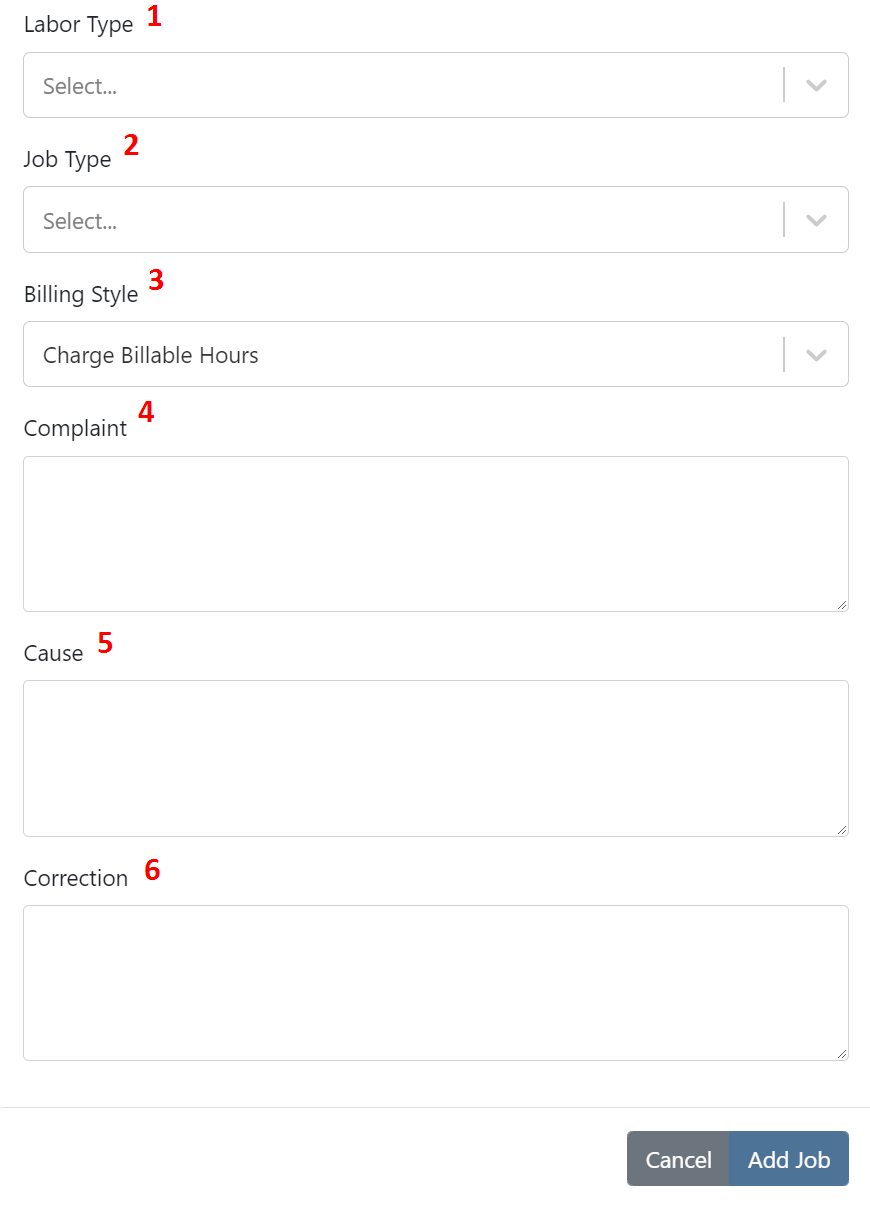
- (Required) The default type of labor to be used on this job.
- (Required) Job type that is being performed.
- (Required) The type of billing style on this job.
- Charge Billable Hours will charge the billable hours put on the labor lines.
- Charge Estimated Hours will charge the hours estimated to complete the job.
- Flat Rate will charge a determined flat-rate amount.
- (Required) The customer's initial concern with the machine and why they are bringing it in
- The technician's analysis as to what is causing the complaint or anything else that they have discovered.
- What the technician did to fix the machine.
Recommended Jobs
We will list all jobs that are being recommended by the vendor of the machine. This currently is only working for John Deere machines but we will incorporate this feature for all other vendors that provide us warranty or recommended service jobs.
Job Icons
We will add icons next to a job on the job list to indicate certain actions that have happened on the job.
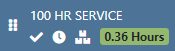
- The checkmark will indicate that the job has been marked as complete.
- The clock icon will show that someone is clocked into the job.
- The stacked boxes mean that there are parts on this job.
Job Information
When you have a job selected, the right side of the page will show the data of the job. When hovering over these fields, they will turn a dark grey. This means that you can edit the information that you are hovering over.

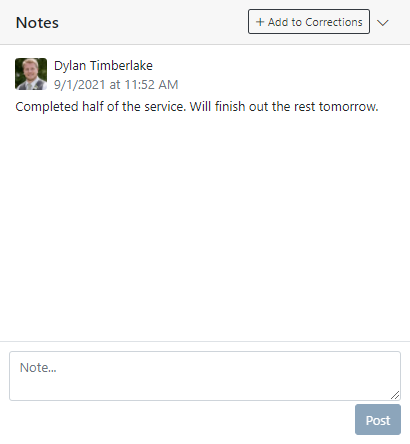
Technician Notes
When clocking out of a job, we will require technicians to punch in notes about what they did in their time while being clocked in. We will then log all these notes along with the date and user who input them into the Notes section. Once the job is complete, there is a button to add those notes to the corrections field!
Parts Ordering
To order parts for a job, you will need to head to the job that will use the parts. From there, head to the parts box and click the + Add button. This will generate an internal parts order to get those parts ordered.
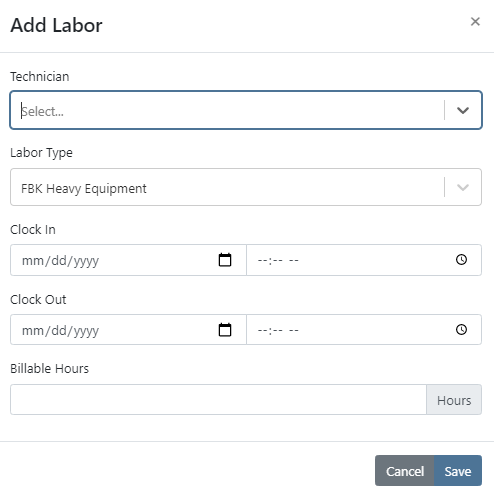
Adding Labor
Just like the adding parts, you will go to the job that will have the labor, go to the labor box, click the + Add button, then input the tech, labor type, and times of the labor.
Files and Associated Forms
Files and forms can be added to the job that they are associated with.
Actions Drop Down
Each job has its own Actions Drop Down.
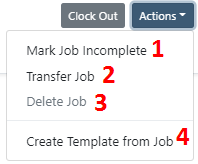
- If the job is marked complete, you can mark it as incomplete.
- You can transfer the job and everything associated with the job to a different work order.
- Allows you to delete the jobs.
- We will take all information on the job and create a job template.
Management Tab
Within the management tab, you will be able to view all time punches and edit, deleted, or add new time punches. From here, you can also view all the financials of the work order.
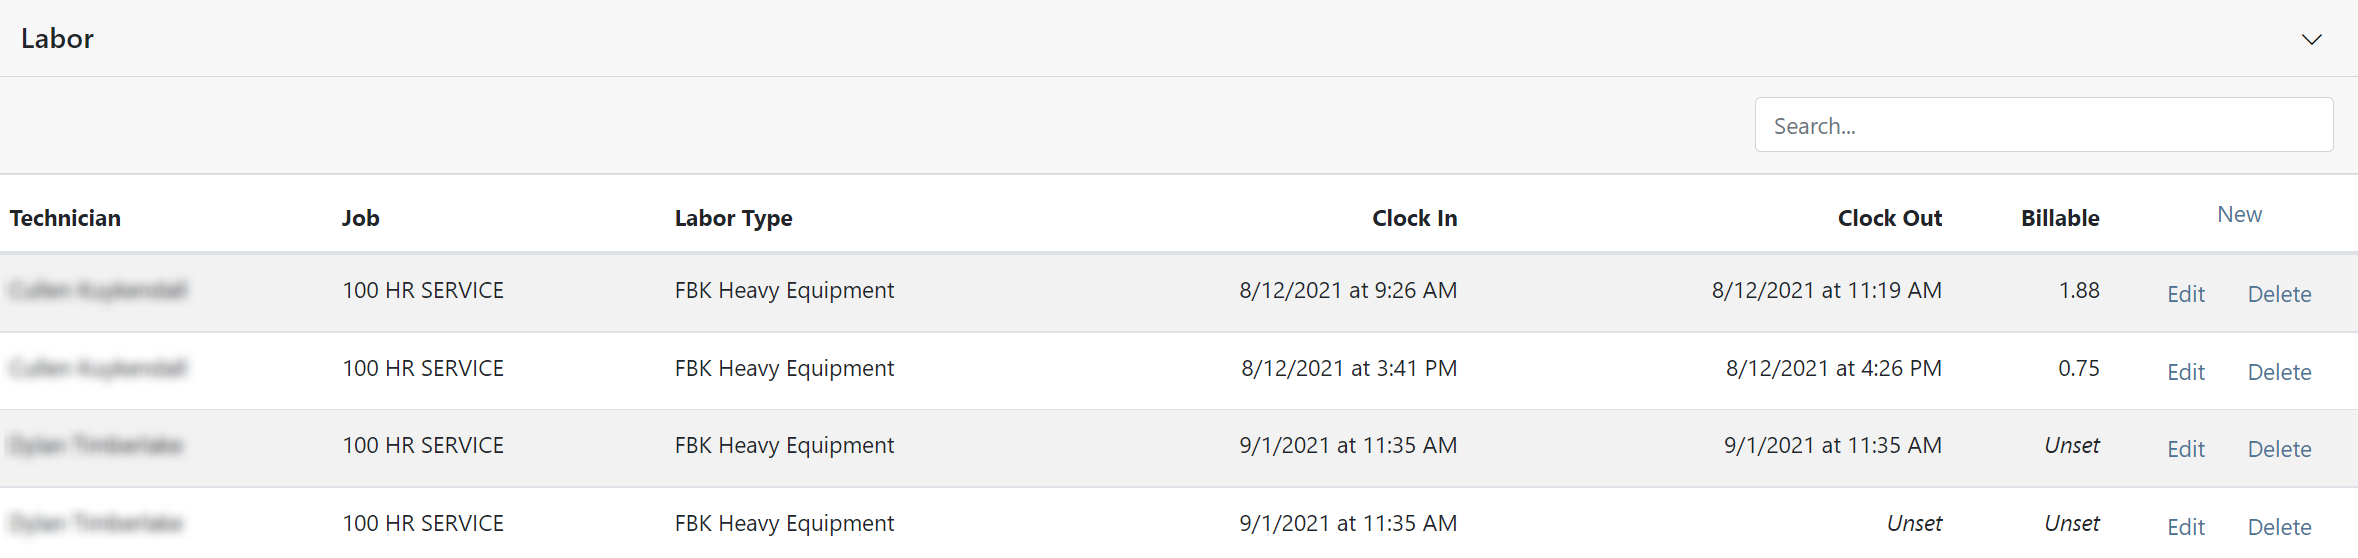
Editing Labor
Our bulk labor editor will make it easy to search for certain labor lines and make any necessary changes. You can edit and remove lines or use the New button in the upper right to add labor lines.
Work Order Financials
Below the bulk labor editor, you will see the Job Finances section. This will contain the revenue, cost, profit, and margin of each job performed. At the bottom of the list will be a total for all the jobs.

Invoicing
Once a work order has been put into Completed status by checking out the machine, you will see the Invoice button in the upper right. If there is something blocking the work order from being invoiced, we will grey the button out and show a pop-up as to why when hovering over the button.
Miscellaneous
Tab Persistence
When loading a work order, we will remember the last tab you were on for a work order and load you directly onto that tab!
Widget Persistence
Closing a widget box will remain closed on every work order you visit until you open it back up!