How Can We Help?
Create Rental Contract
When creating a new Rental Contract in Flyntlok, the process consists of three screens that provide all necessary options for companies to rent out their machines: Rental Creation Screen, Additional Details Screen, and the Rental Contract Screen.
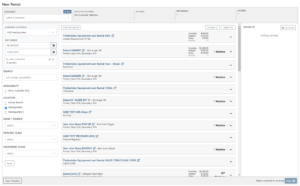
The Rental Creation Screen is the first page in this process, and includes options such as creating new customers, quick display of customer account, insurance, and license information, setting the contract location, searching for a machine by S/N, Model Number, or description, check availability, set Make/Vendor, set Primary and Secondary Class, and contract information. This article covers the Rental Creation Screen, as well as the Additional Details Screen.
The minimal requirements to rent out a machine are selecting the customer, contract location, and setting a date range.
How to Create a New Rental
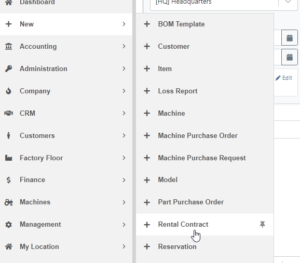
Users can create a new rental by going to their left Nav bar:
- From the left Nav Bar -> New -> Rental Contract
- Once the Rental Contract is clicked, the page will redirect to the Rental Creation Screen
- From here, fill in all the appropriate Customer, Location, Machine, and Rental information before clicking Next
- Then, the page will move to the Additional Details Screen, where you can fill in all the appropriate Contact, General, Billing, Delivery/Pickup, Insurance, and License information before clicking Create Contract
- The page will redirect to the Rental Contract Screen and this newly created contract will include its own Rental ID number
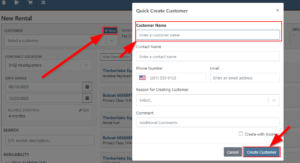
How to Select a Customer or Quickly Create a New Customer
To select a customer, type the name in the Customer search bar in the top left of the Rental Creation Screen.
To quickly create a New Customer, click the + New above the search bar and fill out the Quick Create Customer tab before clicking Create Customer.
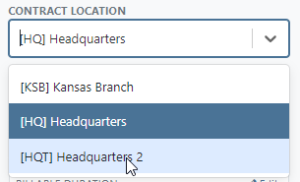
How to Change Contract Location
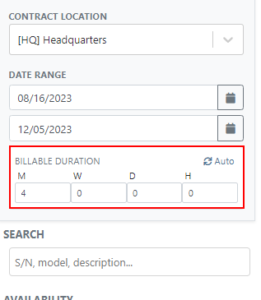
To select Contract Location, select the correct location in the Contract Location search bar.
- This may affect the availability of certain rentable machines if their responsible location is different than the contract location
How to Set Date Range and Billable Duration
To set the Date Range, enter the initial rental date in the first date text box and the return date in the second.
The Billable Duration can be set by clicking edit and then entering the appropriate Month, Week, Day, or Hour.
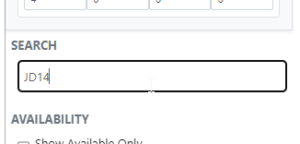
How to Search for a Machine, and Filter Availability
Users can search for the machine in the Search Bar by using either the machine’s S/N number, Model number, or description.
To filter for availability, click the checkbox next to Show Available Only
How to Set Make/Vendor, Primary Class, and Secondary Class
Use the appropriate search bars to select the Make/Vendor, Primary Class, and Secondary Class. Primary and Secondary allow for added categorization of Machines.
- Classes are created when editing Model Information from the Machine dashboards
- From Machine Dashboards -> View Model Info -> (under the Information section) enter classifications in Primary Class and Secondary Class
How to select rentable Machines or rentable Items
To select a rentable Machine or rentable Item, click the arrow in the model description boxes listed in the middle of the Rental Creation Screen. Once clicked, the list of Machines or Items drops down where the quantities can be entered before clicking the Select button.
Machines can be changed to rentable when editing or viewing the Model Information on the Machine Dashboard. From the Machine Dashboard -> Actions tab -> Edit or View Model Info -> change Allow Rent to Yes.
Parts can be changed to rentable when editing or viewing the model information on the Part Dashboard. From the Part Dashboard -> Actions Tab -> Edit -> Check the Item Can Be Rented box.
Note that machines could be either in Available Status or have a Conflict Status, however, listed machines regardless of Status can be selected for a Rental Status. The machine’s availability depends on if the machine is reserved during a conflicting time set by the contract’s Date Range.

How to go to Machine Dashboard, Item Dashboard, or View Model Info
The rentable Machine and Item dashboards are accessible from the Rental Creation Screen by clicking on the listed hyperlinked Model Number and Item Descriptions, or dropping down and clicking on the specific Machine ID number.
Additional Details Screen
Once all Customer information, Machines and Parts are added and reviewed on the Rental Creation Screen, click the Next button to continue to the Additional Details Screen. This page includes all Contact, Insurance, Delivery/Pickup, Billing, and other General information. Click the Select from Contacts button to choose premade Contacts for this customer. Note that all default Contact information comes from whichever Primary Contact is set for that customer.
The selected Machines and Parts are listed to the left can be deleted and include links to their dashboards.
After all information is correctly entered and reviewed on the Additional Details Screen, click the Create Contract button to go to the Rental Contract Screen, the last step.