How Can We Help?
Rental Contract Screen
Once the Rental Creation Screen and the Additional Details Screen are completed, click the Create Contract button in the lower right to move to the Rental Contract Screen. The Rental Contract Screen organizes all rental information under the Info tab and tracks the rental flow under the Contract tab. Each Rental Contract will have its own Rental ID displayed in the top left of the page, along with the customer, and date/time below. The top right of the Contract page will include the Contract Status, Location, Estimated Billable, Billed Duration, and Invoiced Amount.

Contract Tab
The Rental Contract Screen initially appears on the Contract tab. This tab includes Rental Contract Details, Notes, Invoices, Estimated Totals, options to Add Machines and Items as well as Machine and Item Lines. All Machines and Items added to the Rental Contract are listed in the middle section of the Contract tab, and highlights their Reserved, or Checked Out/In status.

Contract Status and Actions tab
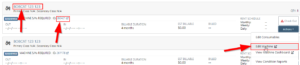
Information displayed in the top right of the Rental Contract includes Status, Location, EST Billable, Billed Duration and Invoiced amount. Contract Statuses change throughout the contract process, i.e., if the Contract has not yet been reserved, the machines appear in Draft status and the option to Reserve Contract appears at the top right of the page as well as under the top Actions tab. Once Reserve Contract has been clicked, the option to Check Out machines appears and the Contract and Machine statuses change to Reserved. If no Machine has been checked Out, the top Actions tab has the option to Revert to Draft once Reserved.
![]()
The default Location that displays on any Rental Contract is the creator’s user location. The location of the Rental Contract can be changed when editing the General section of the Info tab.
The Est Billable amount is the accumulation of all Est Billable amounts for every machine, which is calculated by applying the Billable Duration to the appropriate Rent Schedule Rates.
The Billed Duration is the total amount that has already been billed to the customer through Invoices. The Billed Duration can be calculated by adding all Billed amounts from each machine line. The Billed Duration exempts fees and taxes in its calculation.
The Invoiced Amount is the total of all Invoices that is listed in the Invoice section under the Contract tab. This calculation may include Fees as well as Taxes.
The top Actions tab also includes options to Call Off the contract, Create Invoice, Close Contract, Reopen Contract, Print/Email Lease Agreement, Request Signature, Scan Barcode, View Logs, Force Refresh, Cancel Contract, and Edit Keyboard Shortcuts.
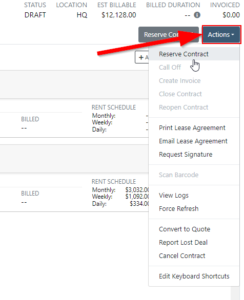
If Print or Email Lease Agreement is clicked, the page will redirect to the option to either Email or Print a Lease Agreement that includes all Rental/Lease Agreement information such as Customer, Date, Estimated Billing Duration, Machine, and Estimated Total information.
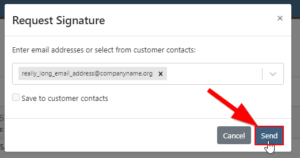
If Request Signature is clicked, then a Request Signature tab will open with the option to enter an email address or select from customer contracts that, once Send is clicked, an Email Signature Request will be sent out. This Email Signature Request will include a link for the customer to easily View/Sign and then Submit.
The View Logs will redirect to another page that includes a list of all actions done to the Rental Contract. Click Force Refresh to update Machines on the Rental Contract if edits were made on other pages.
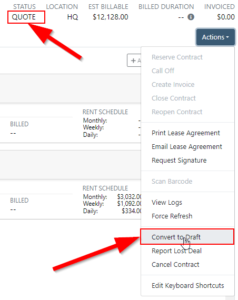
Click Quote under the Actions Tab to change the Rental Contract to a Quote. The Status at the top of both the Rental Contract page and the PDF version of the Contract will change.
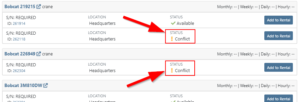
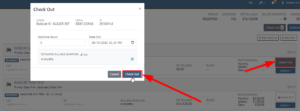
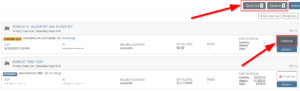
If a Machine listed is either in Reserved status, then there will be an option to Check Out machines in the top right of the Rental Contract Page. The Check Out button will include how many machines that are available to be checked out. Once clicked, a Check Out tab will appear with options to select available machines by clicking their checkmark boxes. Review all Machines’ Date Out, Machine Hours, Estimated Billable Duration, and Consumables prior to clicking Check Out selected, and the Rental Contract Status will change to Active.
If there is a conflict with the machine, the option to Check Out may be omitted and will show this in red letters. To view the reason why blocked, click the Cautionary Check Out button from the Rental Contract Page. All conflicts, such as Work Orders, or other Reservations must be resolved or completed before the machine can be checked out. Any machine of On Order status will also show as a Conflict machine.

After Checked Out, the status of the specific machine will change to Checked Out and the Rental Contract status will change to Active, and an option listed above will include a Check In button, with the number of total machines available to be checked in, as well as a Check In button on the machine line.
Details, Note, Invoices, and Estimated Totals
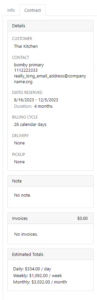
The left side of the Contract page includes all Contract Detail information such as the Customer, Contact, Dates Reserved along with the total Duration, Billing Cycle, and if there’s Delivery or Pickup information as well. Underneath this are all Contract Notes. To edit any of these details or write a note, just click into the areas and type the correct information.
The Invoice section includes all Invoices that cover any part of the contract’s Billing Period. The Invoice section will include a hyperlinked Invoice Number that, once clicked, redirects to the linked Sale Order. This section also includes each Invoice’s total amount and the Billing Period which it covers.
Just below, all Invoices are listed as well as the Estimated totals for each Rent Schedule time period. The Estimated Totals are calculated by combining all Daily, Weekly, and Monthly costs from each Machine’s Rent Schedule.
Machines
The Add Machine and Add Item buttons are located in the top right of the Contract Tab. By clicking one of these, a Machine or Item searcher appears. The Machine searcher provides location, vendor, primary and secondary classifications to ease your search. Once Add to Rental is clicked, the machine or item will add to the machine list in the main part of the Contract tab.
- If a Machine has a conflict, this will also be reflected in the Add Machine tab
All Machine or Item Lines that are listed will include a hyperlinked description and ID number, classes, its statuses, S/N, Quantity chooser, Out and In information, individual Billable information, Rent Schedule, Check Out and Actions Tab. These hyperlinks allow for quick access to both the item or machine dashboard as well as the machine model page.
To Check Out an individual Machine, click Check Out on the right side of the Machine Line. Once clicked, enter all Machine Hours, the Date Out, any Consumable or Estimated Billable Duration, in the Check Out tab and the machine’s status will show Checked Out. To change the Item/Machine’s Out, click into the Out area to open up the Edit Line Check Out tab. This tab allows edits to Machine Hours, Date Out, and Consumables prior to Saving Changes. Note that a machine must be in Reserved Status in order to check it out.
To Check In an individual machine, click Check In on the right side of the Machine Line. Once clicked, enter all Machine Hours, the Date In, Consumables, and the Billable Duration before clicking Check In. The Check In tab also has an option to Reassign the Check In location. Once completed, the Machine status will show Checked In as green.
The Billable Duration is calculated by the difference between the Out and In date/time. Users can manually edit the Billable Duration by clicking into the Billable Duration area and typing the time period into the Edit Line Duration tab prior to Saving.

The Est Billable calculated by applying the Rent Schedule costs to the Billable Duration. The Est Billable listed in the top right of the Rental Contract combines all individual machine/item Est Billables.
The Billed amount listed in each Machine/Item line is the amount billed covering rental costs of this specific machine for the duration shown when hovering over the [picture of i icon].

The Rent Schedule can be set by clicking in the Rent Schedule area on each Machine/Item line. The Edit Line Rental Schedule tab includes an text to apply a Schedule Template. Templates are set when editing the Item Dashboard or viewing the Machine Model page. Go to the Rental Administrative Settings Page [Hyperlink] for further information on creating a Rental Schedule Template.

A custom Rental Schedule can be created for a machine by filling out all time period rates and allowed times, Overage Rate, and Minimum Cost. This tab allows to create Rental Schedule as a new template, as well as apply a discount. Once saved, the Rent Schedule for that machine/item will update, as well as the Est. Billable, and Estimated Totals.
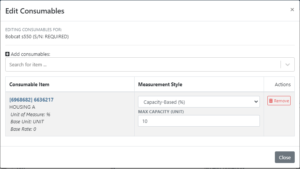
The Actions Tab on the right side of each Machine/Item Line includes options to Reverse Check Out/In, Edit Consumables, Edit Machine, View Machine Dashboard, View Condition Reports, Convert to RPO, Call Off, Reverse Call Off, and Remove Machine.
Clicking Reverse Check In or Out will undo the Check In or Check Out of that specific machine.
![]()
Edit Consumables allows users to change or add Consumable items as well as their Measurement Styles directly from the Rental Contract.
Click the Edit Item/Machine or the View Item/Machine Dashboard to redirect the page to the Machine/Item Dashboard or Edit page.
Click View Condition Reports to open the Condition Reports tab, which includes either Outbound or Inbound reports.
Click Convert to RPO to convert the Rental Agreement, specifically the machine on the rental agreement, to a Rental Purchase Agreement.
Click Call Off to call off the specific Machine on the Rental Contract. The machine will remain listed on the contract, however in Called Off status, and Reverse Call Off will return the machine to Checked Out status.
Clicking Remove Item/Machine will remove the Machine/Item from the contract all together.
Info Tab
The Info tab on the Rental Contract includes all Contract information, and also is all editable. This information includes all General information, Contract Dates, Delivery, Pickup, Billing, Insurance, License, and Files. Click Edit in the top right of each section to change any of its information. Once done with editing, click Save at the bottom of the section.
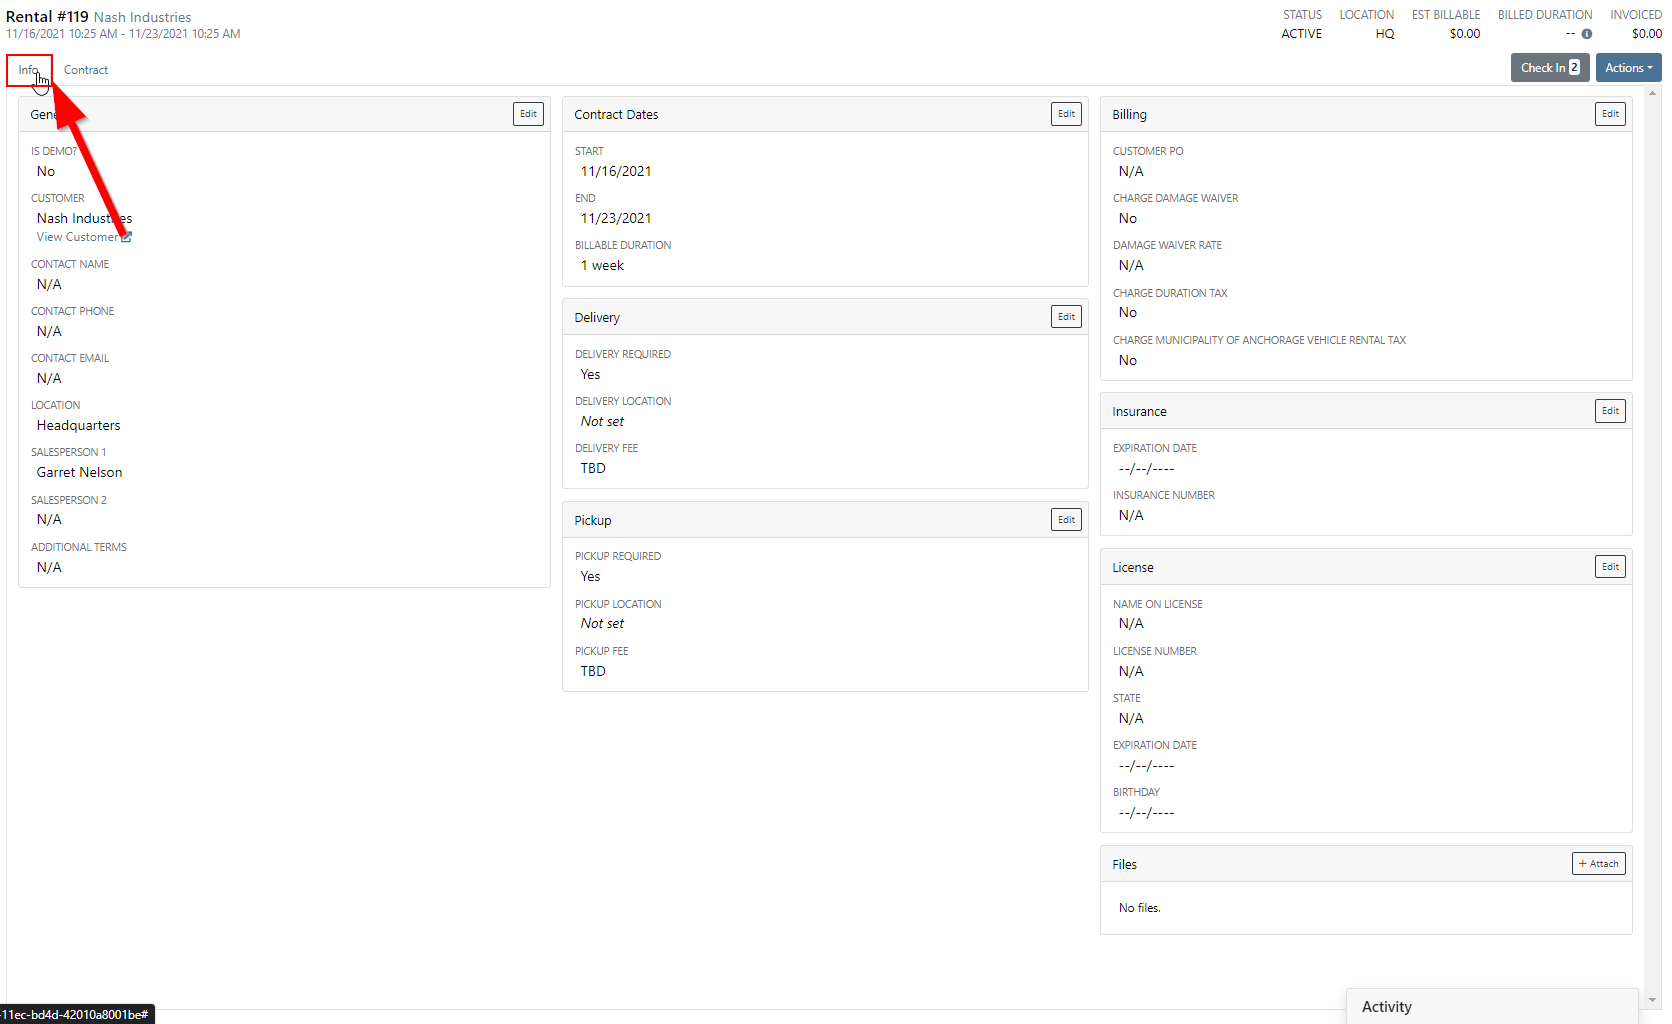
All General Information includes Customer, Contact Name, Contact Phone, Contact Email, Location, Salespeople, or Additional Terms.
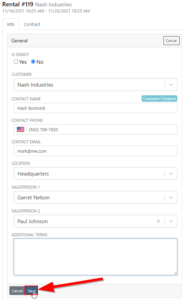
Contract Date information includes Start, End, and Billable Duration.
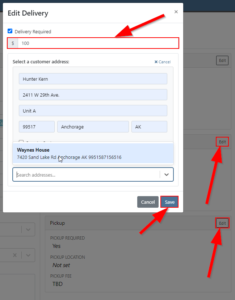
Delivery Information includes if a Delivery is Required, its Delivery Location, and if it has a Delivery Fee.
Pickup Information includes if a Pickup is Required, its Pickup Location, and if it has a Pickup Fee.
Billing Information includes the Customer PO, Charge Damage Waiver, and Damage Waiver Rate.
Insurance Information includes Insurance Expiration Date and Insurance Number.
License Information includes Name On License, License Number, State, Expiration Date, and Birthday.
When clicking the + Attach button in the Files section, a tab to Upload Files includes an area where any files pertinent to the Rental Contract can be dragged or selected, then uploaded. Each uploaded file is listed in the Files Section.
