How Can We Help?
CRM
Office365 Emails on Locations and Users
Opportunity
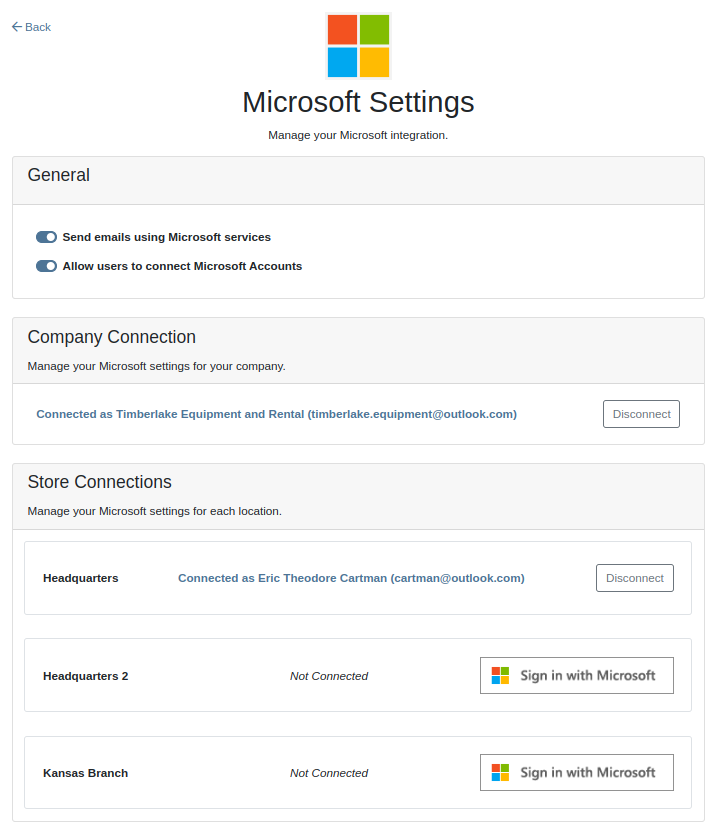
Flyntlok users previously faced limitations with our Microsoft email integration, as it only supported configuration at a company level and for a single email account. This made managing communication with customers challenging, especially when replies and conversation threads needed to be organized among various employees and store locations. Users required the ability to connect multiple Microsoft email accounts at both user and store location levels to improve efficiency and communication management.
Solution
Flyntlok now supports the connection of multiple Microsoft email accounts at both user and store location levels, in addition to the corporate account. This enhancement allows for more flexible and efficient email communication directly from Flyntlok.
Key Features
- Updated Microsoft Settings Page
- Added configuration options for Microsoft email accounts at store locations.
- Introduced a setting that allows users to connect their Microsoft accounts, controlled by the "Allow users to connect Microsoft Accounts" switch. When enabled, users will be able to configure their Microsoft account.
- Updated User Settings Page
- Added configuration for user’s Microsoft email account.
- Only visible to users if the "Allow users to connect Microsoft Accounts" setting is enabled by the administrator.

- Updated UI elements to support the new functionality
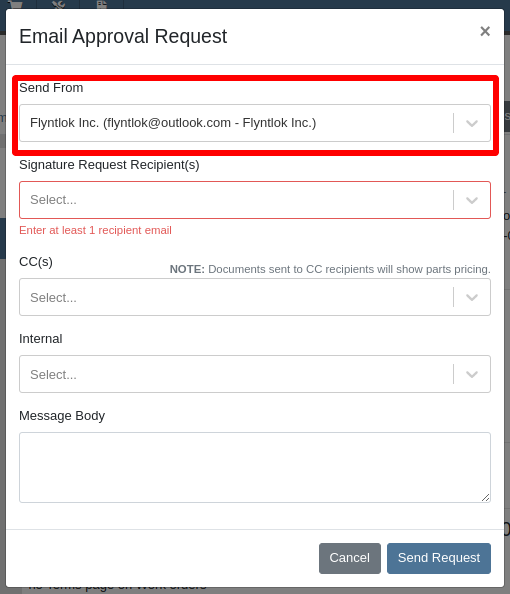
- Added a "Send From" field to all email forms, allowing users to select the desired Microsoft email account when sending emails.

Integration Setup:
To connect Microsoft email accounts to store locations follow this steps:
- Access the “Integrations” Page
- Click on the wrench icon on the Navbar
- Navigate to “Flyntlok” section and click on “Integrations“ link.
- Locate the “Microsoft” card and click on the “View Microsoft Settings” link.
- Choose the location you want to connect to your Microsoft email account
- Click the “Sign in with Microsoft” button and complete the authentication process as guided by Microsoft.
To connect a Microsoft email account to a user’s profile follow this steps:
- Access the “Profile Settings” Page
- Click on your name on the Navbar
- Navigate to “Preferences”
- Locate the “Profile” card and click on the “View Your Profile” link.
- If the "Allow users to connect Microsoft Accounts" setting is enabled, users are able to navigate to the “Microsoft Email Account” setting.
- Click the “Sign in with Microsoft” button and complete the authentication process as guided by Microsoft.
Daily Task Due Reminders
Opportunity: It can be oh-so-hard to remember all the tasks that are due and need immediate attention! There is no way currently to receive reminders about tasks that are due soon without going to the tasks grid and checking it yourself. (Sometimes you need to create a task to remind yourself to review your tasks.) There is a need to receive reminders about due tasks so that important work is not missed.
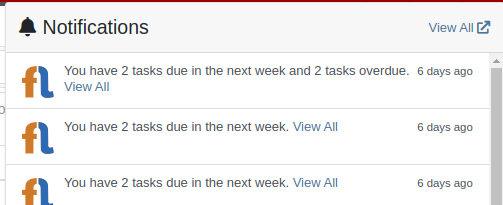
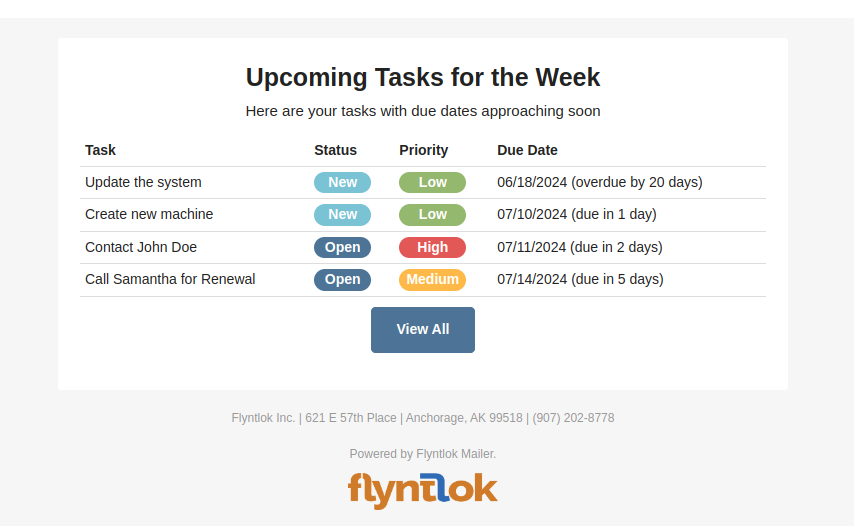
Solution: We have added a new notification for “Due Task Reminders” which can be enabled by navigating to Preferences -> Notifications -> CRM

If this notification is turned on, Flyntlok will send a report about all the tasks assigned to you that are due within the next week at the end of each day. This will help users to stay up to date on their progress and avoid missing out on important tasks. Based on the selected medium (Email, SMS or notification) the notification may look slightly different.
Click to Call or Email on Customer Dashboard [#53648]
Opportunity
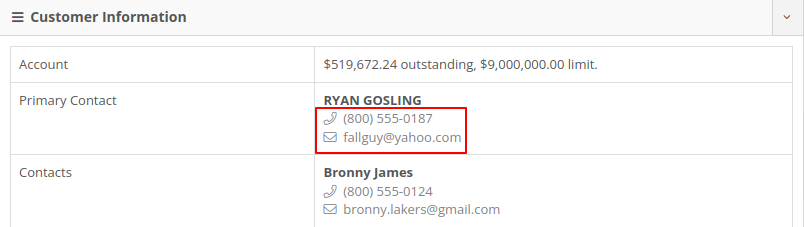
Users managing contacts on the Customer Dashboard have requested the ability to click to call/email their contacts listed in the Customer Information panel.
Solution
The Customer Dashboard has been updated to have links for calling and emailing in the Contact and Primary Contact sections. By clicking on a listed phone number or email address, a phone call or email can be initiated right from the Customer Dashboard.
Saved Cards on Customer Dashboard [#53851]
Opportunity
Users managing customers’ saved credit cards have requested an indicator on the Customer Dashboard that displays if a customer has credit cards on file.
Solution
The summary section of the Customer Dashboard has been updated to display the status of a customer’s saved credit cards. The icon will indicate if all credit cards are valid, if any card has expired, or if a customer has no credit cards.


Service
Parts Used On Work Orders
Opportunity
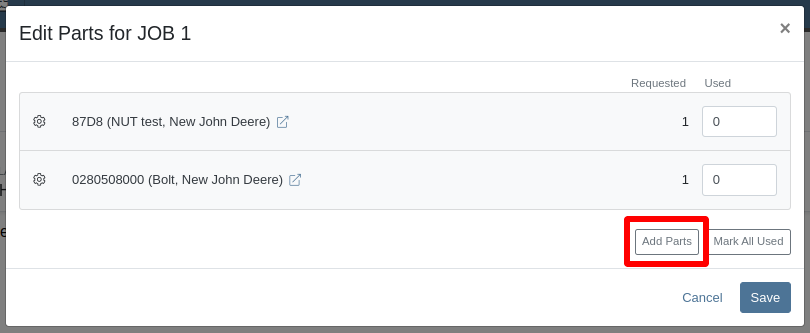
The current implementation of the “Parts Used” modal on the desktop-version of Flyntlok supports marking parts that have already been requested as “Used”. This multiple-step process requires technicians to request parts first and then navigate back to log the quantities used, which can be cumbersome. There is a need to streamline this process to improve efficiency and reduce the number of steps required.
Solution
The “Parts Used” modal on the desktop-version of Flyntlok has been updated to allow technicians to add and mark additional used parts directly within the same step. This feature simplifies the parts management process, reducing the number of clicks and streamlining the workflow for technicians.(N.B. This feature already existed in the mobile version of Flyntlok)
Key Features:
- Add Parts Button: A new button within the "Edit Parts" modal allowing users to search and add parts.
- Parts Searcher: Displays parts and their availability from the Work Order’s location.
- Additional Parts List: A list of additional parts with an input field for the used quantity.
Inventory Management Details:
- In-stock Parts: When additional in-stock parts are added, an Internal Parts Order is created and fulfilled immediately, moving the Order to “Delivered” status once saved in the "Edit Parts" modal.
- Out-of-stock or Insufficient Stock Parts: An Internal Parts Order is created and fulfilled as much as possible. The Order moves to “Pending” status until the Parts Department orders, receives, and fulfills the parts.
How to add an additional used part:
1. Click “Edit Parts” in the “Parts” section of the job page.

2. Click “Add Parts” in the modal to open the parts searcher
3. Search for a part and select it.
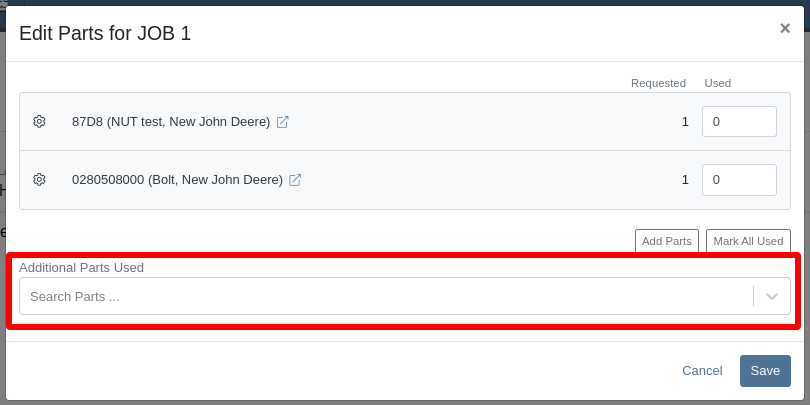
4. Set the used quantity for the selected part
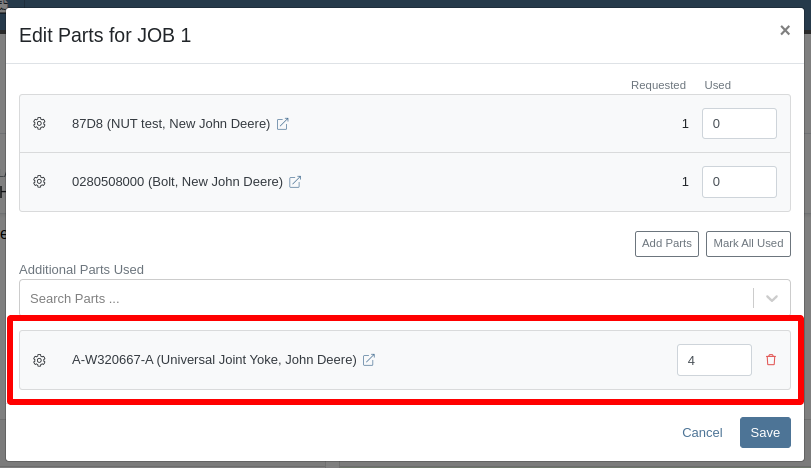
5. Repeat steps 3 - 4 to add more parts.
6. Click "Save" to finalize.
Currently Viewing Work Order
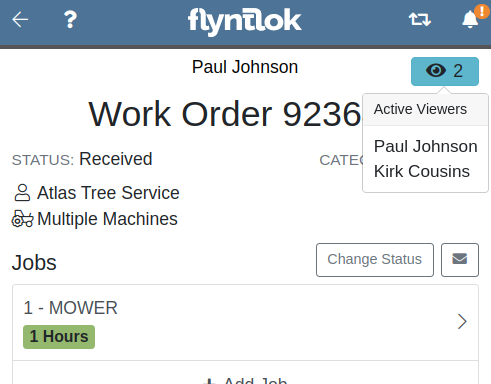
Opportunity: Technicians often face workflow conflicts when multiple users inadvertently work on the same Work Order simultaneously. This can lead to inefficiencies and errors. By providing real-time visibility of users currently viewing a Work Order, Flyntlok can significantly improve coordination and prevent such conflicts.
Solution: The Activity panel on the Work Order Dashboard has been updated to display the users who are currently viewing the same Work Order. Flyntlok does not prevent two people from editing the same Work Order, but the system will alert you to other simultaneously viewing users.
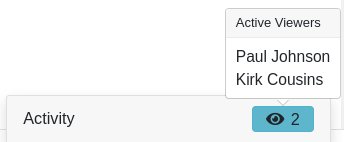
The Active Viewer list applies to users viewing the Work Order across both Mobile and Desktop platforms.
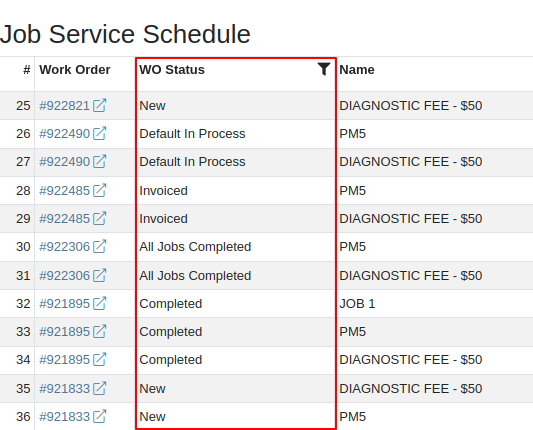
Work Order Status on Job Service Scheduler [#53355]
Opportunity: Service managers have requested the ability to view a Work Order’s status on the Job Service Scheduler. This would enable Service Managers to better organize their jobs table, streamlining the job scheduling process.
Solution: We added a new column for the Work Order status on the Job Service Scheduler. The column can be sorted and filtered as well.
Forcing Machine Down on Work Order Creation [#52227]
Opportunity: Service Managers have requested the ability to force a machine down on Work Order creation. This way the machine’s status will be set to ‘Down’, regardless if work has started on it.
Solution: We have added this as a setting in Flyntlok Settings. This setting can be found under the Service section, titled “Force Down Machine on Work Order Creation''. With this option enabled, checking ‘Force Down’ on the New Work Order page will update the machine's status to ‘Down’ when the Work Order is created.
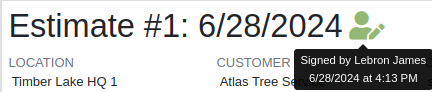
Signee Information on Work Order Estimates [#53231]
Opportunity
Service Managers would like to see who signed a Work Order Estimate and when they signed it. Previously, a green icon with a message ‘Customer Review Complete’ would be the only indicator that an estimate was signed.
Solution
We have updated the displayed text for the green icon to show when an estimate was approved and who signed off on it.
Cause and Correction on Work Order Job Templates [#53445]
Opportunity: Managers requested the ability to save Cause and Correction to Work Order Job Templates. One example for needing this is to make these Job fields populate exactly as needed for Warranty work, eliminating the variability of a technician’s entries.
Solution: Users are now able to add and edit Cause and Correction on the Work Order Job Templates page. These fields will populate on the Job when added via Work Order creation or Work Order Dashboard.

Primary Contact on Work Order Printouts [#53529]
Opportunity: Service Managers would like to see a customer’s Primary Contact on their Work Order print out, regardless of the contact that is set on the Work Order.
Solution: We have updated the Work Order print out to display the customer’s Primary Contact in the ‘Bill To’ section. If the Primary Contact is the same contact that was selected on the Work Order, the print out will appear the same as before.

Sales
OPEHub Integration
Opportunity: Salespeople at Toro dealers have requested the ability to access real-time inventory data from Flyntlok within OPEHub. (OPEHub is a third party quoting and reference sales tool used by Toro dealers. If you are a Toro dealer and are interested in OPEHub, please contact them at drew@opehub.com.)
Solution: We have implemented an integration for OPEHub that allows users to view the inventory details of specific models from Flyntlok.

Integration Setup
To connect OPEHub to Flyntlok follow this steps:
1. Access the Integrations Page within Flyntlok.
- Click on the wrench icon on the Navbar
- Navigate to “Flyntlok” section and click on “Integrations“ link.
- Locate the “OPEHub” card and click on the “View OPEHub Settings” link.
2. Choose the location you want to connect to OPEHub.
3. Generate a token by clicking the "Request New Token" button. This will populate the Access Token field.
4. Click on the “Copy Access Token” button to copy the Access Token.
5. Link your Vendors to OPEHub supported Manufacturers
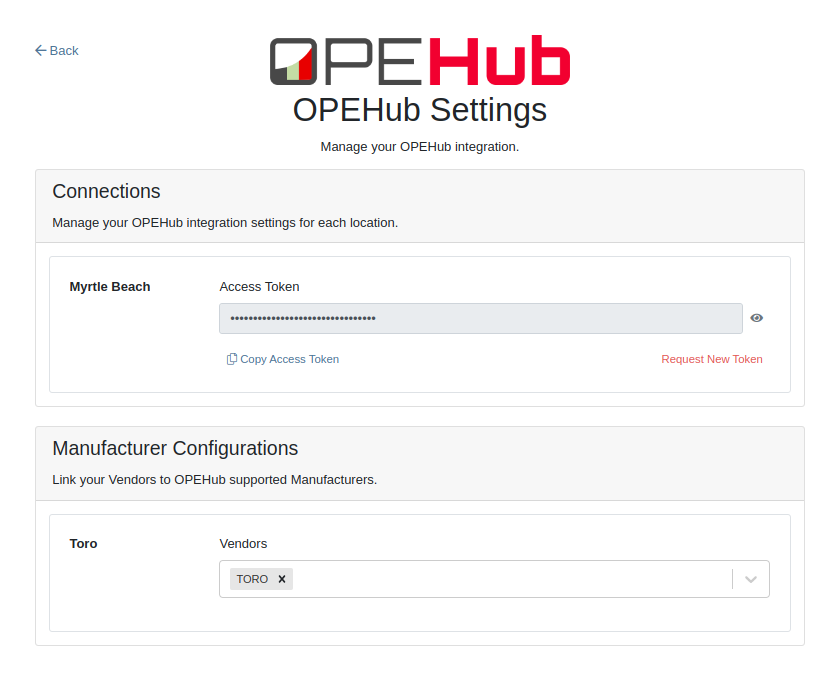
6. Connect to OPEHub
- Log in to your OPEHub Account.
- Go to Inventory Settings and paste the access token from step 4 to the “Flyntlok Key” field.
- Click on the “Save key” button.

Machines
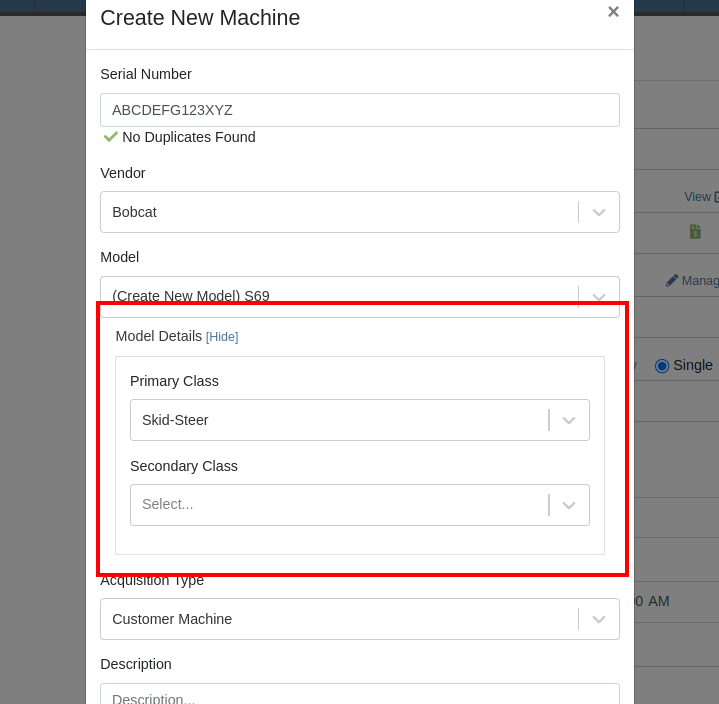
Set Classes on New Machine Creation
Opportunity:
Service Technicians and Managers have requested the ability to assign classes to a Model when creating a new Machine with a new Model. Doing this currently requires that the user first create the Machine, then go to the Machine Dashboard, then click on the Model Editor, and then finally set the Primary and Secondary Class options there. Being able to do this at the Machine creation step would save the user time (and clicks!) for shops who require classification of Models.
Solution:
We have added Model Primary Class and Model Secondary Class fields to Machine creation on these pages:
- New Machine
- New Work Order > "+ New" Button above "Machine"
- Work Order Dashboard > Info Tab > Edit Machine > Create New Machine
A new "Model Details" section will show after typing in a new Model name and choosing to create it. The selected Class options will be applied to the Model immediately when created.
Redirect on Model Creation [#53540]
Opportunity: Users creating models would like to be redirected to their new model on creation from the Add a New Model page.
Solution: We have updated the Add New Model page to redirect to the newly created model. This should streamline model editing after creation for things like Rental or Maintenance Schedules which cannot be set until a model is created.
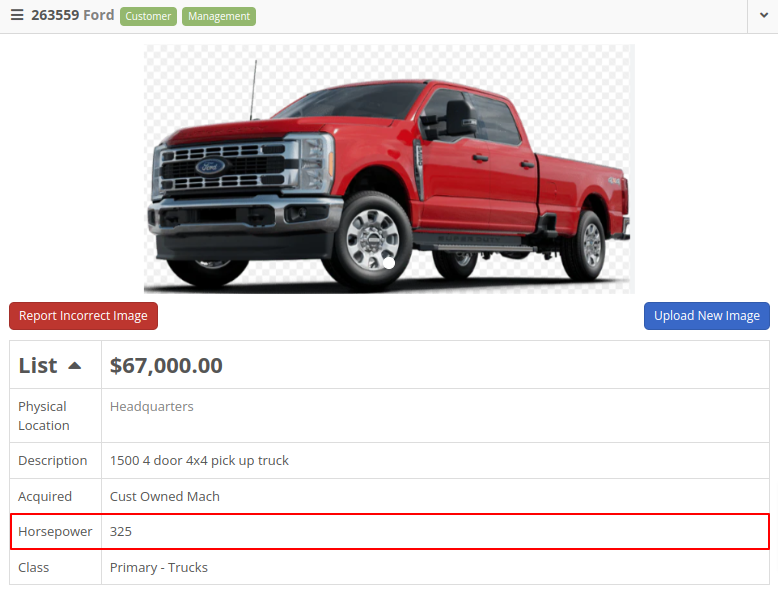
Model Horsepower on Machine Dashboard [#54043]
Opportunity: Users managing machines would like to see the model’s horsepower on the Machine Dashboard. This information can be useful to salespeople who want to get more machine information at a glance.
Solution: The Machine Dashboard has been updated to display the horsepower of a machine’s model. This value must be edited at the model level, but will display on any machines of the model.
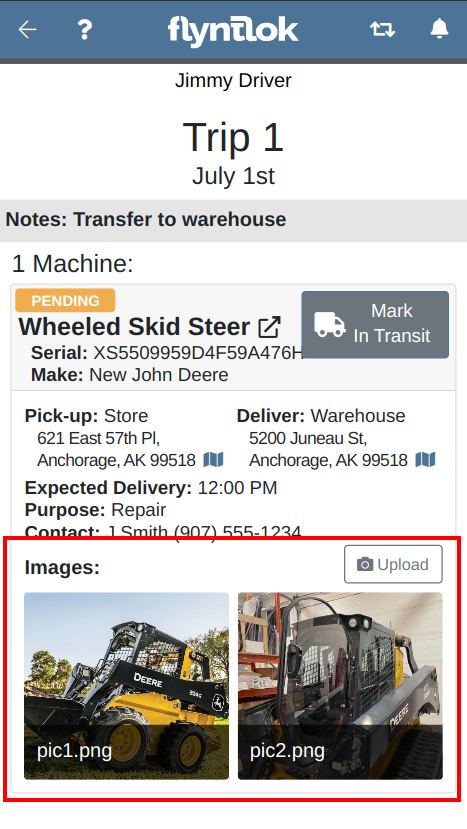
Moves
Upload Pictures on Moves
Opportunity: Managers requested the ability for drivers to upload pictures for pickups and drop-offs. This is intended to facilitate the documentation of machine conditions and improve transparency and accountability during the moving process.
Solution:
Mobile "My Trips" View: Users can now upload pictures directly from their mobile devices via the "My Trips" section. Uploaded images will be displayed in a gallery-like format, providing a visual record of machine conditions at pickup and drop-off. To upload a picture, click on the "Upload" button in the Images section:
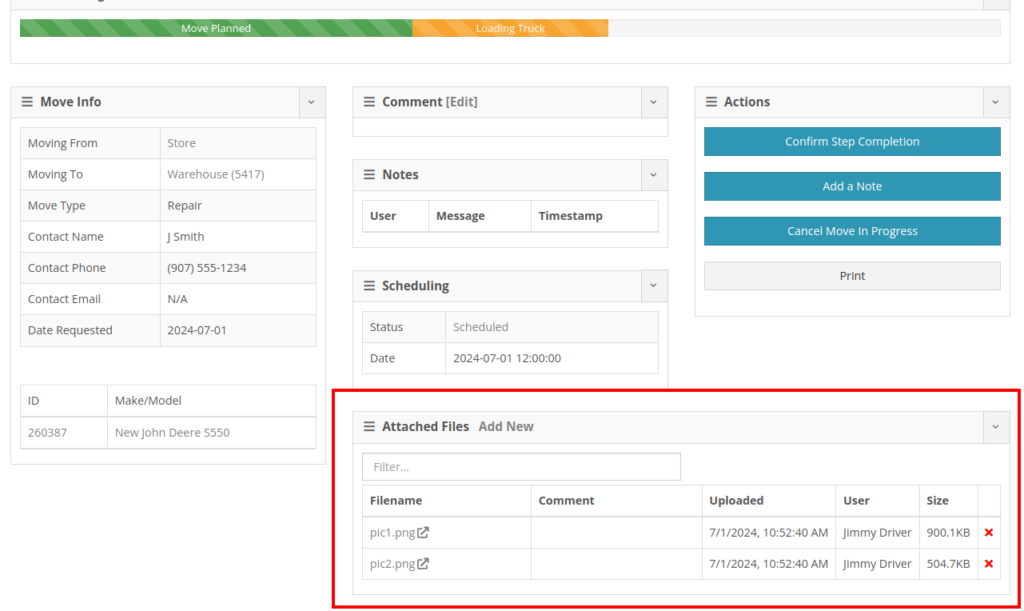
Desktop Moves Dashboard: Users can manage the files when viewing Moves on desktop. Additionally, other accepted file types (such as PDF) can be attached.
Reservations
Allow Editing "Is Open Ended" Field on Reservations [#53731]
Opportunity: Users have requested the ability to change a Reservation’s “Is Open Ended” field after the reservation has been created.
Solution: Implemented an editor for “Is Open Ended” on the machine Reservation dashboard page.
Accounting
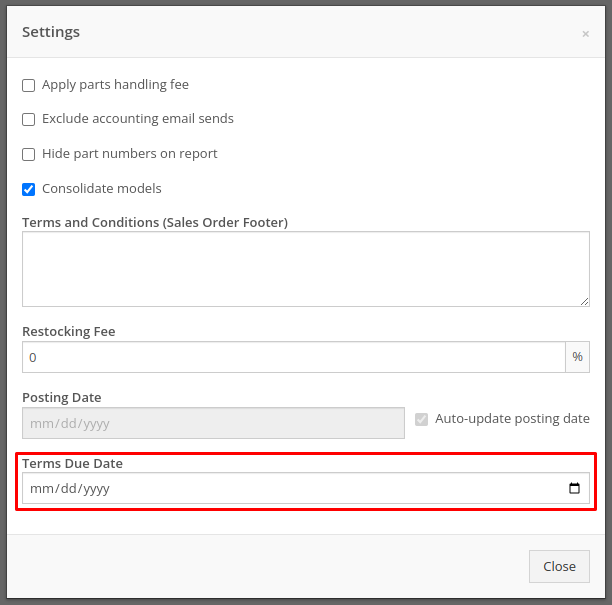
Terms Due Date for QuickBooks Invoices [#52887]
Opportunity: Salespeople have requested the ability to adjust the Due Date of an Invoice from Flyntlok and have that feed to QuickBooks Online.
Solution: We’ve added a new field called “Terms Due Date” to the Invoice. When posted as an Invoice to QuickBooks Online, any date set here will become the QuickBooks Online Inovice’s Due Date. You can find this new field on the Point of Sale by opening the Details panel and clicking the Settings button in the top right corner.
Resolved Issues
#53249
Complaint: Service managers noticed their Upcoming Maintenance page was blank and would not load their Maintenance Schedules.
Correction: Fixed.
#53344
Complaint: Service Managers noticed labor lines on the Work Order that were not associated with jobs would intermittently disappear on non-segmented Work Orders.
Correction: Fixed.
#53149
Complaint: Users creating items with alternates/supersessions noticed that the alternates/supersessions would not be saved once the item was created. Because of this, they would then have to edit the item after creation to update the alternates/supersessions.
Correction: Fixed. Alternates and supersessions are now properly saved on item creation.
#53412
Complaint: Service Managers noticed taxes were being shown on Work Orders for internal customers. These customers should have been recognized as tax exempt on the Work Order, like they are on Sales Orders.
Correction: Fixed. Internal customers on Work Orders are now properly recognized as tax exempt, and the Work Order will correctly display no taxes.
#53425
Complaint: Receivers noticed serial numbers and received dates for machines on Machine Purchase Orders would disappear if an associated Fee-Only Voucher was canceled. This logic was intended to reset machine data when a Machine Receiving Voucher got canceled.
Correction: Fixed. Machine data will no longer be reset if a Fee-Only Voucher is canceled.
#53253
Complaint: Service Managers noted that they were not able to access videos that Technicians had uploaded to Work Orders.
Correction: An issue was identified where many large files on Work Orders were not downloadable by users. This issue has been resolved.
#53796
Complaint: Service Managers noticed that when Sales Orders were linked to Work Orders via the “Link SO as Internal Parts WO” widget, they were not showing on the linked Work Order’s dashboard.
Correction: Fixed, Sales Orders linked to Work Orders via the widget will now be shown when viewing the Work Order.
#53665
Complaint: Salespeople reported that initiating a Text-2-Pay payment would not move the invoice forward from “Draft” status.
Correction: Fixed.
#53694
Complaint: Users noted that when clicking on the email link on a Customer’s dashboard, it would only ever try to send emails to the customer’s default contact email rather than the selected recipient.
Correction: Fixed, all email links on a Customer’s dashboard will now try to send a new email to the address displayed in the link.
#53678
Complaint: When changing the Customer from the Point of Sale, users reported not being shown the new customer’s warning note as a popup.
Correction: Fixed.
#53659
Complaint: When requesting a customer’s signature on a Work Order Estimate via SMS, users reported not being shown the selected Customer’s phone numbers by default. They had to do a name or number search instead of being at least shown that Customer’s related contacts.
Correction: Fixed.
#53697
Complaint: Salespeople have requested all available columns on the Leads list be visible on the All Leads spreadsheet export.
Correction: Fixed.
#53810
Complaint: Users noticed that the Work Order system would sometimes allow them to check out an already Invoiced Work Order.
Correction: Fixed.
#54023
Complaint: Receivers were unable to receive items where the quantities had decimals on the item (some items are not always received in whole numbers).
Correction: Fixed.
#54099
Complaint: Service users noted that when viewing "My Trips" on mobile, the wrong Pickup Address would sometimes be displayed.
Correction: Fixed.
Last Release Notes
Not yet a Flyntlok Customer?
Learn More at Flyntlok Dealer Management System
YouTube
Check out our Flyntlok YouTube channel for more highlights of the application!