Interstate Billing Service (IBS) offers Account Receivable management services like billing, collection, credit verification, and financing that allows businesses to be paid immediately while IBS collects payments from your customers following agreed upon terms.
We’re excited to announce that Flyntlok is now integrated with IBS, allowing you to use their service directly from Flyntlok’s point of sale. After setting up your customers’ IBS account information in Flyntlok, you will be able to bill them using this new payment method.
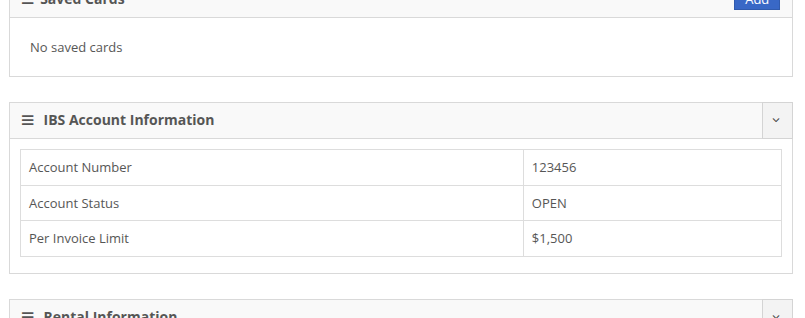
Additionally, you can view your customers’ IBS account information right from the customer dashboard; you’ll see an icon in the summary at the top of the page, as well as a widget containing IBS account information.

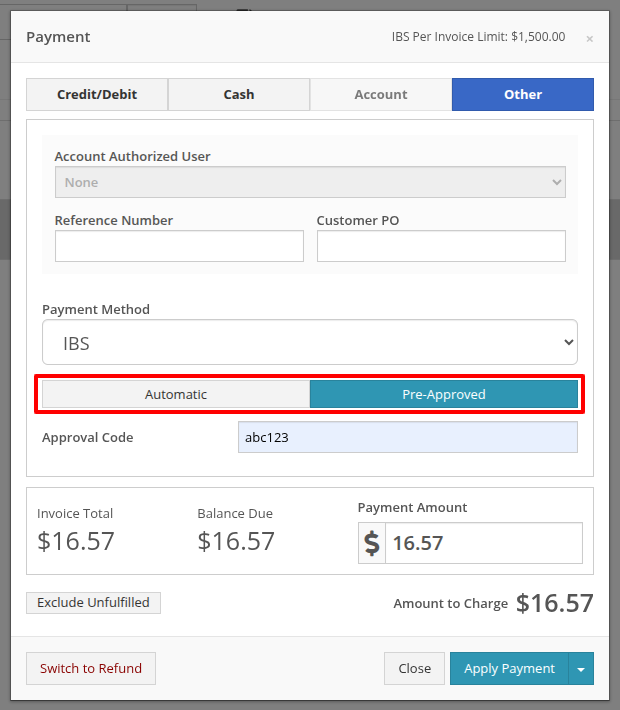
At the Point of Sale, you will see a new payment method in the “Other” section for IBS that supports two approval workflows: automatic and pre-approved. The automatic approval workflow will reach out to IBS for an approval code, and will automatically apply it to the sale if one is granted. The pre-approved workflow allows you to set an approval code that you received outside of Flyntlok on the order, then process it through Flyntlok. In both cases, the invoice will be sent to IBS for validation and processing.
The automatic approval workflow requires a few fields: who the order is for, who it was called in by, and who to contact if some follow-up or more information is needed. These will be prefilled based on the customer set on the order as well as whomever made the order, but these fields can be edited before submitting.
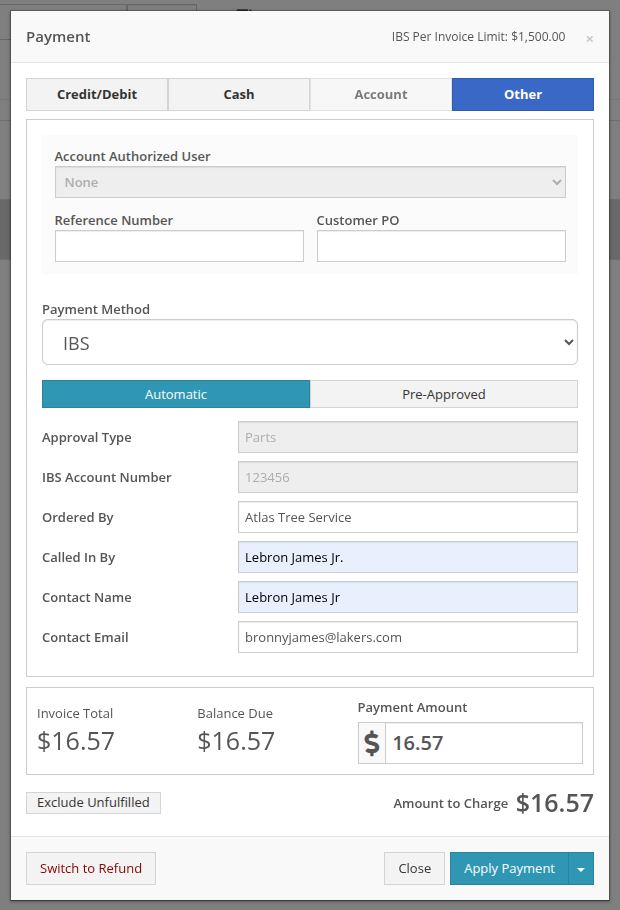
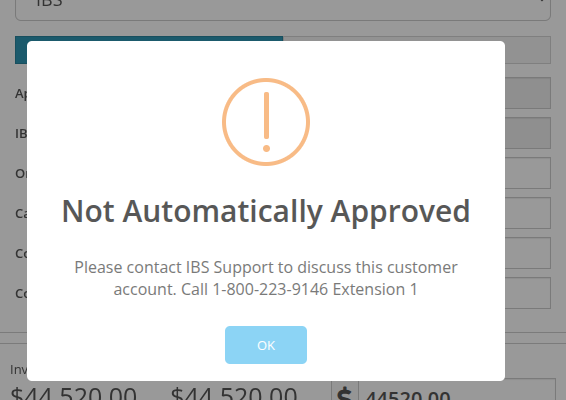
In the event an approval code is not automatically granted by IBS, you will see a pop up providing information on who to contact to follow up on the request.
Note: Not receiving an automatic approval may not mean a request is rejected; some requests may need manual review from IBS (e.g. a request that exceeds a customer’s per invoice limit).
For approval codes granted outside of Flyntlok, you can apply those to a sale by using the “Pre-Approved” workflow. This workflow would be used when an automatic approval requires follow up outside of Flyntlok, allowing you to seamlessly apply the approval code to the order if granted.
For more information on Interstate Billing Services visit https://www.interstatebilling.com/.
Opportunity
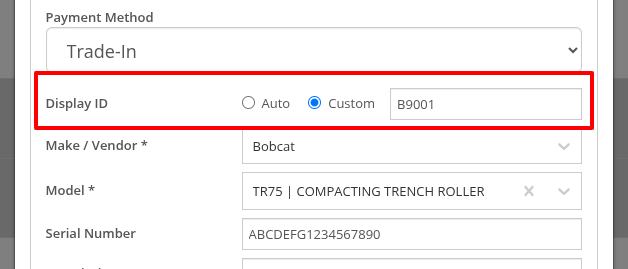
Previously, when creating a Machine through a trade-in, the system would automatically generate a Machine ID. This ID was then used in the Sales Order trade-in description, and changing it afterward wouldn't update the Sales Order.
Solution
For companies that assign Custom IDs to their Machines, we've made it easier to apply these IDs right at the time of trade-in.
With this update, our Point of Sale Trade-In form now includes a new optional field for the Machine ID.
Choose "Auto" to continue using the auto-generated ID. Or select "Custom" to enter your own ID. This ID will be applied to the new Machine immediately and will also appear in the Sales Order description.
Opportunity
Purchasers have requested more flexibility in where they can ship Parts Purchase Orders.
Solution
You can now set a custom Ship To address on Parts Purchase Orders by changing the Ship To from “Standard” to “Custom” when editing.

Opportunity
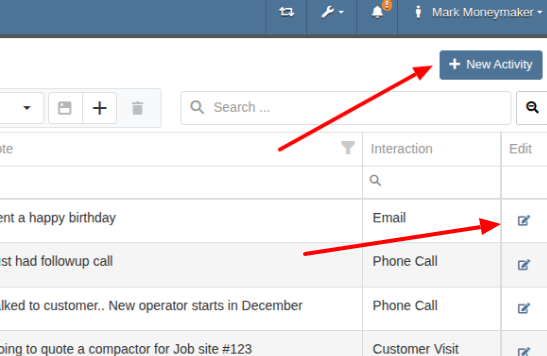
Users wanted more flexibility when managing Customer Activity, especially when working across multiple accounts or reviewing Activity history at a higher level. Previously, all edits and new entries had to be made from each individual Customer Dashboard, which could be time-consuming and limited visibility.
Solution
As promised, we are still continuing to make improvements to our CRM Customer Activity features!
Customer Activity Management
You can now add and edit Customer Activity directly from this page. Click "New Activity" to create a record. Or, use the Edit icon in the corresponding column to modify any existing entry.
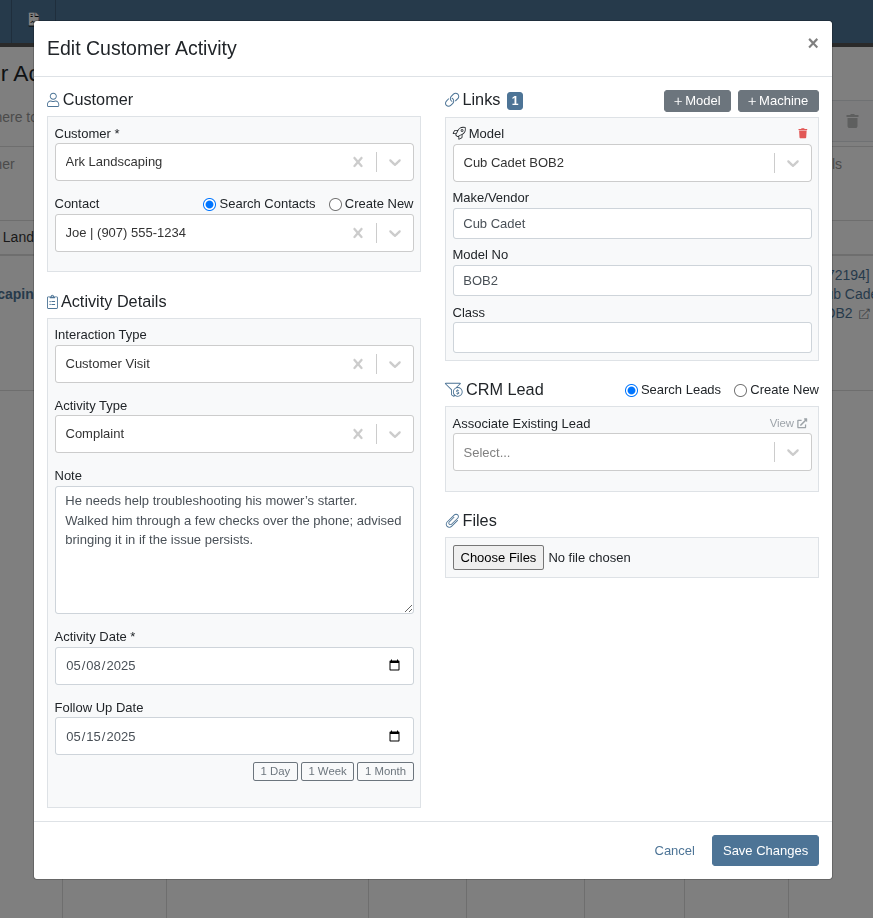
Saved Layouts and Filters
Users can now save layouts on this page. This will allow for faster navigation and a more personalized workflow by remembering your preferred column visibility, sorting, and filters. Whether you're focusing on a specific sales rep, filtering by date range, or hiding unneeded fields, your saved layout will automatically load the next time you visit, which will save you time and reduce clicks!
Opportunity
On our CRM Lead Dashboard, all customer-related actions (searching, linking, and unlinking) were previously bundled into a single dropdown menu, making the process feel cluttered and unclear.
Solution
We've enhanced the "Link Customer" feature to make associating a CRM Lead with a Customer more intuitive. With this update, we've simplified the experience by clearly separating available actions and improving the flow.
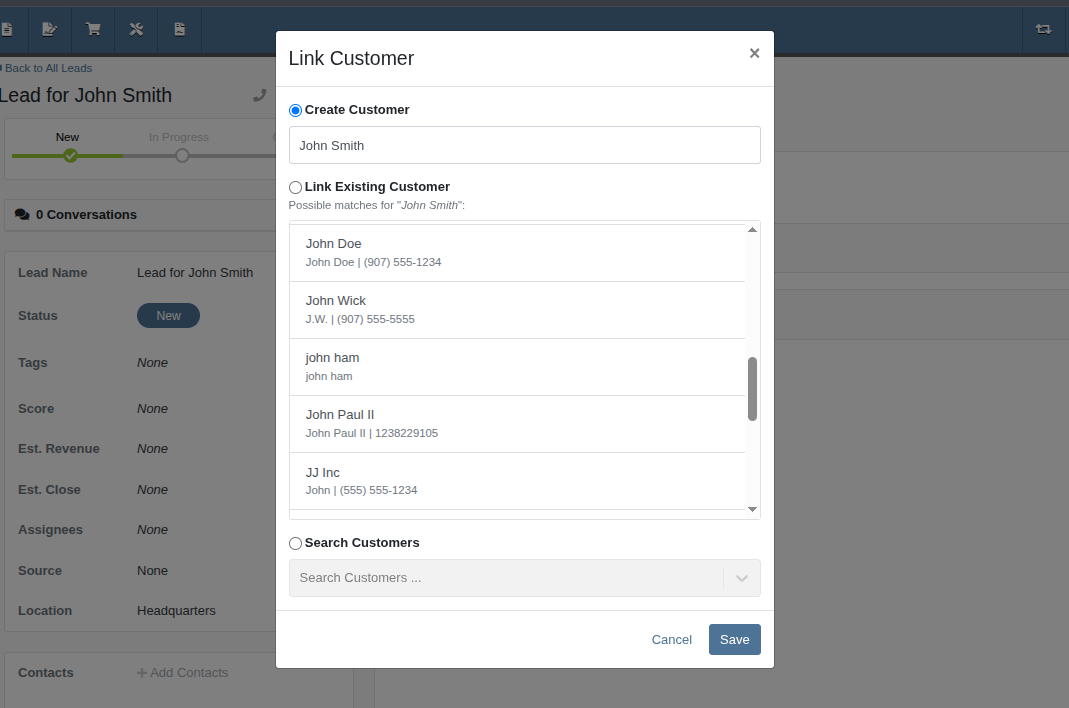
Now, when creating a customer from a Lead, the Create Customer field will automatically prefill a suggested name. This suggested name also powers a smarter list of potential existing customers, helping you avoid duplicate entries.
And of course, the "Search Customers" option is still available, giving you the ability to link a Lead to any of your Customers.
Opportunity
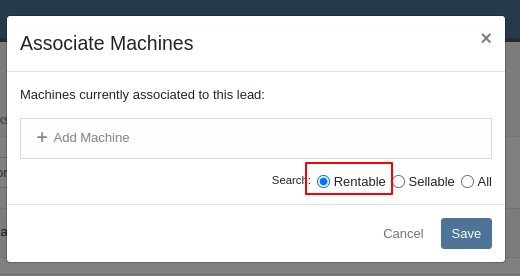
Rental Managers needed a clearer way to identify models and an easier method to locate rentable machines when working leads. Model numbers alone were often not descriptive enough, and the lack of a “Rentable” filter made machine selection inefficient.
Solution
We’ve improved the model and machine association workflow on leads:
Opportunity
Managers configuring Machines’ attachments noted that the attachments’ unit numbers were not shown in the list, but the unit numbers can be helpful to quickly identify machines.
Solution
The unit number of attachments are now shown in the attachment list while configuring machines.
Opportunity
Service managers wanted to ensure that machine hour entries on work orders reflect accurate usage. They requested a safeguard to prevent users from entering values lower than previously recorded.
Solution
We’ve added a validation to the New Work Order form that prevents users from entering machine hours less than the current recorded value. This helps maintain accurate machine hour history and prevents data entry errors.
Complaint: Rental clerks reported that once a Machine has been replaced on a Rental Contract, it cannot later be exchanged back into the contract, since it is “already in” the Rental Contract.
Correction: Fixed.
Complaint: Service Managers reported that the AvaTax “Entity Code” was not being set on invoices generated for work orders.
Correction: Fixed.
Complaint: Service Managers noted that Service Writers were able to inadvertently create a Work Order on a deleted Machine.
Correction: Fixed an issue on Machine Dashboard where the "Create Work Order" action was still available when viewing a Machine in "Deleted" status.
Complaint: Salespeople reported that sometimes when printing a Sales Order, the title of the PDF would appear as a Refund Receipt.
Correction: Fixed an issue on Sales Order PDFs where the incorrect title was being applied when the Sales Order contained a mix of sold and returned items with discounts applied.
Complaint: Users mentioned that when attempting to change their email address via their User Profile page, the page was non-responsive after entering the provided token.
Correction: Updated the Change Email form to show errors.
Complaint: Accountants reported that sometimes processing documents to Sage Intacct would get permanently stuck and never unlock.
Correction: Fixed.
Complaint: Managers noted that when printing a Machine Purchase Order PDF, line totals that had discounts sometimes appeared to show the wrong amount in the extended line total column.
Correction: Fixed.
Complaint: Technicians reported some inconsistencies between the Requested and Used / Reserved Parts on Mobile Work Orders, noting that the list price and quantity on hand were not showing for parts in the Used / Reserved section.
Correction: Fixed.
Complaint: Salespeople were experiencing copious error messages when viewing Leads with invalid or international phone numbers.
Correction: Fixed.
Complaint: Service Managers noted slight discrepancies in Labor Cost between the Work Order Dashboard and its printouts when a labor type’s hourly rate was high.
Correction: Fixed.
Complaint: Managers noted that when merging a Customer with multiple accounting contacts, not all contacts were being moved over.
Correction: Fixed.
Complaint: Salespeople mentioned that when accepting a payment using a saved card, the "payment amount" written to the payment description did not appear to include the card fee surcharge amount.
Correction: Fixed. Note that this did not have any effect on the actual payment transaction amount.
Complaint: Rental clerks noticed that some models and classes were incorrectly showing as "Available" in the selected list during Rental Contract creation.
Correction: Fixed an issue with Rental Availability logic to better account for overdue machines.
Complaint: Managers mentioned that they were not able to edit the "Advertise" option while editing a Machine, even though they had the permissions set up to edit Machine data.
Correction: Fixed.
Learn More at Flyntlok Dealer Management System
Check out our Flyntlok YouTube channel for more highlights of the application!
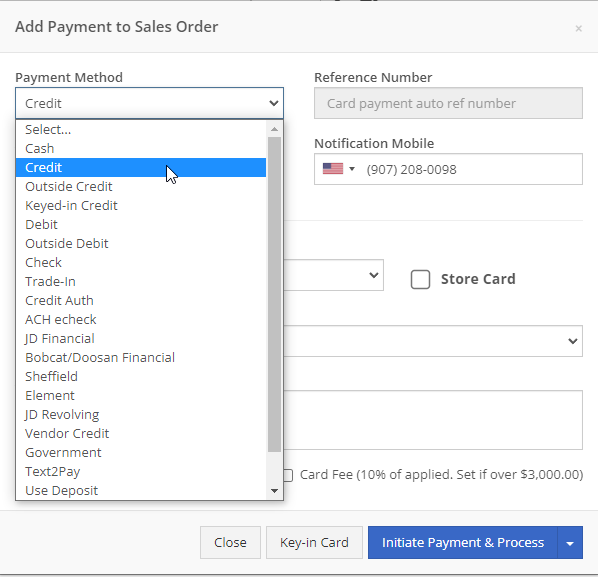
The blue Payment Tab (3), accessible at the bottom of the Point Of Sale or by pressing the hotkey 3 when on the Point Of Sale homepage, allows users to access all necessary payment options in order to complete the Sale Order. Payment options include Cash, Credit, Debit, Check, Trade-in, Text2Pay, Use Deposit, Cash on Acct, and multiple other payment methods. The tab also allows users to create Quotes, or make Copies of the SO.

Users can add payment with cash by clicking the cash button, or pressing C, on the Payment tab.


Users can add payment with pre-saved Credit Cards by clicking the Credit Card button, or pressing R, on the Payment tab.

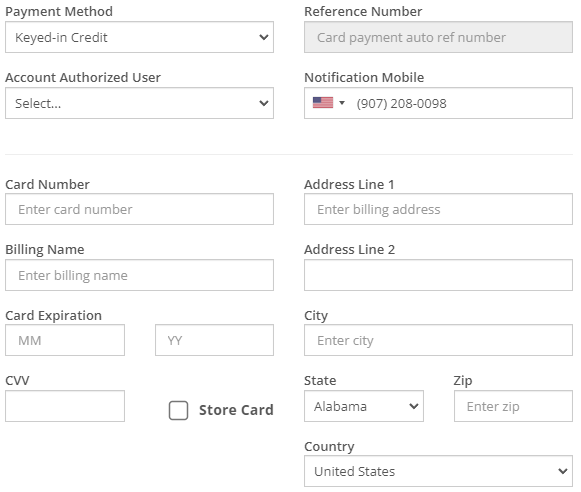
Users can add payment by manually entering a credit card using the Keyed-in Credit button, or by pressing K, on the Payment tab.

Users can add payment using debit by clicking the Debit button, or by pressing D, on the Payment tab.


Users can add payment using check by clicking the Check button on the Payment tab


Users can add payment using Trade-In by clicking the Trade-In button on the Payment tab.


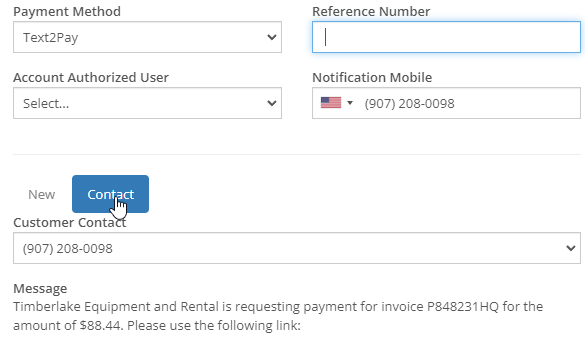
Users can add payment using Text2Pay by clicking the Text2Pay button on the Payment tab.

Users can add payment using a deposit by clicking the Use Deposit button on the Payment tab

Users can add payment using Cash on Account by clicking the Cash on Account button on the Payment tab.

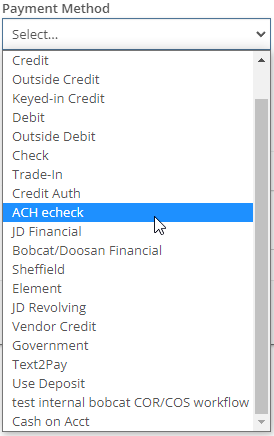
Users can add other methods of payment by clicking the Other button on the Payment tab.
 Other payment methods include but are not limited to Outside Debit, ACH check, JD Financial, Bobcat/Doosan Financial, Sheffield, Element, JD Revolving, Vendor Credit, and Government.
Users can create quotes by clicking the Quote button on the Payment tab.

Users can Reprint a Sales Order they wish to Reprint by following these steps:


Users can Reverse a Sales Order they wish to Reverse by following these steps:

Users can create a new Return Order from the Sales Order they wish to make the Return Updated Trade-In from by following these steps:

Users can create copies of a SO by clicking the Copy button on the Payment tab. After clicking, the page redirects to a copy of the Sale Order in a new page.

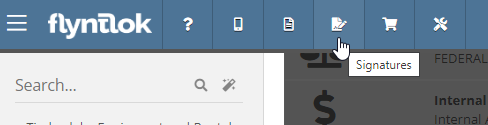
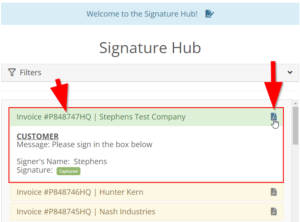
Users can have their customers electronically sign an invoice by clicking the signature hub icon.