You faithful readers of the Flyntlok Release Notes know that we operate in two-week release cycles. Given the upcoming holidays for American Thanksgiving and Christmas, we will be operating on three-week cycles. Our next release will be on Dec 12, 2024 followed by Jan 2, 2025. After that we’ll return to our regularly scheduled program of two-week cycles.
Also, since we have you! Flyntlok offices will be closed on Thursday, November 28 and Friday, November 29. We’ll send a reminder next week as well. Happy Thanksgiving!
Opportunity
Whenever a dealership sells a Stihl Machine, they need to register that sale with Stihl to begin the customer’s Warranty and for the dealership to obtain rewards. While Flyntlok already has an integrated Stihl Machine Registration workflow, if a dealership sells a large number of Machines at once, that workflow becomes very slow and time consuming.
Solution
Flyntlok’s Stihl "Machine Registration" view now supports registering Machines in bulk. Just select the Machines you want to register and click “Bulk Register” in the top right of the page.

You have the option to set the registration information for each Machine you’re sending to Stihl individually or by using the bulk operation tool on the lower left. The bulk operation tool currently supports updating the “Purchase Date”, “Primary Use”, and “STIHL Salesperson”.

When you’re ready, click “Submit to Stihl” to start registering your chosen Machines in the background. You can track the registration’s progress at the top of the page.
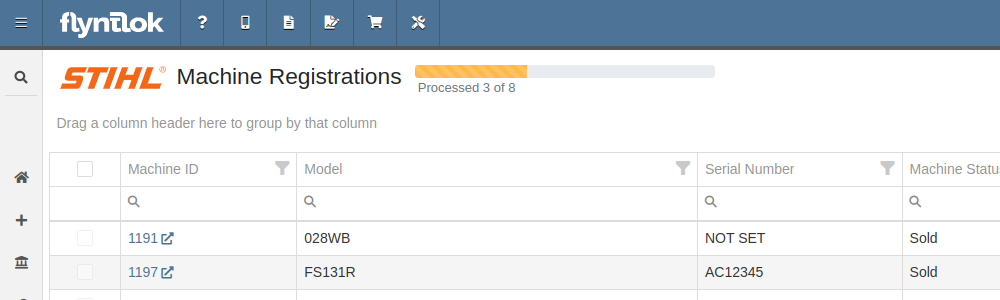
Refreshing or leaving the page will not stop any registrations in progress. Submitting another batch of Machines to register will add those machines to the queue to be registered without stopping any other registrations in progress.
Opportunity
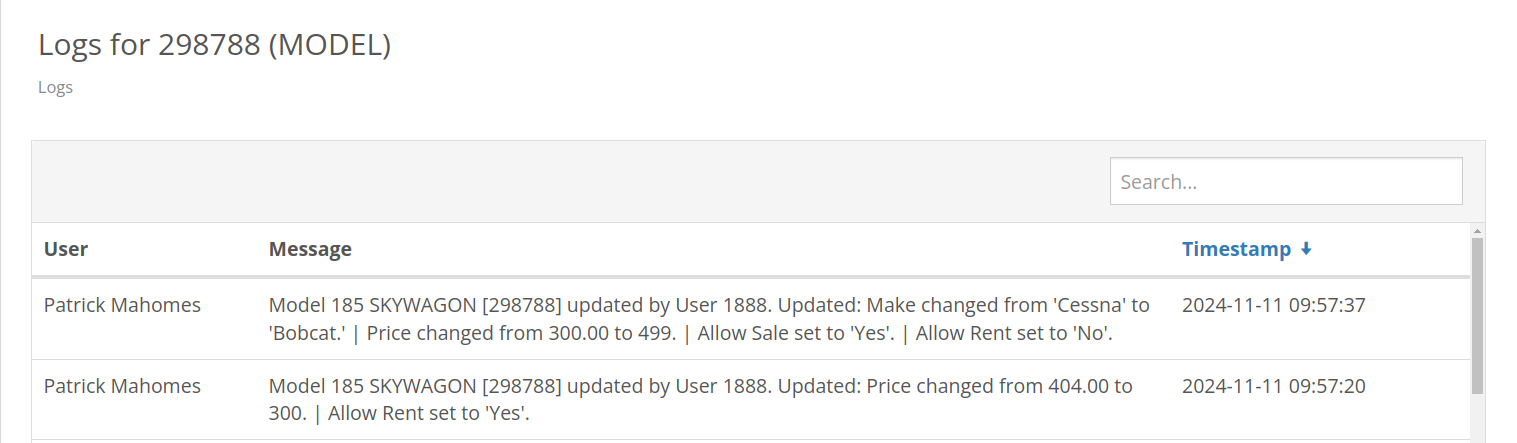
Managers requested that Flyntlok log more end-user changes to Models and provide a way of viewing edits made.
Solution
Added “Action Logs” to Models. When a change is made, a new entry will be created, tracking the user who made the change and the timestamp. Updates to important fields will be logged as well, including Make, Model name, List Price, and Allow Rent/Sale. Don’t go making changes you shouldn’t, Big Brother is watching you.
Opportunity
Managers requested the ability to see a Machine’s “Finance Name” and “Due Date” on the Machine Dashboard.
Solution
Added both fields under the Finance Information section.
Opportunity
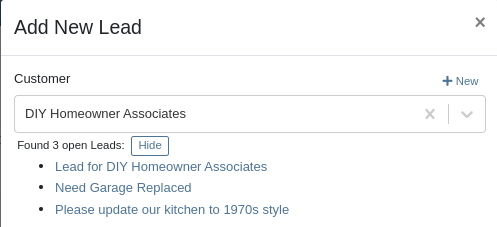
Managers reported that when creating a new Lead with a Customer, it would be helpful to see any existing open Leads for that Customer, as to avoid creating duplicate Leads.
Solution
Added a check for existing Leads upon new Lead creation.
Opportunity
Salespeople requested that when creating a new Lead from the Leads grid, the location would be set to their current location, and the creator would be set as the default Assignee, instead of starting blank.
Solution
Creating a new Lead will now set the default Location and Assigned User.
Opportunity
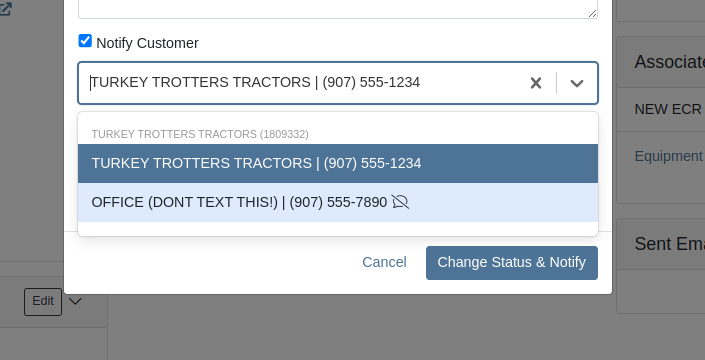
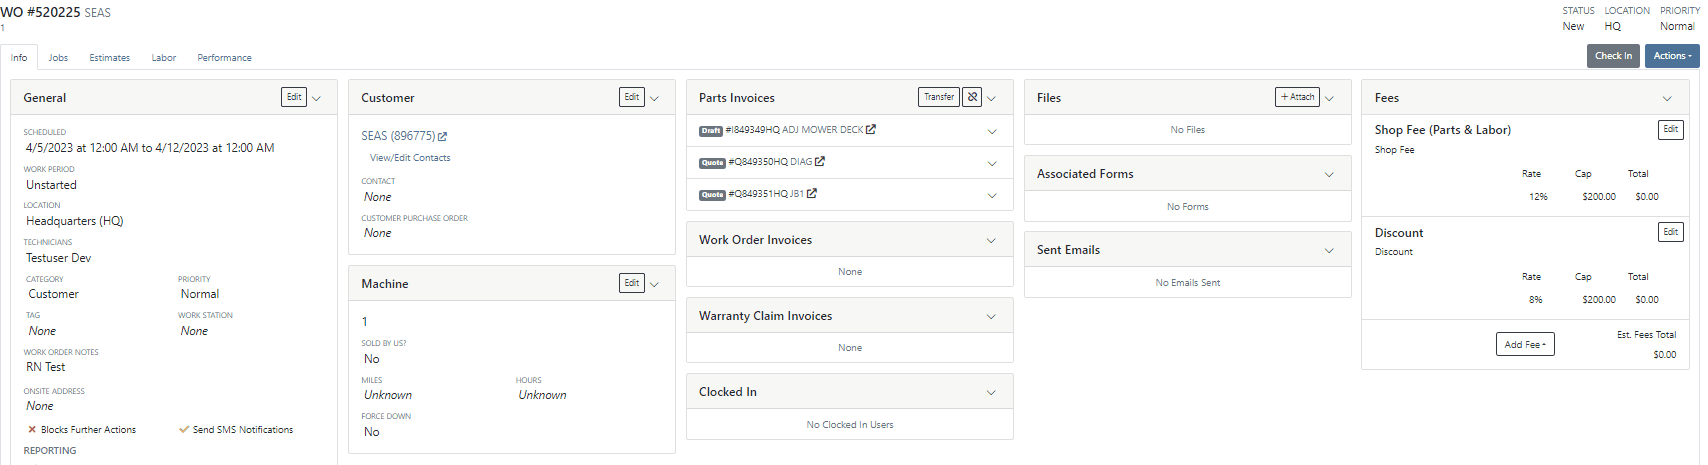
Service Writers mentioned that when sending a text from Work Order Dashboard, they were unintentionally sending messages to phone numbers with "Allow SMS" set to false.
Solution
Features on Work Order Dashboard that involve sending SMS to Contacts (Change Status & Notify, Activity Panel, etc.) have been updated to indicate if a number has "Allow SMS" disabled. If the Work Order's Preferred Contact does not allow SMS, they will no longer be the default selection when choosing a Contact phone number.
Icons have been added to reflect if a specific Contact number does or does not allow SMS:

Opportunity
Users needed a way to manage longer notes in the CRM “All Leads” grid view without overwhelming the screen layout. Long text entries made it difficult to navigate and reduced the overall usability of the view.
Solution
“Internal Note” and “Latest Note” fields with longer text are now trimmed to save screen space. Users can view the full content by hovering over or clicking on the [...] icon:
Opportunity
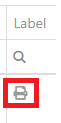
Salespeople requested the ability to print labels for individual Items on Receiving Vouchers. Right now it can only be done for all of the items only
Solution
Added a Label column to the Receiving voucher grid with a nice little button in it. Clicking this button will print an individual label for that Item.
Opportunity
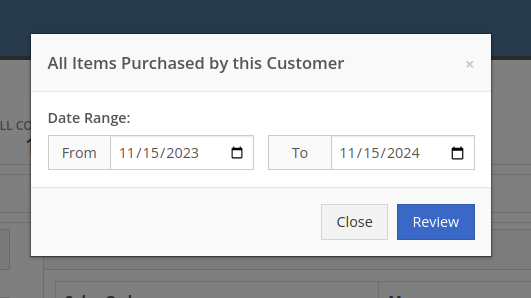
Salespeople (and Sean) requested a quicker way to view a Customer's “Item Sales History” on the Customer Dashboard.
Solution
We have simplified the "All Items Purchased" pop up. It now defaults to a one year date range so you don’t have to first type in some values.
Opportunity
Purchasers needed the ability to streamline the creation of Machine Purchase Orders when dealing with multi-vendor Purchase Requests. Previously, the system did not allow selecting models from multiple vendors in a single request, creating inefficiencies in the purchasing process when purchasing from a Distributor that handles multiple manufacturers.
Solution
On the Machine Purchase Requests page, users can now select models configured to different Vendors.

When creating a Machine Purchase Order, it will now generate a new PO without a Vendor. Users can then select the appropriate Vendor or Distributor in the next step.
Opportunity
Managers requested the ability to add Notes on Moves via the “My Trips” mobile view.
Solution
Added the option to add a new Note to Moves on the mobile page.
Opportunity
Managers requested the ability to print Thermal Pack Slips on an Invoice.
Solution
Added a “Generate Pack Slip” option under the “Actions” menu on the “Details” tab on an Invoice.

Opportunity
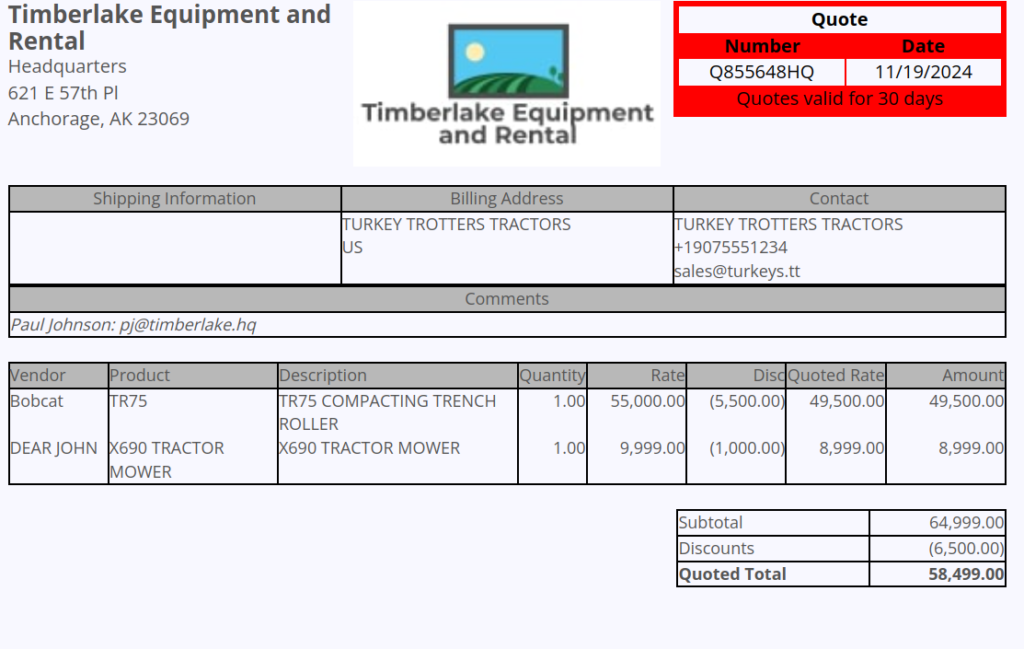
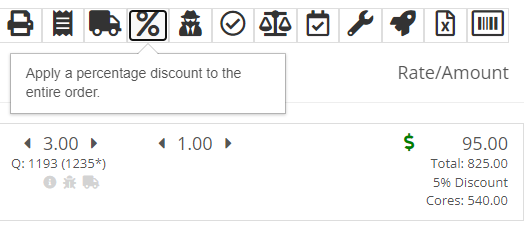
Salespeople requested a way to display any discounts applied when creating a Quote Package for their Customers.
Solution
We now show a summary area under the quoted details that breaks down the subtotals, and if any discounts exist, they will highlight the total discounts applied. Additionally, each line will show the original rate and discount. (Discount Totals will not be displayed if there are no discounts, or if lines have been marked up.)
Opportunity
Salespeople and Managers requested a visual indicator to quickly identify when Tax Rules had not been configured on a Sales Order. This would help prevent errors and streamline the order review process.
Solution
If this feature is enabled, a dot will appear on the Tax Rules button to indicate that no Tax Rules have been configured for the Sales Order. This provides a simple yet effective visual cue for users to take necessary action.
Admins can enable this feature by checking this option in Flyntlok Settings:
![]()
Opportunity
Service Managers requested the ability to restrict their Technicians from clocking into Work Order Jobs, depending on the status of the Work Order.
Solution
Added the ability to configure Work Order statuses that don’t allow technicians to clock in. This configuration can be accessed through the wrench icon > Work Orders > Work Actions. Select “Edit” on an Action and select the “Prevent Techs Clocking In” box. (And ignore the ugly modal window you are presented with.)

Complaint: Managers reported that Work Order Labor Revenue was being doubled for certain labor types.
Cause/Correction: Fixed.
Complaint: Managers reported that marking Moves as “In Transit” would cause the Trip to no longer appear on the My Trips view.
Cause/Correction: Fixed. Moves can now be processed correctly and will continue to show up.
Complaint: Salespeople reported that when a Special Order is canceled, the Part label on the Receiving Voucher would still be printed under the “Will Call” labels section.
Cause/Correction: Fixed. When a Special Order Invoice line is removed from the SO, or the entire SO is deleted, the Part label will now print under the “Stocking” labels instead of “Will Call” on the Receiving Voucher.
Complaint: Accountants reported that some Machine Vouchers were failing to post to Sage.
Cause/Correction: Fixed.
Complaint: Service Managers reported that the Mobile Work Order Dashboard was allowing users to edit the Cause, Complaint, and Correction fields when they didn’t have the permissions to do so.
Cause/Correction: Fixed. These fields correctly respect user permissions now. And we are all about respect.
Complaint: Users noticed that data grid views were not respecting preset column widths.
Cause/Correction: Fixed. Data grids will now automatically resize columns on default views, and use the preset values on custom saved templates.
Complaint
Receiving Personnel reported that some Receiving Vouchers were presenting duplicate lines.
Receiving Personnel reported that some Receiving Vouchers were presenting duplicate lines.
Cause/Correction
Fixed. This was a rare visual bug and did not have any effect on the Receiving Voucher or Purchase Order data.
Complaint
Rental Clerks noted that when closing a Rental Contract that had a Pickup or Delivery address set at no charge, the system would still generate a Final Invoice instead of just closing the Contract.
Cause/Correction
Fixed. A final Invoice is no longer being generated when closing a Rental Contract with no charges due.
Complaint
Managers mentioned that some users were able to delete a file from a Purchase Order even though their permissions were set to not allow it.
Cause/Correction
Fixed. The system now respects the appropriate delete permissions and only authorized users will be able to delete a file. Again, it’s all about respect.
Complaint
Salespeople reported that when using the "Copy Invoice" button on Point of Sale, the original Invoice's selected “Source” was not carrying over to the newly created one.
Cause/Correction
Fixed.
Complaint
Service Managers stated that they were sometimes not receiving notifications for “Parts Requests” from their Technicians.
Cause/Correction
Fixed a bug that was causing notifications to not be sent from Technicians that were configured as part of a Technician Group but not as a Technician User Type.
November 6th, 2024 Release Notes
Learn More at Flyntlok Dealer Management System
Check out our Flyntlok YouTube channel for more highlights of the application!

We are excited to announce that Flyntlok will be attending the Equipment Exposition October 15th-18th in Louisville, Kentucky (Booth Number C001). The Equipment Exposition is an annual event dedicated to growing landscapers', manufacturers', and equipment dealers’ businesses. Please reach out to Mike Wasserman (mwassy@flyntlok.com) or Alex Clementi (alexc@flyntlok.com) if you would like to arrange a meeting while we are there. Or just stop by to say "Hello!"
Opportunity
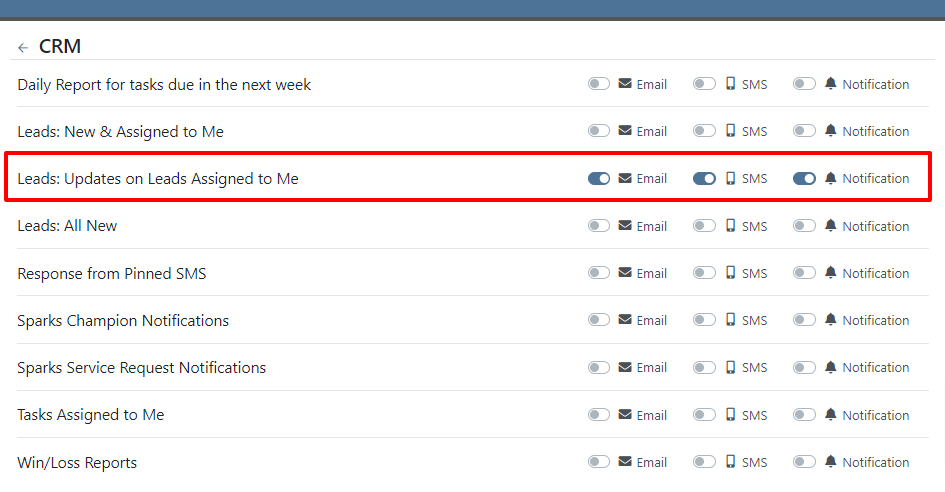
Salespeople have requested they be notified when someone makes a change on a Lead that is assigned to them..
Solution
Users now have the option to receive notifications when any Lead they are assigned to is updated. Notifications are triggered when any of the following changes occur:
Users can enable this feature through their User Settings page.
Opportunity
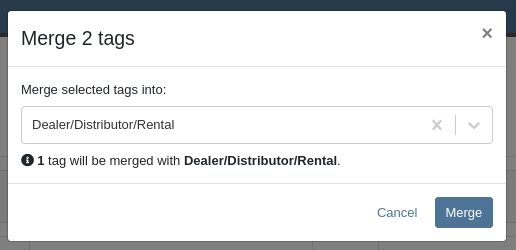
Managers have requested the ability to control who can create Lead “Tags” on the fly through the Tag selector. Managers have also expressed a need for a Tag Editor where they can manage their Tags.
Solution
A new Permission called “Lead Tags” has been added under the CRM section. This permission grants users the ability to create new Tags for Leads. Additionally, Flyntlok now has a Lead Tags editor, which is accessible from the CRM settings page. This editor includes features to create, rename, delete, and merge Lead Tags. Deleting a Tag will remove it from all associated Leads; renaming will update the Tag on Leads; and merging will combine Tags across Leads. This allows administrators to clean up redundant, irrelevant, or mistakenly created tags.


Opportunity
Service Managers have requested the ability to sort by their upcoming maintenance by a “Location” field.
Solution
A new “Location” column has been added to the Upcoming Maintenance grid.
Opportunity
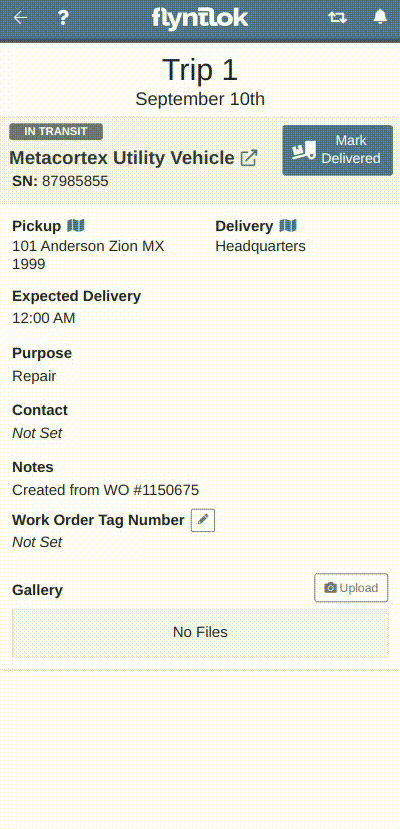
Fleet Managers have requested the ability to update the Work Order’s “Tag Number” on Trips through the Mobile view.
Solution
We added a “Tag Number” editor to the Mobile view of Trips.
Opportunity
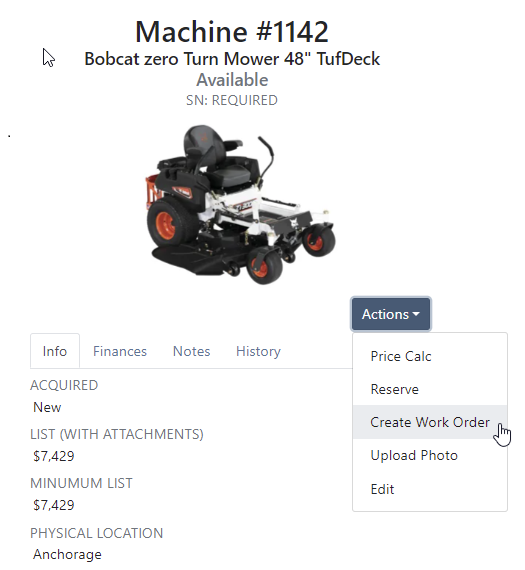
Managers have requested the ability to create Work Orders from Leads and Machines through the mobile view.
Solution
The mobile Lead and Machine dashboards now include the option to create a Work Order in their Actions drop-downs.
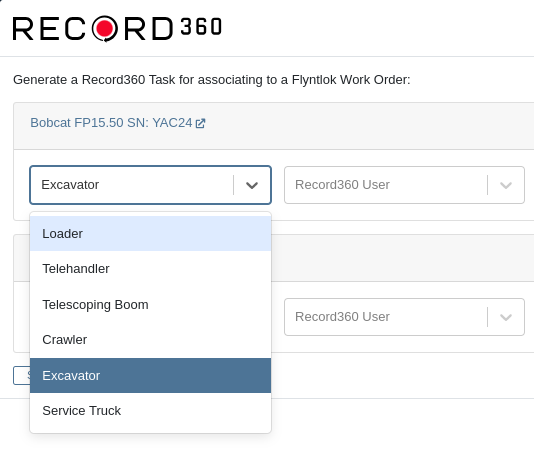
Opportunity
Managers have requested the ability to select a Record 360 Workflow when reserving and checking-in machines on a Rental Contract.
Solution
A Workflow can now be selected for each Record360 Task. Selecting a Workflow will make it the default option when reserving that Machine or Model on future Rental Contracts.
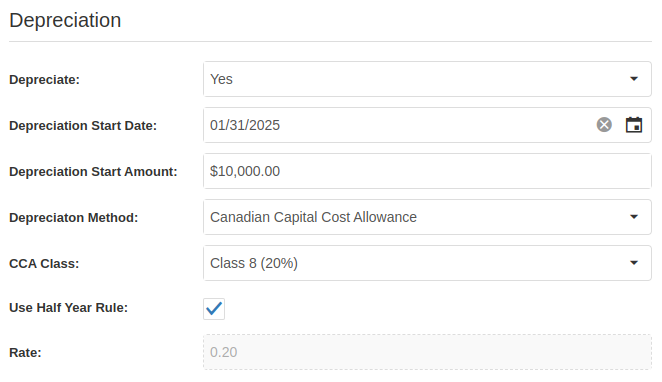
Opportunity
The Canada Revenue Agency defines specific depreciation schedules that Canadian companies must follow. Currently, Flyntlok supports two kinds of depreciation schedules – Straight Line and Percent of Rent – neither of which matches any of the CRA’s schedules. Equipment Managers in Canada have requested Flyntlok add support for these schedules.
Solution
When editing a machine, you may now select “Canadian Capital Cost Allowance” as the depreciation method. Once you select this method, you will be presented with a second selection for the specific Capital Cost Allowance class; Flyntlok currently supports the Class 8 schedule.
For questions regarding CCA Depreciation specifics, please see the Canadian Revenue Agency documentation here. If you have any questions about setting this up or how depreciation journal entries are created within Flyntlok, please contact your friendly Flyntlok Consultant for details.
Complaint: Parts on the Suggested Orders view were still present even after they had been ignored.
Correction: Fixed. They are now ignored like a parent is ignored by their teenager.
Complaint: Salespeople reported that when a “Delivery Tax” was applied to a Sales Order, sometimes it would not allow the Sales Order to be fulfilled.
Correction: Fixed.
Complaint: Service Managers reported that a sales tax was displayed on Work Orders for tax-exempt customers.
Correction: Fixed.
Complaint: Salespeople reported that when applying a discount to a Sales Order through the “Apply Discount” modal, Item Modification discounts were being doubled.
Correction: Fixed.
Complaint: Service Managers reported that moving Work Order cards on the Service Scheduler could duplicate the card.
Correction: Fixed.
Complaint: Fleet Managers reported that saving changes to a Move could empty the “Start Location” and “End Location” fields, causing the Move to disappear from the Truckload Scheduler.
Correction: Fixed.
Complaint: When updating Machine Receiving Vouchers using the “Detail” view, users reported that updates to the “QuickBooks Online Accounts” field were not reliably persisting.
Correction: Fixed.
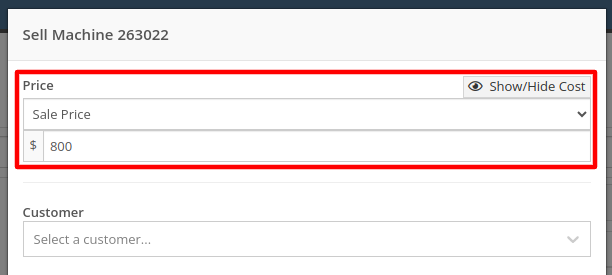
Complaint:
When selling a Machine from the Machine Dashboard or a Sales Order, its Special Sales Price was not being used. It continued to use the List Price.
Correction:
Fixed. Flyntlok now applies the Special Sales Price on both Machine Dashboard’s “Sell Machine” modal and the Point of Sale’s “Sell Machines” modal.

August 28th, 2024 Release Notes
Learn More at Flyntlok Dealer Management System
Check out our Flyntlok YouTube channel for more highlights of the application!
Opportunity:
In our last Release, we added an "Allocate" option to the Item Receiving Voucher, allowing users to automatically allocate an Item's received stock to outstanding Invoices containing Special Ordered or Back-Ordered Items. Our next iteration will be to group together multiple allocated lines on the Receiving Voucher and allow you to adjust the auto-allocation strategy manually.
Solution:
We have updated the Item Receiving Voucher to group together all of the Item’s individual allocations together for easier viewing and managing. We have also added an “Allocations” column, which will display the allocation status of each item line of the voucher, and, finally, we made a slight change to the “Allocate” option from the  button’s drop-down menu (which now displays as “Allocate All”). Finally, we have created the ability to prioritize the allocation of Received Items to a particular Sales Order.
All Allocated line items will be grouped together under a parent line of the Item. You can expand and collapse allocated sub-sections of the item line by selecting the "arrow" icon on the left-hand side of the line. We have also added an "Expand All"  and "Collapse All"
  option to the action icons list.
 -This icon indicates that the line has been allocated. Selecting the icon will allow you to remove the allocation from the chosen Invoice.
 -This icon indicates that the line has not been allocated. Selecting this icon will allow you to choose from a list of outstanding Invoices to assign the received quantity to.

Users can manually override an allocation by selecting the icon. The user will then be presented with a drop down list of Open Orders to choose from. If there is not enough of the item to fully allocate to that item, it will allocate what is available and the rest will remain as back-ordered.

We have added a “Prioritize Special Order Receives” check box to the "Details" tab of the Sales Order page. When a SO is marked as a “Special Order Priority”, Flyntlok will automatically move this Sales Order to the top of the Outstanding Invoice queue, bypassing older, non-prioritized orders. Flyntlok will allocate an Item’s Received Quantity to the ”Prioritized” invoices before the oldest outstanding non-prioritized order. Prioritized Invoices themselves are then “prioritized” by oldest to newest before moving to non-Prioritized Invoices.

Opportunity:
Service Managers have requested the option to create, schedule, and track Machine Transfers directly from the Work Order dashboard when Pick-up or Delivery is required for the associated Machine. They would like this option to be available for all Machines associated with the WO; both actual Machines known within Flyntlok and Virtual Machines.
Solution:
Flyntlok will now auto-generate a new Machine Move when pickup/delivery is scheduled for the associated Machine of a Work Order.

The generated "Move" will provide a link back to the Work Order in the "Comments" section.

Opportunity:
Flyntlok customers in Canada have requested the option to apply a Harmonized Sales Tax (HST) to their Sales Orders. HST is a combination of federal and provincial taxes levied on most goods and services sold for domestic consumption, which the customer pays.
Solution:
We have added a Harmonized Sales Tax (HST) option for companies operating in Canada. Please reach out to your friendly consultant if you would like any additional information about applying the HST to your Sales Orders.


Opportunity:
Service Managers have requested the option to add a default "Labor Type" for a specific Customer, so that when the customer is added to a Work Order, Flyntlok will auto-set the Labor field for all jobs associated with a Work Order.This is most typically requested for “Internal Labor” Work Orders.
Solution:
We have added a "Default Labor Type" field to the Customer Dashboard's "Edit" page, allowing managers to set Work Order Labor Type for the specific customer. When the "Default Labor Type" is set, all associated Service Jobs associated with the Customer will be automatically set to the selected "Default Labor Type."
Opportunity:
If an Inventory Item has alternate parts, Flyntlok will display those items on the Items Dashboard in the "Item Information" section. Salespeople have requested the option to display more than one alternate Item.
Solution:
We have updated the "Alternates" section of the Item Dashboard, and Flyntlok will now display up to four Alternates in the "Item Information" section. If the Item has more than four Alternates, Flyntlok displays the first four and indicates how many other alternate parts the item has available with an option to "Show All."

Opportunity:
Rental Managers have requested the option to add additional Model information to the Rental Contract's Lease Agreement. They would like the ability to link a website to the Lease Agreement, where the recipient can be directed to the webpage in order to review information on the associated Model of their Rental Contract (for example, a YouTube video demonstrating how to operate the equipment).
Solution:
We have updated the Lease Agreement as well as the Model Info page and you will now have the option to save a website’s URL to a specific Model. We have added two new fields to the Model Information section of the Model Dashboard titled "Primary Support URL" and Secondary Support URL" which will allow you to input the URL of the support website(s) you'd like customers directed to. Once the support URL is saved to the Model’s information, Flyntlok will automatically add a QR Code for the website(s) to the Lease Agreement when a Machine of that Model is added to a Rental Contract.


Flyntlok will display the QR code(s) on a second page, with a message prompting the recipient to scan the code to learn more about the Model.

Note-Please contact your friendly Flyntlok consultant if you would like this feature set up.
Complaint:
Rental Managers had experienced issues when attempting to invoice a Rental Contract when the associated Machine had been replaced with an alternate Model. While the user could swap the associated Machine on the Rental Contract's Dashboard, the Invoice generated was incorrectly charging for both the replaced Machine and the new Machine.
Cause/Correction:
Fixed.
Default Curser Into Text Box (WO Parts Request Note)-(Ticket # IHK 47985)
Complaint:
Service Technicians requesting parts to complete Service Jobs directly from the Work Order Dashboard requested that we default the cursor to the text box when the add note button is clicked.
Cause/Correction:
Fixed. When requesting parts from the Work Order Dashboard, Flyntlok will auto-focus the curser into the text box when the  button is selected. Yeah, another two-second item, but when you ask, you shall receive! (Plus, I think our developers like to 'pad their stats' with items like this...)

Unable to add Items to "Quick Order" if Vendor is Set as a Distributor-(Ticket # IHK 47985)
Complaint:
Purchasing Managers had reported an issue where they could not add Items to a Purchase Order when attempting to create a "Quick Order" for Vendors set as "Distributors." The Item Searcher inside the "Quick Order" modal of the Vendor Dashboard was not populating the alternate Vendors’ Items distributed by the Vendor.
Cause/Correction:
Fixed. The Item searcher of the Vendor Dashboard "Quick Order" option will populate all Items that the Vendor distributes.
January 31st, 2024 Release Notes
Learn More at Flyntlok Dealer Management System
Check out our Flyntlok YouTube channel for more highlights of the application!

We would like to keep you up to date with the happenings here at Flyntlok. Take a look at some of the recent articles written about Flyntlok and our esteemed founder and CEO Sean McLaughlin!
Opportunity:
Service Managers have requested that their Service Technicians have the ability to request parts needed to complete Work Order Jobs directly from the Work Order without having to separately create and process a new Internal Parts Order Invoice. This will streamline the process and remove the responsibility of processing Internal Part Orders from Service Technicians.
Solution:
We have updated the Parts Request settings of the Service Work Order, and Service Techs will now have the option to request Items directly from the Work Orders Jobs tab, removing the need to create an Internal Parts Invoice. Techs can now simply select the ADD/EDIT button from the Parts section, and choose to either create a Parts Request or a Request Note.

When the  button is selected, Flyntlok will display a Part Searcher where Technicians can add Items and the requested quantity needed to complete a Service Job. Once the “Save” button is selected, Flyntlok will then generate an “Internal Parts Order Invoice” in "Quote Status" for the requested items. Subsequent parts requested will be allocated to a new Internal Invoice.

When the  button is selected, Flyntlok will display a text box where users can add notes that will be attached to an Internal Parts Invoice and delivered to the Parts Department via internal notifications to process. At this point, the Parts Department will need to manually fill and allocate the parts request, relieving the Tech of the responsibility of filling out the details for the Internal Parts Order.
Users will have the ability to add/remove items and edit the order quantity by selecting the ![]() button. Flyntlok will generate a return Invoice for Parts Requests that have already been processed then update it to a lower quantity.
button. Flyntlok will generate a return Invoice for Parts Requests that have already been processed then update it to a lower quantity.
The generated Internal Invoices will remain in "Quote" status until the  button is selected. This will move the Invoice forward into a Delivered, or Pending status.
Upon completion of the Service Job, Techs can navigate back to the "Parts" section to log the quantity of Items used against the quantity that was requested.

Note- This new feature is currently Flyntlok controlled, please reach out to your Friendly Flyntlok consultant for assistance!
Work Order Custom Default Status-(Ticket #FD-2595)
Opportunity:
Last release we implemented certain “Points of Action” within the Service workflow where users can now (with the help of their Flyntlok consultant) automate a Status change on a Work Order based on the WO's current Status. Our next iteration is to allow you to request custom “Estimate”, "In Process, and “Completed” status workflows and the option to replace the Flyntlok default statuses with a customized “Estimate”, “In Process”, or “Completed” status.
Solution:
We have implemented backend changes to support internal statusing, which in turn will allow for user-defined custom statuses in "Estimate", "In Process", and "Completed" internal statuses. You will need to work with your Friendly Flyntlok Consultant to get these workflows setup. Give them a call!
"Upsell" Service Jobs-(Ticket #FD-2774)
Opportunity:
Service Managers have requested we add a new Job-level Work Order field titled "Upsell" so they can track work by Service Technicians that was considered an “Upsell Job.”
Solution:
We have added a new Job-level WO field "Upsell Job" that will allow Service Managers to mark a WO Job as an Upsell job. We have also added an "Is Upsell Job" field to the column chooser of the "All Jobs" report where users can track “Upsell” WO Jobs.


Opportunity:
Flyntlok users purchasing parts from Agco have requested the ability to export Item POs from Flyntlok that can then be uploaded into the Agco Online Solutions (AOSL) application.
Solution:
We have added an  "Export to Agco" icon to the Item Purchase Order, located in the icon list below the PO balance sheet, which will allow users to extract an Agco-specific file from Flyntlok. This file can then be manually uploaded into the Agco Online Solutions (AOSL) application to complete the process for parts ordering.

Opportunity:
Sales Managers have reported instances where their salespeople have had difficulties differentiating which lines of a SO are associated with the Inventory Kit items. This manifests itself when attempting to edit, remove or re-order “Inventory Kits” from the Point of Sale screen. They have requested that we eliminate the option to remove “sub-items” associated within a Kit, and to allow the “Parent” item to control actions of the associated Sub-Items. They have also requested we make Inventory Kits and all the associated Sub-Items more apparent so salespeople can easily distinguish between main-level line items and sub-items.
Solution:
We have updated our Inventory Kit feature, and the Kit parent Item will now control most actions of the Kit sub-items. For example, if a salesperson wants to change the Kits order quantity, or remove it from the sale, they must perform the action from the parent item. Changing the order quantity of the parent item will update the sub items accordingly based on the Kit's configuration. We have also Updated the Kits associated Sub-items Icon to make it more obvious which lines belong to the kit.

Convert Sales Order to "Quote" -(Ticket #FD-2738)
Opportunity:
Salespeople have requested we move the "Convert to Quote" option, previously found on the "Actions" tab, onto the main Sales Order page.
Solution:
We have updated the “Convert Sales Order to Quote” feature on the SO page, and Flyntlok will now display the  button in the bottom left corner of the page next to the "Process” button , removing the need to first select the "Actions" tab. The “Quote” option will only be displayed when the SO is in a “Draft” status.

This feature will retain all of its previous functionality where:

Opportunity:
Service Technicians using the Mobile View have requested the ability to add, edit, and remove the associated Machines on the Work Order job level from their mobile device.
Solution:
We have added a job level Machine field to the Mobile Views Work Order dashboard. Users can now add/remove or edit the associated machine of a WO job.
Opportunity:
Service Technicians utilizing the "Mobile View" currently have no way of taking a machine out of service and have requested the option to "Force Down" Machines from their mobile device.
Solution:
We have added a "Force Down" option to the "Edit Machine" button from the WO dashboard which will allow users to taking a Machine out of service from their mobile device.


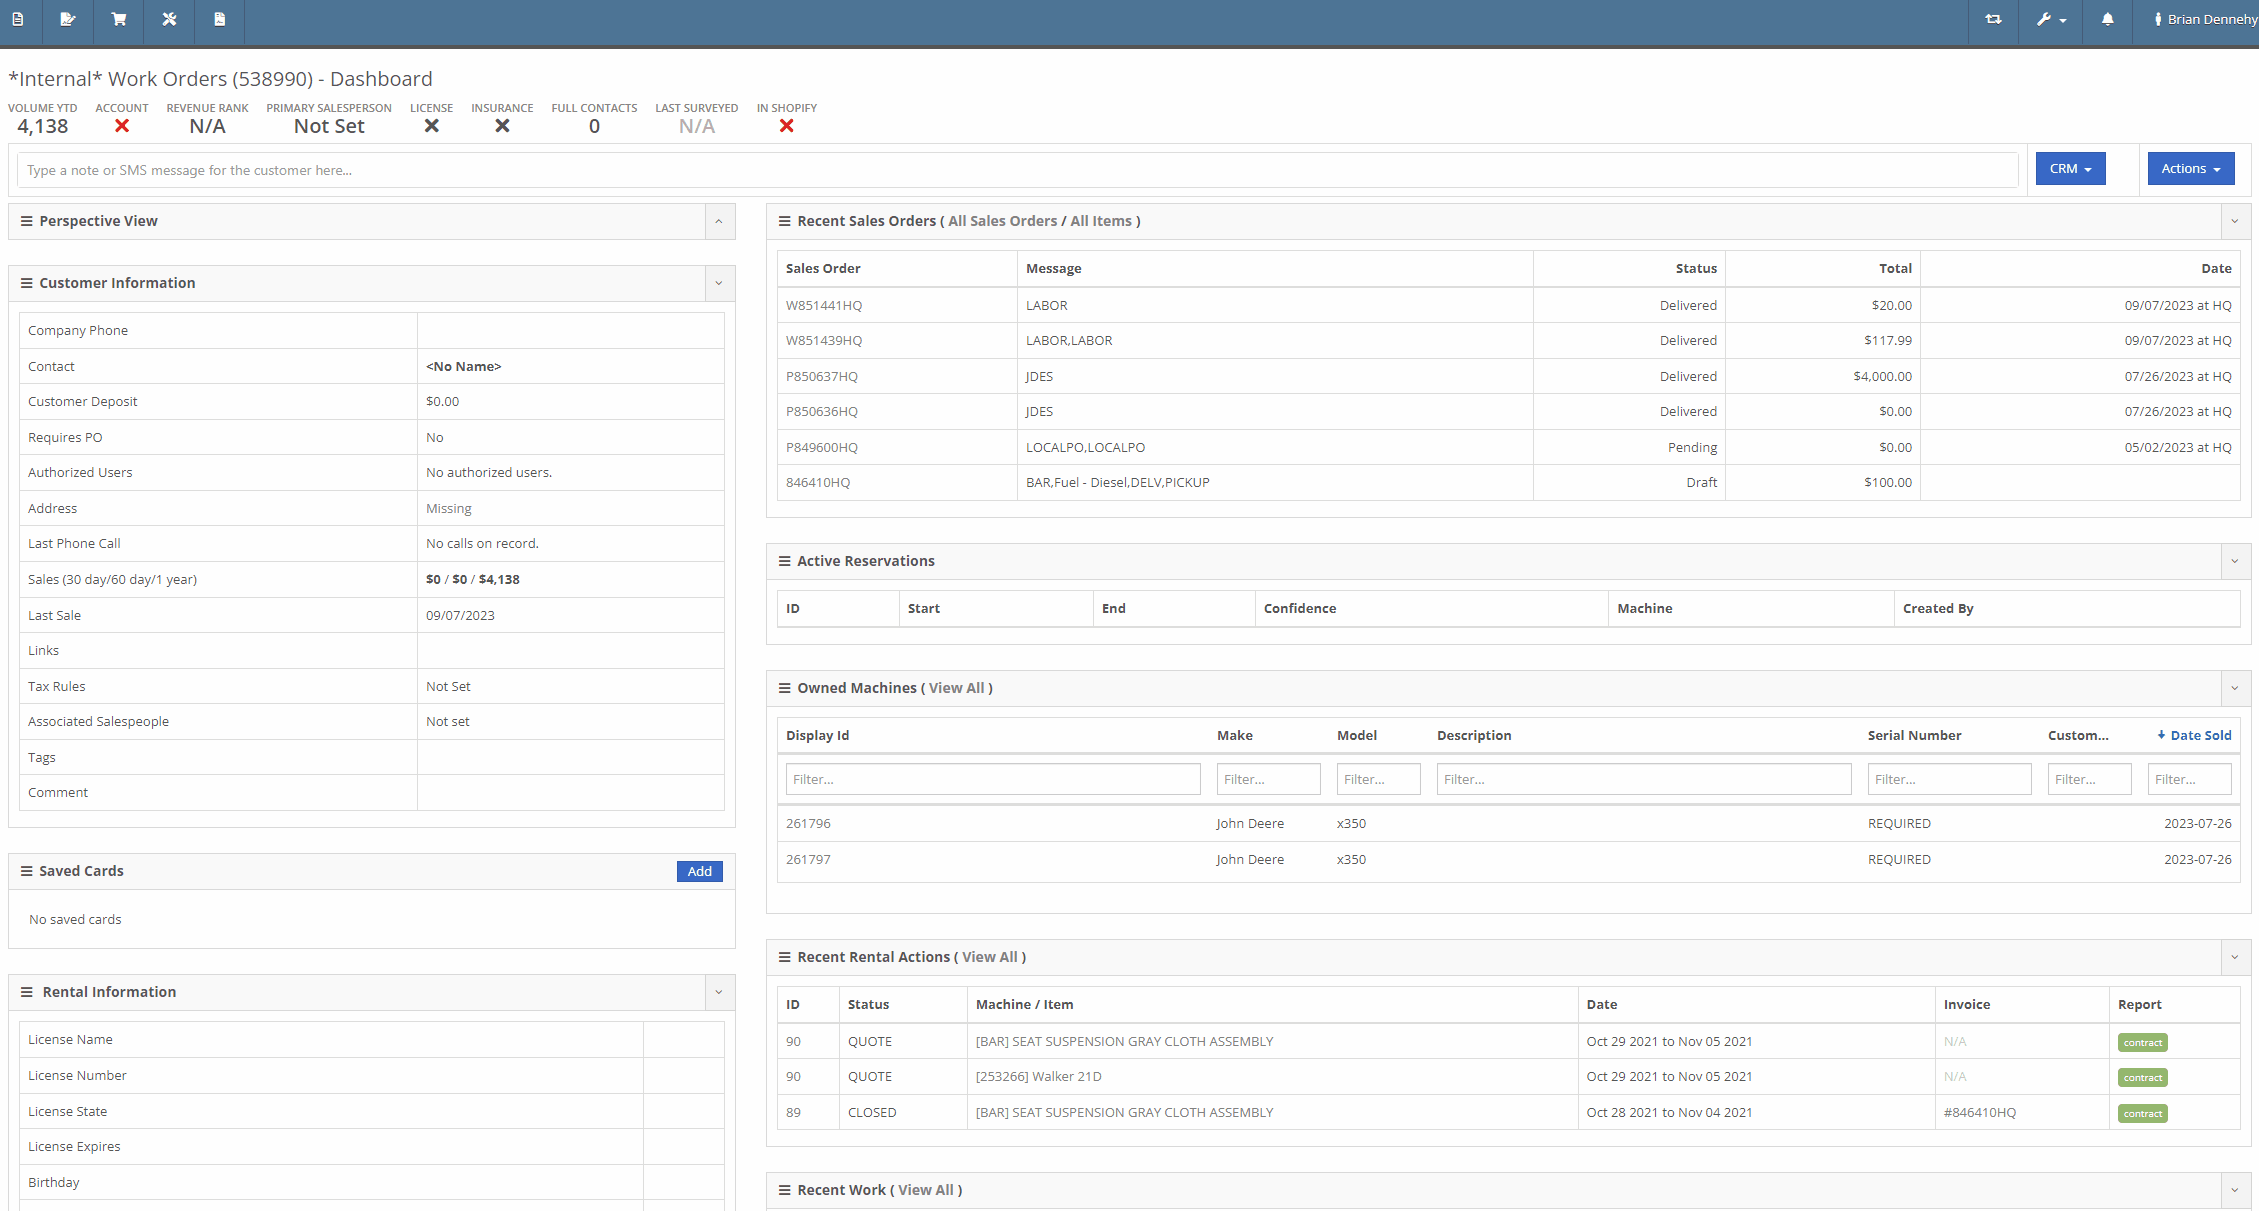
Opportunity:
Flyntlok administrators have requested the ability to add/remove or edit a Customer’s "Authorized Users" from their Customer dashboard.
Solution:
We have added an "Authorized Users" option to the Actions drop-down menu. When selected it will allow users to add, remove, or edit the "Authorized Users" associated with the customer.


Opportunity:
Flyntlok Administrators have requested the ability to restrict a user’s ability to modify tax settings from the Point of Sale.
Solution:
We have added a new setting to the "Access Control" page that will give administrators the option to allow or restrict their users access to change tax settings from the Point of Sale. When the "Modify Tax Rules" is turned off users will no longer be able to access the  icon.
icon.


Complaint:
Salespeople had reported an issue where Items that had been marked as "Inactive" were still populating the Item searcher from the Point of Sale.
Cause/Correction:
Fixed. We resolved a timing issue that was causing inactive Items to be caught in the Item Genome. Inactive items will no longer populate search results from the Point of Sale.
Complaint:
Salespeople had reported an issue where the "expected completion date" was cleared when a Sales Order had been converted to a Quote then modified back to a SO.
Cause/Correction:
Fixed. Flyntlok will retain the "expected completion date" manually set by users when the sale is modified from a SO to a Quote and also when converted back.
Shopify “Ship To/Customer Contact”/“Shopify ID Information” not Synching -(Ticket #FD-2810, 46972)
Complaint:
Flyntlok Managers using the new Shopify Integration have reported instances where their Shopify ID number was not properly synching between the two systems.
Cause/Correction:
Fixed. The Shopify ID number will populate the Customer PO field of the Flyntlok SO and SO PDF.


December 13th, 2023 Release Notes
Learn More at Flyntlok Dealer Management System
Check out our Flyntlok YouTube channel for more highlights of the application!
Opportunity:
Salespeople have requested the ability to set up a temporary discount on an item for a customer so that each time that customer buys that item there is a default discounting rate set. This will save users time from having to re-add the discount from the Point of Sale and serve as a reminder that the customer has that discount available.
Solution:
We have added a new "Item Discounts" module to the Customer Dashboard that will allow users to add and edit individual item discounts and set a specific expiration date for the discount. This new module will be found in the Action Buttons drop-down menu.

We have also updated the discount structure of the Point of Sale to incorporate the Customer Item discounts so that you can save a new discount directly from this screen. When adjusting/discounting the list price of a line item from the POS, Flyntlok will now give users the option to save that discount to the customer. Item discounts saved via the POS will then populate the "Item discounts" module of the Customers Dashboard.

Opportunity:
Flynlok offers users an option to email a "Signature Request" or "Lease Agreement" to customer contacts to confirm the rates and values of a Rental Contact. Currently, the email sent out is including our Flyntlok logo and mailing address. Because this can be confusing to recipients that are unaware of Flyntlok, our users have requested to have their actual company logo and address information added instead of Flyntlok's.
Solution:
We have added a new option to upload a custom Company Logo image on the Flyntlok Settings page.

To set a custom Company logo that will display on the Rental Signature Requests and Lease Agreement Emails, you will navigate to the "Admin Editor Wrench"  icon in the upper right corner of the home screen and select the "Flyntlok Settings" option from the drop-down menu. From the "Flyntlok Settings" page select the "Company Logo" link and upload a custom Company image from your device. Once uploaded this image will be displayed on the Rental Signature Request and Lease Agreement Emails.

Opportunity:
We recently released a new feature that allows users to merge open Special Ordered quantities into an existing Purchase Order. The issue is when multiple Special Orders are merged into the same PO they are combined into one line item. This makes it unclear that the remaining quantity from the original Purchase Order is not related to the Special Order. It was also not possible for multiple Special Orders to be merged into the same PO for the same item. Flyntlok users have requested that merged Special Orders populate the PO in individual line items.
Solution:
We have updated the Special Order merge functionality so that when merging a Special Order (or Orders) into an existing Purchase Order, the PO will display each Special Order as individual line items distinct from the original PO quantity.


Opportunity:
Flyntlok now offers Users the ability to merge open Special Orders with regular Stock Orders when using the Flyntlok Draft Stock Order page. Purchasing Managers have requested a more obvious indicator when an item has open Special Orders available to merge with Purchase Orders.
Solution:
We have added a new " Has Mergeable PO" icon to the Special Orders column of the Draft Stock Order page. This new icon will be displayed with open Special Orders quantity only when there are available PO's to merge the Special Order quantity into.

Opportunity:
Salespeople would like to see how many days or months an individual open Lead has been active. Flyntlok currently displays the Lead creation date on the Leads report but does not calculate a day's active "age".
Solution:
We have added a new "Age" field to the All Leads report which will display the individual Leads' age by days based on the creation date.

Opportunity:
Flyntlok offers customers the ability to have a "Text Us" widget on their company website, which allows potential customers to submit inquiries to the company. Flyntlok then takes these incoming messages and generates a new CRM Lead for this potential customer. Salespeople have requested that the associated location and department be added to the new Lead's name.
Solution:
If you have Branch Locations and Department fields set up on the "Text Us" widget, Flyntlok will now apply this information to the new Lead's name.


Opportunity:
Flyntlok offers users multiple different ways to edit and document the mileage from a Machine's odometer through the course of a Service Work Order. Users have requested a new report that will display a history of mileage logs for a specific piece of equipment.
Solution:
We have added a new "Mileage History" section to the Machine Dashboard which will display all Work Order check-in mileage logs as well as any edits to the Miles field of the Machines edit page. This new section will display the ten most recent entries as well as a link that will redirect users to an alternate view that will display ALL mileage logs for that Machine. Flyntlok will display the date, the mileage, and the user's name that performed the logging.

Opportunity:
Sales Managers using the new Gravity Payments emergepay system have requested billing address fields be added to the Text2Pay payment type. Gravity Payments offers additional discounts for enabling fraud protection steps, such as billing address fields, on the Text2Pay payment option. Flyntlok currently does not provide the billing address details over to Gravity for address verification.
Solution:
We have added the billing address details to the Text2Pay settings. Default billing information (pulled from the Customer's Dashboard) will auto-populate into the payment system when the Text2Pay option is selected, but Users will also have the option to edit this new field. N.B. Editing the address fields here does not update the original contact record.

Opportunity:
Rental managers in Anchorage, Alaska would like the option to apply a Municipality-specific tax charge on the rental of motor vehicles. Anchorage requires the collection of an 8% tax on the rental of motor vehicles with a 30-day cap of $240 for trucks, vans, and RVs or a $120 cap on all other motor vehicles.
Solution:
We have added a“Charge Municipality of Anchorage Tax” field to the Model Dashboard's edit page, which allows users to associate the specific MOA tax charge to all Machines of that particular model. We have also added a new “Charge Municipality of Anchorage Tax” check-box on a Rental Contract, that when selected, will charge the specific tax rate on the Rental Contract. This box is auto-selected when a contract is created but can be overridden by the user.


Complaint:
Flyntlok users were experiencing an issue when trying to email Sales Order PDF documents to customers where the contact record contained an email address but no contact name. In this scenario, the Flyntlok user received an error and the email was not sent.
Cause/Correction:
Fixed.
Complaint:
Flyntlok users were having an issue when trying to manually type in the start date of a Rental Contract, rather than using the date picker. In this scenario, the page would error out and users were then redirected to an error page.
Cause/Correction:
Fixed. Flyntlok users will be able to type out dates without having to break the keyboard stride.
Complaint:
Users were experiencing issues where sold Machines were able to be added to a Rental Contract via the "Actions" button of the Machines Dashboard.
Cause/Correction:
Fixed. We have removed the ability to select the "Rental Contact" button from the Machines Dashboard when the machine is in a "Sold" status.

Complaint:
When an item's description is lengthy, the generated PDF document from the Point of Sale moves the entire item line to a new page, creating an awkward formatting issue. Flyntlok users have requested that the unnecessary extra spacing be removed from PDF documents generated from the POS.
Cause/Correction:
We have updated the Point of Sale PDF allowing item descriptions to be broken up between two pages.
Complaint:
Users reported an issue when they were adding an Item onto an existing Sales Order where that Item already had previously been added to the SO and where they merged the two line items into one. In this scenario, the Purchase Plan would only account for the original Line Items' order quantity and did not reflect the updated merged quantities.
Cause/Correction:
Fixed. Purchase Plans will respect the combined quantity set from the Point of Sale.

Complaint:
Service Managers were experiencing an issue when applying a deposit to a Service Work Order where, the deposit was not auto-populating onto the final invoice.
Cause/Correction:
Fixed. The deposit will auto-populate on the final invoice.
Complaint:
Users were experiencing an issue when trying to invoice a Work Order with both Warranty jobs and Customer jobs. The customer invoice that was generated displayed costs on items associated with Warranty jobs when they should show up as $0.
Cause/Correction:
Fixed. All the warranty jobs, parts, and labor are included on the customer bill at $0 cost and $0 list.
Complaint:
Rental Managers were experiencing an issue when closing a Rental Contract, where the Contract had been fully paid for on a previous invoice including all fees and charges, Flyntlok was still generating a final invoice for $0.00.
Cause/Correction:
Fixed. Flyntlok will close the Rental Contract and no additional invoice will be generated.

Complaint:
Users were running into an issue when attempting to see how many of a certain Machine Model their company has sold, from the Sold Machines report. The report was excluding results due to a max capacity set at 15,000 results per page.
Cause/Correction:
We have increased the results limit of the Sold Machines report to 25,000.
(And kudos to you folks for selling more than 15,000 machines.)
Complaint:
Salespeople were having issues with Customer Sparks Orders not displaying the Stock available to transfer from other branch locations.
Cause/Correction:
Fixed. Spark Orders will display available stock from other branch locations. This information will be indicated by the (*) icon in the item line's QOH box.
Complaint:
Ok, bear with us here as this is a confusing bug: If a user took a Deposit (e.g. $50) on a Work Order then the Customer has a balance of $50 (since the WO is still in progress). Then you later go and sell a part to the Customer for $30 and you apply the payment using the “Deposit” payment type. The balance for the Customer should now be $20 since you just used part of their earlier Deposit for this sale. Later you go and finalize the invoice for that original $50 Work Order. The Customer should only have a balance of $20 now, but the invoice for the Work Order was still showing the original $50 deposit. Later you find out the Customer owes you $30!
Cause/Correction:
Fixed. The Work Order will now know if the deposit was partially (or completely) used on a separate transaction.
Complaint:
Service Managers were seeing a discrepancy between the timestamps displayed on the service technicians' "Timecard" Report and the actual Work Order.
Cause/Correction:
Fixed. We have addressed a timezone error on the "Timecard" report. Flynlok was incorrectly displaying clock-in/out times in the Alaska standard time zone regardless of the company location.
(Lesson learned: World does not revolve around Alaska.)
Complaint:
Flyntlok users were receiving an "Error Sending Message, Contact Flyntlok for Assistance" notification when attempting to send an SMS text message from the CRM Hub when there is an invalid phone number.
Cause/Correction:
We have updated the message displayed when attempting to send SMS messages with invalid phone numbers. (N.B. Flyntlok does not know if the number used is in service or is capable of receiving SMS messages, simply that the number/format was not valid.)

August 2nd, 2023 Release Notes
Learn More at Flyntlok Dealer Management System
Check out our Flyntlok YouTube channel for more highlights of the application!
We have added a new setting to the work order to make the job approval processing quicker. From the Jobs Tab of the Work Order dashboard, you will see a new option in the Actions dropdown titled Process Jobs. When clicked, you will see a list of your jobs, allowing you to select and process the part orders associated with the jobs.
When the process button is selected, Flyntlok will move the internal parts orders tied to the selected job(s) forward from a Quote or Draft status into a Pending or Pickup status.
When a technician clocks out of a job, Flyntlok requires them to log a note. You will now be able to view this note from the corresponding labor punch. From the Labor Tab of the Work Order, you will now see a new Note Icon on the labor punches. When you hover over this new icon, Flyntlok will display the tech note added at that clock-out.
We have added additional Credit Card information to the Sales Order. When adding a customer credit card as a payment type, you will now see the card number, the name on the card, the date the payment was taken, and the approval number populate on the payment line of the Sales Order and the Sales Order PDF.


We will now tell you what fields will be changed on the model when updated from a machine. 
We have added new settings to the Machine Receiving Voucher, you will now be able to generate a new journal entry to put the machine into a flooring account! When the QB flooring field is set on the receiving voucher, Flyntlok will now generate a journal entry for the machine instead of creating a bill. We recommend also setting the category (Floored) checked to indicate yes. This will allow Flyntlok to create new reports on the floored machine. Please reach out to the Flyntlok support team to review this workflow!
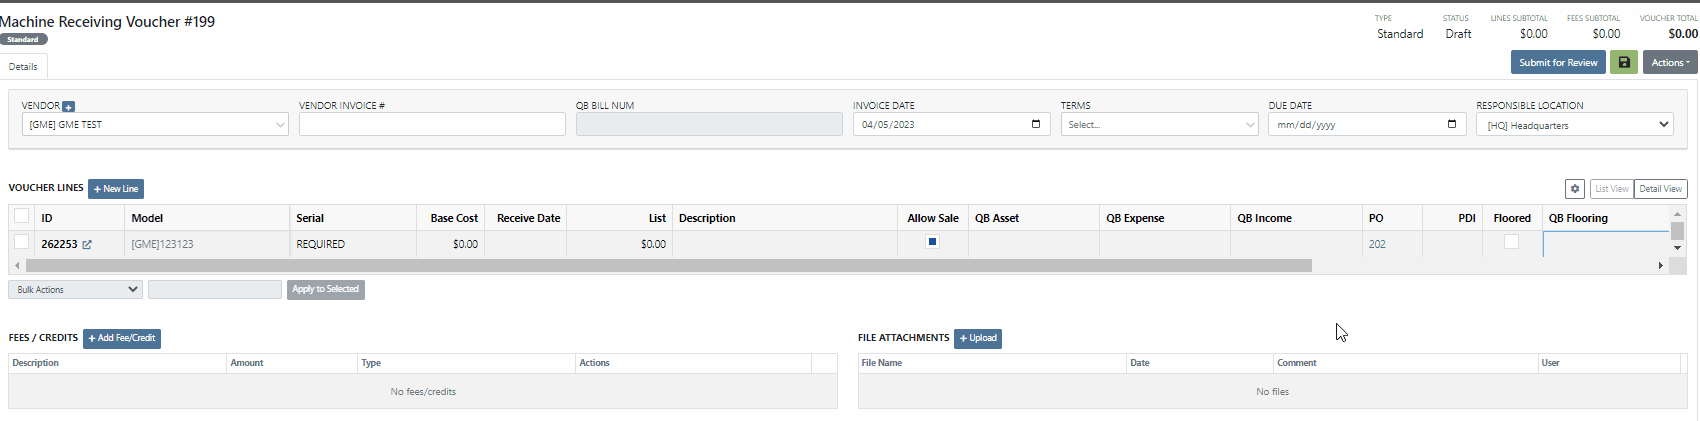
This information will immediately populate the machine's balance sheet, viewable from the machine's dashboard.

We have added the Machine Miles and Hours categories to the column chooser of the Machine Receiving Voucher.
We have updated the settings of the rental contract call-off. When a rental contract is called-off, invoicing uses the call-off date if it exists; (otherwise uses check-in date.) The Call-Off date will now populate on all relevant rental PDFs and lease agreements.


We have updated the Tax Rules pop-up on the customer's dashboard. This will make configuring a customer's tax rules easier.
You will now be able to send files such as PDFs, Photos, or Videos to new leads when communicating with them via SMS.
Learn More at Flyntlok Dealer Management System
Check out our Flyntlok YouTube channel for more highlights of the application!
The Item Line allows users to effectively view part items and their locations, edit ordered quantities, edit fulfilled quantities, and edit amounts as well as check traceability, verify correct Item Numbers, report lost sales, remove items from SO entirely, and create/edit discounts for specific items. The Item Lines appear as rows in descending order by when they were added to the SO.
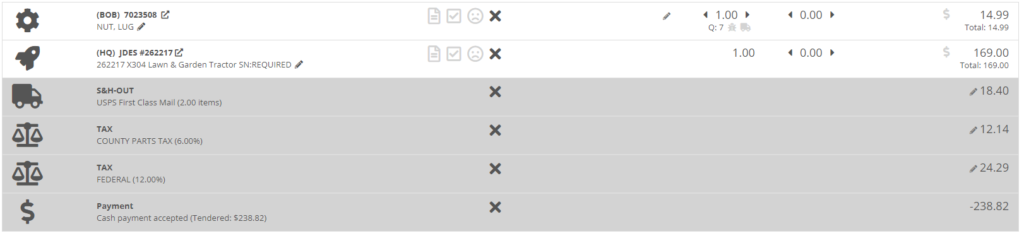
The POS icons that appear in the left-hand column help signify what classification each Item Line is, and the different icons can be defined as follows:
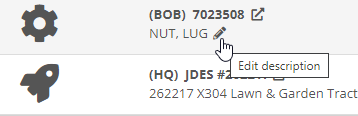
The Product/Service column allows users to view Item Number, Item Description, go to Item Dashboard, and change Item Description. The Item Description is listed underneath the Item Number in the Product/Service Column.
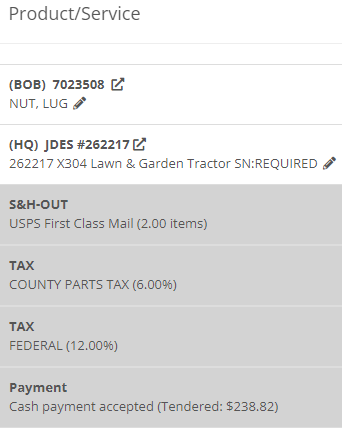
Click the Item Dashboard button located just right of the Item Number to open up the Item Dashboard in a new tab.

Click the Pencil icon to change the Item Description.
If Item has a Core, the Item Line will contain a Dirty Core option underneath the item description. Check the box if the Dirty Core has been returned. You can set the Core status of the Item when editing the Item's Dashboard.

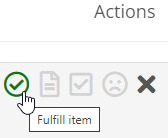
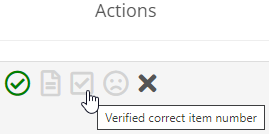
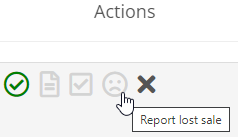
The Actions column, located in the middle of the POS, allows users to check fulfillment status, fulfill item, check traceability, change status of item number verification, report lost sale, check if there is updated pricing, and remove item from the SO.
To fulfill all item quantities, check the green Circled Check Mark icon
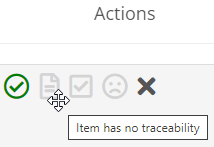

To check Traceability, click the Traceability icon ![]() .
.
To change status of item number verification, click the Squared Check Mark icon.
To Report Lost Sale, follow these steps:
To check Updated Pricing for an item that has changed pricing, a golden icon [picture of the icon] will appear in the action column. After clicking, an Update Pricing notification will pop-up and ask if a pricing update is applicable. If so, press the Send button and the item price will be updated appropriately.
To remove an item from the sale order, click the X, and the item line will disappear from the POS.
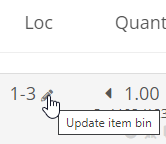
The Location column allows users to update or enter in an Item BIN, or a designated inventory storage location. To set the location, click the Pencil icon and type the BIN into the prompted text.
The Quantity column allows users to view and change Ordered Quantity, and view Quantity on Hand (available quantity), Quantity Consigned, Total Quantity, Dispute Quantity, and Request Transfer.
To change Ordered Quantity, use the arrows or click into the quantity number to manually type in the desired quantity. The QOH, or Available Quantity, is located directly below. Also, by clicking the Information icon, the QOH Breakdown Tab pops-up with the Quantity Available, Consigned Quantity, and Total Quantity.
To Dispute Quantity, click the Ladybug icon and enter the quantity that is actually on hand, not including ordered quantity.
To Request Transfer Quantity, click the Truck icon and fill out the Transfer This Item pop-up page. This page requires the Transfer Location, Transfer Quantity, Shipping Method, and if Drop shipped. Select either Transfer or Quick Transfer to finish the Transfer process.

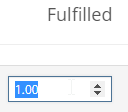
The Fulfill column allows users to view and change fulfilled quantities. To change fulfilled quantity, either click into the Fulfilled Quantity number or click arrows to incrementally add or take away Fulfilled Quantity.

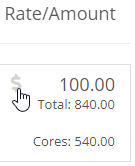
The Rate/Amount column, located furthest right of the POS, allows users to view and change Item Prices, as well as add discounts to each Item Line separately. The top number of the Rate/Amount cell is the Item Price which takes into account the Item Discount. Just below, is the Total Item price which additionally takes into account the Quantity Ordered.
To add an Item Discount, click the Discount Line cell and fill out the Line Pricing pop-up menu and press Save. The Line Pricing pop-up menu requires Discount Percentage, Reason for discount, and will propagate the New Amount.

You now have the ability to transfer an item directly from a sales order! Previously, this could only be done from the item dashboard. After adding an item to the sales order that needs to be transferred to your location, you will see a truck icon next to the QOH of the item.
Clicking this will bring up the transfer information box. In this form, fill out how much, from where, your comments, your preferred shipping method (for the transfer) and whether or not this should be drop-shipped to the customer. This will initiate queue up a request to transfer the item to your location.
Tip: "Quick Transfer"
The quick transfer button will move your inventory instantly from one location to the next. This means upon clicking this button the QOH is immediately removed from the source location and moved to the destination location (your invoice location). This by-passes all the current transfer workflows in place, but will still create a record of the transfer.
Flyntlok will now keep your customer data from QuickBooks Online up to date in real time with Flyntlok. This ensures that things like the customers balance due stay in sync between the two systems with less clicks, and less human intervention.
!!! Tip "Loading QuickBooks Customer Data"
You can still sync the two systems by heading to the Wrench -> Accounting -> QuickBooks online and clicking the `Load Customers` button, but with this update, you really shouldn't have to do that ever again!
!!! danger ""
This is a beta feature. We will be monitoring its status over the next few weeks. We will be expanding on it during this time frame as well to incorporate all of the data between the two systems. Less clicks!
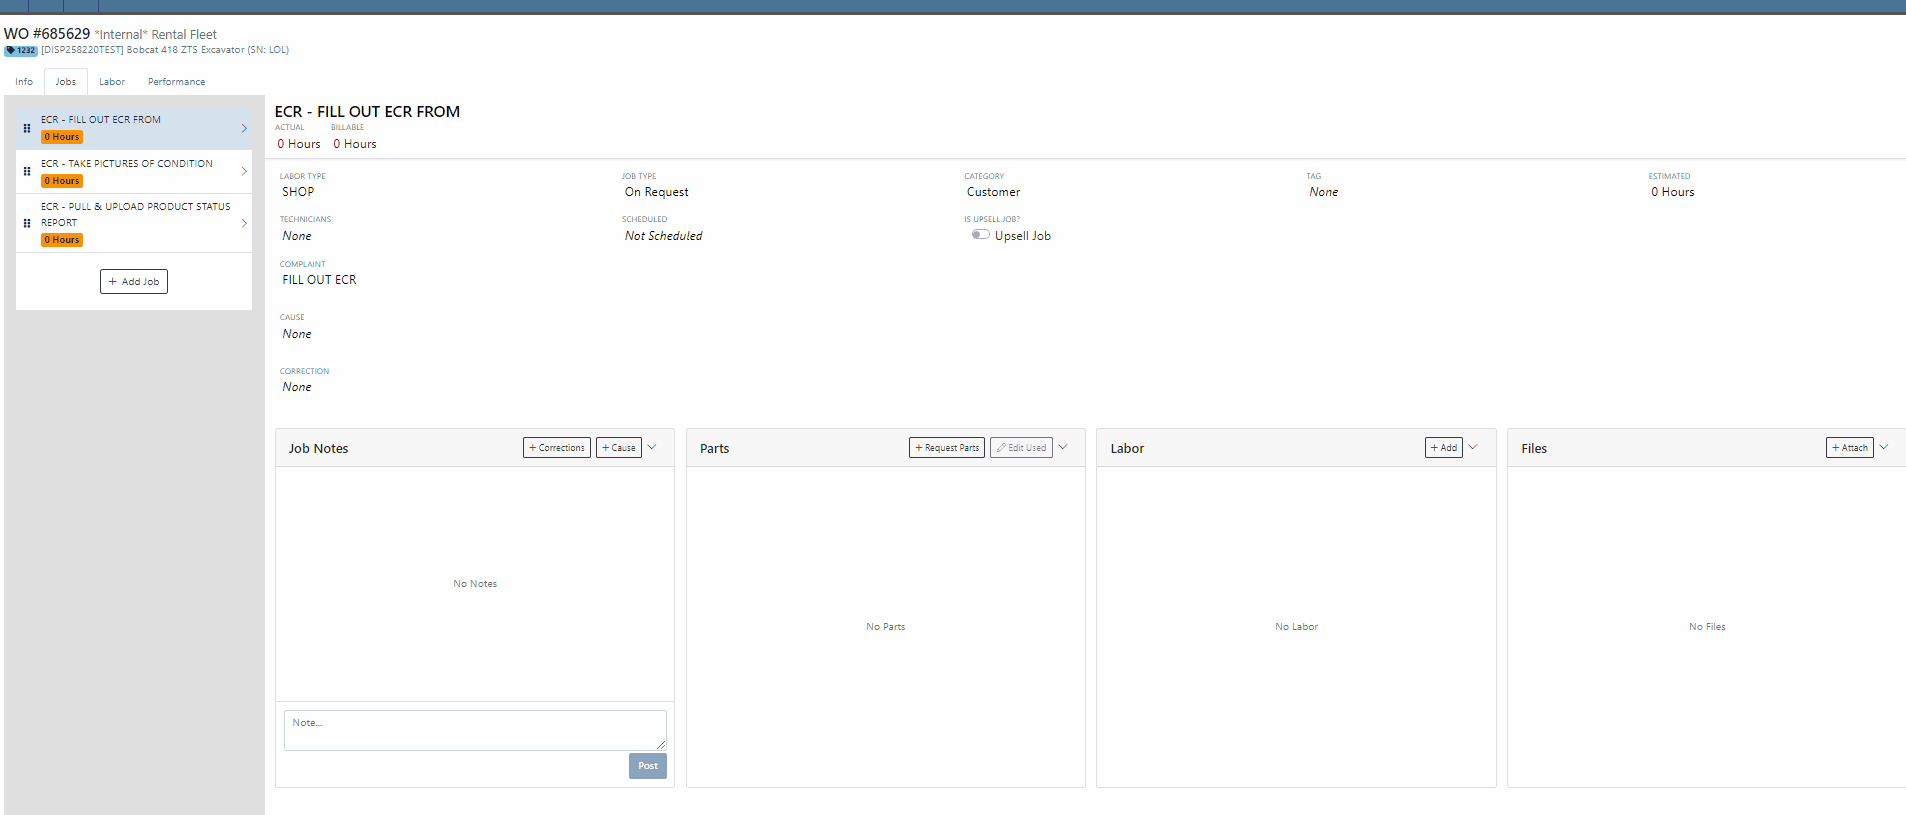
When an Equipment Condition Report is attached and completed on a work order, we will now generate a segmented work order for the needed repairs.
1. After adding an ECR in the Associated Forms section, selecting it will allow you to edit the form.
2. Selecting **No, requires fix** will prompt the system to generate a work order for the repairs.
3. When all appropriate fields are filled out on the ECR, next to the form number, you will click the *Save* button and then the *Go to Work Order* button.
4. The auto generated work order will be created after the machine is checked out from the work order.
5. On the new work order, for everything that was marked as needing a fix, there will be a job for that repair.
!!! danger ""
None of the jobs that are auto generated will have a labor type set. Be sure to set this before clocking into the job.
!!! tip "Rental Check Ins"
A reminder that Flyntlok can auto generate work orders when a rental unit is checked in. The work order will already have an ECR form attached. This allows for rental units to be checked in, have their condition reviewed, and then a work order generated for any repairs needed. We can also create new condition options on the ECR that will create a work order for the customer of the rental if you choose to bill them for repairs. Please reach out to Flyntlok to get this configured!
We have removed alternate payment options when a customer type is internal. You can only use the Flyntlok generated payment in this case.
We have added an internal cost report for work orders. This report will break out your labor cost, parts cost, and labor entries by job.
With this data, we can also show you your profit, margin, estimated hours, and actual hours per job.
If the work order is not in an Invoiced Status, you will go to the Actions drop-down and select Print Internal to access the report.
If the work order is in Invoiced status, there will be a red Internal button next to the Print and Email buttons, where you can access the report.
!!! note ""
This document is currently in beta. Any feedback on layout or data would be greatly appreciated to help utilize this report!
!!! danger ""
The internal document only works for segmented work orders. You cannot view this report on simple work orders.
We now send notifications when a quote is set to expire. You will receive notifications when the quote is 7 days from expiring, 3 days from expiring, and the day of expiration. You will see a green notification that shows in the lower right of your screen.
And you will get a red banner on your dashboard.
When a quote hits the expiration date, we will now mark it as expired with a message indicating that it was rejected due to expiration.
We made a few enhancements to the auto-generating DMS work order feature.
1. When setting the location on the work order, we will first check the default manufacturing location of the item, then the default manufacturing location set in the Flyntlok Settings page, and if neither of those are set we will set the location based on the sales order location.
2. The end date of the work order will now reflect the date that is set in the *Due Date* field on the sales order.
3. The description of the item on the sales order will be copied into the work requested section of the work order. This allows for that description to be set per sales order for custom work requests.
4. The origin of the work order will be noted.
5. The public message on the sales order is set as a note on the work order.
6. The customer PO on the sales order is noted on the work order as well.
On the work order PDF, we will now show the tag number and work station that have been assigned. We also removed the date that is associated with the hours and miles on the machine.
From a variance report for a physical inventory sprint, you can create a journal entry for those item variances. When you are on a variance report, you will see a button in the upper right that will create the journal entry.
This journal entry will contain a debit and credit for every item that had a variance. An increase will result in a debit to the asset account for that item, while a decrease will result in a credit to the asset account of the item.
We will automatically assign the correct asset and expense accounts. We will first look for the part's asset account, and if that isn't set, we will use the vendor's asset account for that item. For the expense account, we allow you to select an expense account to be used in the Flyntlok Details admin editor.
!!! note ""
Go to the wrench in the upper right -> Flyntlok -> Flyntlok Details. You can find the Inventory Variance Expense Account field towards the bottom of the accounting section.
If that default expense account is not set, we will first look for the parts expense account, and if that is not, set we will use the vendor's expense account of that part.
!!! warning ""
We do not restrict the creation of multiple journal entries for one sprint.
Flyntlok now supports adding an account payment type with any other type of payment! To use this feature you will need to add an Item Reference to your payment types that is different from the account payment type item reference. This item reference is a QuickBooks item that will be used to create the invoice in QuickBooks with the payment line.
You can edit your payment types by going to the admin editors, hovering over Point of Sale, and selecting Invoice Payment Types.
We have added a field to your labor types that indicates if a labor type is active. This allows you to keep old labor types at their rates and cost so that they can still be accurately reported on. When doing a labor rate or cost change, you will need to create a duplicate of the labor type, adjust the cost and rate of that new labor line, then mark the old one as inactive. We will then remove that inactive labor type from being shown when selecting a labor type to clock into.
You can now review order confirmation and shipment information directly in Flyntlok. This data was previously only available on the Volvo Parts Online Portal. By line, you can review where the part is coming from, and get information such as the carrier and tracking number. This data is updated real-time from Volvo.
We now exclude quote status internal parts orders from showing on work order PDFs. Internal parts orders must at least be in draft status for them to be seen on the PDF.
When you go to edit a work order, you can now add, change, or remove tags and work stations.
Our quote system has been revamped to allow tracking of quote conversions and their reasoning. Through this we will be able to report on how many of your quotes are accepted vs rejected and your valuation of open quotes.
When you are on a quote, in the Payment tab you will now see three new options:
- Modify Quote: This will allow you to turn the quote back into a draft sales order and make changes.
- Reject: If a customer rejects the quote, clicking *Reject* will mark the current date as the date of rejection, and we will give you the option to categorize and explain the reason for the rejection.
- Accept: When the customer accepts the quote, selecting *Accept* will mark the current date as the date of acceptance and you will have the option to attribute that sale to a category.
!!! warning ""
When you turn a sales order into a quote, you can set the date of expiration. When this date is reached, we will mark the quote as expired.
!!! warning ""
When a quote is accepted, you will not be able to turn it back into a quote.
!!! warning ""
When a quote is rejected, it cannot be reopened.
We have created a few dashboard grids that report on the quote conversion statistics. These dashboards WILL NOT have legacy data. They will only contain quote data that is created from today and on.
!!! info ""
If you have current pending quotes, turn them into a draft sales order, then turn them back into a quote to start the conversion tracking.
We will have more reports in the future, and are open to any requests of reports that would be valuable to you or your company! The current options are:
- My Quote Stats YTD: Your quotes' valuations, broken out by month and quote status.
- My Quotes Expiring: Your quotes that are expiring within a week.
- My Quote Conversion: Your quotes' acceptance and rejected amounts.
- Company Quote Conversion: Quote acceptance and rejection by store location.
- Quotes by Sales Person: Quote counts by salesperson. (Note: This will only show users who are set to be Sales for their user type. This is set in the Users admin editor.)
!!! warning ""
You will need to talk to your management team to help get your dashboard configured if you are interested in the reports.
!!! Note ""
All the dashboard grids are YTD(Year To Date) information except for My Quotes Expiring.
When you charge a CC fee, we now link that fee to the CC charge that it is associated with. If the CC charge z-out is approved, the fee will move with that charge to approved, likewise, when it is disapproved, the fee will be marked as disapproved. This allows for you to remove CC fees from being queued up to post to QuickBooks until you approve the CC charge.
Happy Veterans Day
From all of us at Flyntlok, to all the veterans out there… we salute you! Thank you for your service and sacrifice!
We are in the process of creating a new way to track quote conversions and save old versions of quotes within Flyntlok. This will include the ability to accept, reject, and modify quotes. When modifying a quote, we will take a snapshot of that quote before it is modified so that you can see what changed and potentially what made the deal! This week we are releasing a few smaller features of the new quote system to start tracking quote success and rejection rates. You can read more about this week's quote features below.
We've revamped our quoting system to now track when a sales order is converted to a quote, and when that quote is accepted or rejected. When a quote is rejected, we give the salesman the opportunity to explain why the quote was rejected. Rejected quotes will show on your wins/losses report as a loss.
!!! info ""
The wins/loss report should be located under the Company tab on your left-hand nav. If you have difficulties finding or adding that menu, please reach out to Flyntlok!
- Category: This will help to categorize the reasons for a quote rejection.
- Lost To: You can name who the customer went with if there was competing sale.
- Reason: Here the salesman can add more relevant information as to why the customer rejected the quote.
When a quote is converted to a sales order, we mark that date as the successful quote conversion date.
You now have the ability to take overpaid amounts on sales orders and apply that amount to the customer's deposit. Instead of issuing a return transaction for the excess amount, you can select the Customer Credit payment option on the sales order to put that amount into the customer's deposit. As with regular deposit transactions, that amount will not show on the customer's dashboard until that payment line is approved and posted by your accounting department.
!!! warning ""
This will only work for customers that do not have an account.
After marking a physical inventory plan as complete, you now have the ability to reverse that plan to make any necessary changes.
We have added more to the transaction lockdown feature when doing an inventory count. Previously, you could only prevent the *order* button from being clicked on the sales order. Now, you can also prevent parts from being received/returned on POs, inter-store transfers from being executed, and ERP work orders from being graded. If the lockdown is active, and there is an active plan being executed, the system will only lockdown for the location with the active plan. This allows for the rest of your company to continue working.
We recommend the lockdown to prevent transactions from happening while you are counting parts. If you don't lockdown, and transactions are created, it has the potential to negatively affect your reported QOH.
!!! info ""
To activate the lockdown, head to the admin editors->Flyntlok->Flyntlok Details. At the bottom of the accounting, section will be a check box called Lock Inventory During Counts.
The new Labor History report will give you a breakdown of your DMS work order clocked time vs billable time for the month. We give a summary at the top of the report that shows the hours by location with rates and costs of those hours.
You can schedule this report by going to the Report Scheduler within the Flyntlok admin editor.
We have added a new item type field that, when assigned to an item, will create a simple DMS work order to create the item. This can be used for selling predefined services like flat-rate service work, or for custom work with a set quoted price.
!!! tip "To utilize this feature, follow these quick and easy steps"
1. We have pre-generated a new item type for you called "Work Order Generator". (You can modify this on the item types editor)
2. Create a new item in Flyntlok. While filling out this form, ensure you set the item type to "Work Order Generator".
3. You will need to set the proper income, asset, and expense accounts on this item for recording purposes, but it is not required to test out the feature.
4. After creation of the item, create a new sales order and sell this item.
5. Once you have clicked order on the sale, a new DMS Work Order will have been auto-generated for you.
Upon closing this work order, we will update the cost of the item on the sale to be the sum of the parts costs on the work order. We will also update the MSRP of the item on the sale to the sum of the list price of the parts used on the work order. This is to give you an idea of how close you were to your set price for this work.
We have amped up the reporting of costs on MRP work orders. You will see more fields that report on costs within the details tab of work orders. Many of the new labor cost calculations will depend on the labor time and labor type being set on a per-item basis. (The labor time was released last week, check out the information below!)
??? info "MRP Labor Averages"
If you are an MRP customer, when editing an item, you will now see averages under the Labor Time input. These averages will show actual and billable times of the 10 most recent closed work orders for that item.
Just above the Labor Time field is the Labor Type field. This field will allow you to select one of your current labor types as a default for this item. The cost of the labor type selected and the labor time that is input will be used to find estimated labor times and cost or sub labor times and costs on work orders.
Here is an explanation of all the cost fields and how they are calculated:
- Expected Parts Cost: This will be the current cost of the item being built multiplied by the quantity being built.
- Actual Parts Cost: This is the cost of all the items on the BOM being multiplied by their needed quantity and summed together.
!!! warning ""
Your expected part cost should equal the actual parts cost. This will help to accurately reflect the cost of that item.
- Expected Labor Cost: We calculate this by taking what is set in the *Item Labor* field for the item being built, multiply it by the quantity being built, and then multiply it by the cost of the labor type that is set for that item.
- Actual Labor Cost: This will be the billable time that is set on the work order, multiplied by the labor types' cost that is used to record the billable time.
- Sublabor Cost: Using the labor time and labor type that are set for all item's on the BOM, we multiply the quantity needed of the item by the set labor time, and then multiply that result by the cost of the labor type.
- Misc.Cost: A miscellaneous cost can be set by item. This cost will include anything that is not a labor cost or subpart cost when building or purchasing the item. This will field will take the miscellaneous cost of the item being built and multiply it by the quantity being built.
- Subparts Misc. Costs: This will take all item's on the BOM, multiply the needed quantity to build by the amount set for Misc. cost of that item, and sum this result from all the items.
- Total Costs: This will sum subparts, sub labor, labor, and all miscellaneous costs to show how much this or these items cost to build.
- Expected Labor Time: This will be the time that is set in the *Labor Time* field of the item, multiplied by the quantity being built.
- Actual Labor Time: This will be the time that is clocked in on the work order.
- Sublabor Time: This will be the labor time that is set on each item of the BOM, multiplied by the quantity of that item needed to build.
Along with the new reporting, you can now update the cost and labor time of an item when the final grade is submitted.
When the final grader goes to sign off on the work order, they will get two comparisons.
- Unit Cost: will show what is currently set as the cost (Expected) vs what the subparts cost is per item (Actual).
- Unit Labor: will show what is currently set in the item labor field for the item (Expected) vs how much time was clocked on the work order per item (Actual).
Below both comparisons are checkboxes that default to not checked. Checking these will update their respective field for the item being built. If the work order is linked to a sales order, we will go out and update the cost of that item on the sales order.
We have added notifications when submitting electronic POs. We find this necessary on a few of the integrations we currently have as they do not provide an immediate response to the PO. Starting with our Volvo integration, when you submit a PO, you can expect a notification to come via the lower right pop-up and blue banners on your dashboard. You no longer should have to wait on the PO and constantly refresh the page hoping for a response from the vendor.
Just a reminder that we are still in the process of migrating over Flyntlok customers to the new Gravity portal. A Flyntlok consultant will reach out to you when we are ready to migrate your company onto the new keyed-in transactions system. If you have any questions, please reach out to Flyntlok if you have any questions!
We have released a new feature that allows you to create, edit, view, and schedule work orders on a calendar page at the week- and month-level. You can also filter by five separate criteria to find the exact set of work orders you're looking for.
Dragging and dropping is enabled, allowing work orders be moved around freely. This makes scheduling much quicker and more efficient.
To get to the work order scheduler, go to the *Service Overview* tab and select *Work Order Scheduler*.
!!! note ""
Please check out document to learn more about this feature!
[***Work Order Scheduler***]
!!! attention ""
This feature is being released in beta. Please let us know any issues you run into. Feedback is always welcome!
We have added the ability to lockout all sales order from moving out of draft status when your company is performing an inventory count. This will prevent the *Order* button from being clicked. If you would like this enabled when performing your count, please reach out to Flyntlok!
You now have the ability to make a PDF version of your variance reports for inventory counts. When you are on a variance reports page, click the pdf icon in the upper right!
We've added the ability to print PDFs of inventory plans. This allows you to print the plan, take the count, and log the adjustments later if you are not able to take the inventory count on a mobile device. You can find the link to print the PDF on the *Physical Inventory Sprints and Plans* report, next to the plan's name.
We now allow you to duplicate journal entries.
Copying a journal entry will retain all data except for the journal date, journal number, and any attachments.
If you are an MRP customer, when editing an item, you will now see averages under the Labor Time input. These averages will show actual and billable times of the 10 most recent closed work orders for that item.
!!! attention ""
In the near future, we will use this field to estimate your sub-labor costs per work order.
Now, when you add a comment to a pending action, that comment will be added for all associated actions as well.
We have added a new feature that will make doing your monthly, quarterly, or yearly inventory counts a breeze! This feature gives you the ability to create what we call an inventory sprint. Within a sprint, you can:
- Create plans that can have specific bins or ranges of bins assigned to them.
- Assign an employee to execute a plan.
- Set a date that the plan is due by.
Along with this, we have created reports that will show you how much inventory has been adjusted and how your inventory valuations have changed.
!!! note "None of the adjustments will affect inventory until all the plans have been marked complete and the sprint is marked complete"
We prioritized making this feature mobile friendly to give employees the opportunity to carry a smart phone or tablet through the warehouse and execute the counts.
!!! danger ""
We have a guide on creating, executing, and closing out these inventory sprints.
Flyntlok has been working in the background with Gravity Payments (previously referred to as Charge It Pro) to upgrade keyed-in credit card transactions to the newest and most secure platform provided. If you are currently utilizing Gravity as your payment processor, a Flyntlok consultant will be reaching out to you within the next two months when you are slated to upgrade.
!!! primary ""
Now when using the S? search action, you can search for split sales orders.
From the vendor dashboard, you can now access a date range report for the vendor's part order sourcing. This will show you the selling price of items from this vendor that are sold over the counter and on a work order between the dates that you input.
We have revamped the old labels and added new ones! All of these labels now contain QR codes. When you scan the QR code with a smartphone camera, you will get a notification that will take you to the entity that the label was printed for. There are five different locations that these labels can be found:
1. On the item dashboard, under the actions drop-down, there is a Print Label option. This label will contain the item number, bin location, vendor, and list price, along with a QR code that takes you to the item's dashboard.
2. On the item purchase order, the far-right column has a printer icon that, when clicked, will generate a label. This label will contain the PO number, item number, quantity received, and if the item is a special order, you will see the sales order number and customer. The QR code on this label will take you to the purchase order when scanned.
3. From a sales order, there is a new barcode icon in the upper right that will generate a sales order label. This label will contain the sales order number, customer PO, ready date of the sales order or the date that the label was printed, customer of the sales order, and the selected contact information or the contact information for the customer. The QR code here will take you to the sales order.
4. From a DMS work order, in the Actions dropdown, the bottom option of the *Informational* section is Print Label. This will print a label for the work order that will have the work order number, machine, customer, and contact info for the customer. This QR code will take you to the work order.
5. From an ERP work order, in the Actions dropdown, the second to last option is Print Label. This will print a label for the work order that will have the work order number, item, department, priority, due date, quantity, and reference if it is linked to a sales order. This QR code will take you to the work order.
When you print a purchase order, if there is an account number associated with that vendor, it will show in the Vendor box of the purchase order pdf.
On the strategic sourcing report, we have updated it to follow our rules of only being able to set metric override or metric override date when the other is also being set or is already set. We have also added the ability to update the metric override type on this report!
??? info "What is the strategic sourcing report?"
Strategic Sourcing is used as a quick view for vendor stock orders. At the top of the page, you can select a location and vendor that you want to pull the stock order report for. This makes it easier for viewing multiple different vendors' suggested stock orders instead of creating draft stock orders for each vendor. We also allow you to update an item's reorder point, metric override, metric override date, and metric override type from the report. Strategic Sourcing will be located under the purchasing tab on your left nav. If you don't see the report there, please reach out to Flyntlok to get it added!
On the vendor dashboard, we have added a link to a report that lets you view all items that were received for the vendor between a specified date range. The link is located at the top of the Most Recent Purchase Orders box, next to the View All option.
We have added a hotlink for purchase orders on manufacturing work orders. This link will take you directly to the Flyntlok purchase order that is input.
On vendor purchase order drafts, we have added sold 180 and sold 180i columns.
!!! warning ""
- Sold 180: This will be the quantity of the item sold in the last 180 days.
- Sold 180i: This will be the total number of sales documents that the item was sold on in the last 180 days.
When a warranty type customer is set as the customer on a sales order, the machine search field will now search through all machines associated with your company.
When a standard or tax-exempt customer is set as the customer on a sales order, the machine searcher will now search through machines owned by the customer and machines that are part of the company's machine inventory.
When editing a vendor, you can now search for revenue, asset, and expense accounts by account number and view the number of each account.