Last Release Notes
August 13th, 2025 Release Notes
Not yet a Flyntlok Customer?
Learn More at Flyntlok Dealer Management System
YouTube
Check out our Flyntlok YouTube channel for more highlights of the application!
Opportunity
Dealers needed a consistent way to handle serialized items, from receiving through invoicing, without losing serial number tracking. Previously, serialized items in Flyntlok could only have their serial numbers entered at the point of sale. This meant that dealers had to manage serials outside the system when receiving or transferring items. As a result, internal tracking was cumbersome, warranty cores were difficult to manage, and there was no reliable way to know which serial numbers were available to sell.
Solution
We’ve overhauled serialized item handling and implemented a generalized workflow that provides clean serial capture during receiving and sales. The new process works like this:
This means serials are now tracked from the moment they enter your business until the moment they leave it.
Configuration
To start using serialized items, you will first need to create or configure an Item Type for serialized items.


Receiving
When receiving a serialized item on a voucher, Flyntlok now prompts you to enter the serial numbers during receive. This ensures inventory has accurate, traceable serials right away.

If a receive is undone, any serial numbers created in that process are also automatically removed, keeping inventory clean.
Sales
On Sales Orders, serialized items can now be fulfilled by picking from the available serial numbers in stock. For faster workflows, a Scan Mode option has been integrated into workflow so counter staff can scan serials directly at checkout.

Ownership of the serialized unit updates as soon as the sale is completed.
Management
Serialized items can also be managed directly from the Item Dashboard using the Serialized Units Widget. This provides a quick way to review, add, or manage serials without going through receiving or sales.


Opportunity
When searching Vendors on the Part Purchase Order page, if a search returned no results, the user would be prompted to create a new Vendor. Managers requested more control over their users' ability to create one on this page, to prevent unintentional or unauthorized creation of duplicate Vendors.
Solution
A new permission is available on our Access Control page. Under the "Vendor" section, a permission labeled "Allow Vendor Creation on Purchasing Pages" will toggle the user's ability to create a new Vendor while creating or editing a Part Purchase Order.
Opportunity
Dealers often order the same part from multiple distributors, which leads to duplicate item records and makes inventory tracking and receiving confusing. Users needed a way to receive a purchased part into stock as a different part and to find lines using alternate numbers on POs and vouchers.
Solution
We’ve added a new “Receive As” option on the item edit page. This lets you designate a main part that all other versions should be received as. For example, if you set Part A to “Receive As Part B,” any purchase order for Part A will automatically be received into stock as Part B.
In addition, searching on purchase orders and vouchers has been improved so that if you enter an alternate part number, the system will still pull up the correct line.
To configure, edit a part and look for the "Receive As" field in the Purchasing section of the page:


Opportunity
Salespeople requested the ability to specify individual line items to be drop shipped, instead of the entire Invoice as a whole.
Solution
Added a dropship option on the Pick / Order behavior editor. Clicking the gear icon on the Invoice detail under the quantity column will show these options.

Saving this selection will cause the line to be marked as “Drop Ship”. When the Invoice is processed, a Purchase Order will be generated for the part, which will be shipped to the customer’s address. Other items on the invoice will still be ordered or pulled from stock like normal.

The original drop ship button under the Shipping Methods tab has been renamed to “Drop Ship All To Customer.” Checking it will work as before, and mark all lines on the invoice to be drop shipped.
Opportunity
Managers setting up Work Orders noticed the name of the customer’s address was not displayed when choosing an on-site address for the Work Order. They requested to see the address’ name as it is the primary way they identify their addresses.
Solution
The address’ name is now presented when selecting an on-site address on the Work Order. Furthermore, you’ll also see customer address names when selecting an address for pickup or delivery.
Opportunity
Technicians using the mobile view needed an easier way to return to the main Work Order page from a Job page. The back button often left them stuck on the previous page they had visited instead of the Work Order page, creating confusion during navigation.
Solution
A direct Work Order link has been added at the top of the Job view in mobile, giving technicians a quick and reliable way to return to the main Work Order page.
Opportunity
Sales and Rental Managers wanted to be able to see Reservations marked as open-ended on the Customer Dashboard.
Solution
These reservations are now visible in the “Active Reservations” widget.
Opportunity
Users reported that during peak hours, emailed documents and notifications could be delayed, slowing down communication with staff and customers. Timely delivery of these messages is critical for smooth daily operations.
Solution
We’ve made (and continue to make) behind-the-scenes improvements to our email system to increase speed and reliability. Our aim is to reduce delays during busy times so your staff and customers receive their messages more quickly and consistently.
Complaint: Internal Work Order PDFs were displaying fee prices instead of fee costs, and total costs were being calculated using prices rather than actual costs.
Correction: Updated Internal Work Order PDFs to display fee costs and use them in total cost calculations.
Complaint: Sales Orders containing kits could remain stuck and not move into the Delivered status. This happened when receiving the kit parent, if any sub-items had a quantity of 0, their received quantity was not updated, leaving the order in a broken state.
Correction: Fixed the kit fulfillment logic so that sub-items with a quantity of 0 are properly updated when the kit parent is received.
Complaint: Salespeople reported that in some cases, the PDF receipt of a Sales Order would display the subtotal as one cent off from the actual Sales Order.
Correction: Fixed.
Complaint: Service Managers reported that the billable total in the Job Finances section of the Work Order Dashboard Performance Tab would sometimes be different than the sum of the lines.
Correction: Rejected jobs billed by estimated hours were being included in the total calculation. These have been filtered out.
Complaint: Sales Orders paid using saved credit cards were sometimes having duplicate credit card surcharges applied, causing customers to be charged twice.
Correction: Fixed.
Complaint: Accountants reported that their Sage Intacct credit accounts would sometimes not populate on the generated Machine Deprecation Journal Entry.
Correction: Fixed.
Complaint: When returning a final Work Order Invoice, job lines from the original Work Order invoice were incorrectly carried over and displayed on the return.
Correction: Fixed.
Complaint: Users reported that they were unable to group columns on the Upcoming Maintenance Schedules page.
Correction: Fixed.
Complaint: Managers noted that all users were able to preview a machine's margin calculation while selling a Machine. Toggling the "View Internal Pricing Info" button did not toggle this field.
Correction: Fixed. Additionally, for those with the permission enabled, we have made the toggle button available on the "Sell Machines" pop up so users do not have to close it to reveal margin information.
Complaint: Managers noticed the customer’s name they’re searching for does get used as the name in the “Create New Customer” form on the New Work Order page like it does on a Sales Order.
Correction: The name typed into the Customer Searcher on the New Work Order will now be used to prefill the name in the Create New Customer form, just like on Sales Orders.
September 17th, 2025 Release Notes
Learn More at Flyntlok Dealer Management System
Check out our Flyntlok YouTube channel for more highlights of the application!
Opportunity
Salespeople requested the ability to add discount tiers to customers when they are being created from the Invoice.
Solution
This functionality was added to the “Quick Create Customer” dialog box.

Please contact your friendly Flyntlok consultant if you are interested in activating this feature for your sales team!
Opportunity
Salespeople need better visibility into machine warning notes during the sales process. Previously, these notes were only accessible by navigating to the Machine Dashboard, which slowed down workflows and increased the chance that important warnings could be overlooked.
Solution
Machine warning notes are now fully integrated into the Sales Order page. When searching for machines to sell, the warning note is displayed.

When a machine on a Sales Order has a warning note, an icon is shown. Hovering over it reveals the note.

Opportunity
When searching for parts with the Magic Wand tool, users could only see quantity on hand at their current location. This made it harder to quickly identify stock available at other branches, slowing down sales and fulfillment workflows.
Solution
The Magic Wand searcher now provides visibility into inventory at other locations:

A yellow asterisk next to the quantity badge indicates that additional stock is available elsewhere. Hovering over the badge reveals the quantities on hand at other locations. This makes it easier to identify and source parts across your organization without leaving the search screen.
Opportunity
When viewing costs using the "View Internal Pricing" ![]() tool on Point of Sale, sales managers could only see margin as a percentage, making it harder to quickly assess the actual dollar value of profit.
tool on Point of Sale, sales managers could only see margin as a percentage, making it harder to quickly assess the actual dollar value of profit.
Solution
We now display both percentage and dollar value margins, giving sales teams clearer insight into profitability at a glance.
Opportunity
Users (Wayne once again) wanted more control and efficiency when importing parts into Point of Sale. Previously, if a part existed across multiple vendors, the system required manual selection of the part for each line.
Solution
We’ve made enhancements to the Point of Sale import tool.
Additional improvements:
These changes streamline imports, reduce manual corrections, and improve data accuracy on invoices.
Opportunity
Sales Managers requested clearer visibility into estimate totals. Currently, estimates only showed an overall total, leaving customers and staff without an easy way to see how parts, labor, discounts, and taxes contributed to the final amount.
Solution
We've added a new setting: "Display detailed subtotal breakdown on estimate". When enabled, estimates will now include a breakdown showing Total Parts, Total Labor, Discounts, Subtotal, Taxes, and the Overall Total.
To turn this feature on, go to Flyntlok Settings → Sales section.
Opportunity
Sales Managers working on-the-go wanted the ability to not only upload machine images from their mobile devices but also publish listings online quickly. The "Advertise" field is used by some teams to communicate to online sales reps that a machine is ready to be listed. Previously, the "Advertise" field could only be edited from the desktop interface, slowing down the process of getting machines online.
Solution
The "Advertise" field is now editable when managing machines on Mobile. This allows sales teams to upload images and immediately mark machines for advertising in one step, streamlining the process of getting inventory online faster, from anywhere.

Opportunity
Technicians and Service Managers needed a faster, more flexible way to access files uploaded to Work Orders. Previously, clicking on a file link always opened the file in a new browser tab, making it inconvenient for users who simply wanted to download files directly, or download multiple files at once.
Solution
We’ve improved file handling on the Work Order Dashboard with new actions:

These enhancements save time and make file management more convenient when working with Work Orders.
Opportunity
Service Managers rely on dashboard goals to track team performance, but until now only Productivity and Efficiency goals could be set. Many teams also wanted to monitor Recovery, an important metric for understanding how effectively labor hours are being billed.
Solution
We’ve added a new "Recovery" goal to the Service Dashboard. It functions just like the existing Productivity and Efficiency goals, allowing managers to set targets and track actual performance in real time. This provides a more complete picture of service operations and profitability.

Opportunity
Rental Managers requested clearer totals on Rental Contracts. Previously, contracts only displayed estimated totals per rental schedule.
Solution
We have added a new setting: “Show Estimated Billable” under Rental settings. When enabled, the contract will display a breakdown of the Estimated Total Billable amount at the bottom of the agreement.
Opportunity
Businesses needed tighter control over who can edit accounting-related fields when managing customer records. Without permission controls, there was a risk of unauthorized changes that could affect accounting accuracy and reporting.
Solution
We’ve added a new user permission that allows access to accounting-specific fields when editing customers. Admins can access this permission in Access Controls under the Customer category:

Opportunity
Sales Managers reported confusion when customers saw different customer IDs in the “Bill To” section of Sales Order PDFs. Customers expected to see an ID consistent with the Sage Intacct customer ID, but instead saw the Flyntlok internal customer ID.
Solution
Sales Order PDFs will now display the Sage Intacct Customer ID in the “Bill To” section when available.
Complaint: Service Managers noticed the order of job parts lists were not consistent when creating multiple Work Order Estimates. This was causing confusion when an estimate was sent to a customer again after being adjusted.
Correction: Fixed.
Complaint: Managers reported customers were not receiving surveys after purchasing a machine when they had a configured survey rule with the “Invoice Machine’s Make” filter applied on the Manage Surveys page, even though the make of the sold machine matched what they set on the filter.
Correction: Fixed.
Complaint: Service Managers reported that Work Order Job Templates were being created without respecting the company’s default job billing style.
Correction: Fixed.
Complaint: Managers reported that the Quick Transfer button on the Machine Dashboard was not creating and processing a Machine Move like they expected.
Correction: Fixed.
Complaint: Users noticed that the city, state, and zip line would not appear on Sales Order PDFs if the information was only partially filled in.
Correction: This has been fixed. Sales Order PDFs will now display the address line correctly, even if only part of the information is present.
Complaint: On smaller screens, part of the Actions menu on the Work Order Dashboard was inaccessible due to a visual bug.
Correction: The Actions menu is now fully visible and accessible on all screen sizes.
Complaint: On some Part Voucher PDFs, the totals amount would sometimes be cut off and not fully visible. (Yeah, seems to be a trend of things not fully displaying correctly this week…)
Correction: Fixed.
Complaint: After collecting a signature and then accepting an account payment, users still saw a warning that a signature had not been collected.
Correction: This has been fixed. The warning will no longer appear once a signature has been collected.
Complaint: Some users reported that they were unable to create tags when editing a customer.
Correction: This issue has been fixed. Tags can now be added successfully while editing customers.
Complaint: When a customer had a labor type override set, it did not replace the job template's labor type when adding a job.
Correction: Fixed.
Complaint: The true/false filters on the “Item Types” editor were not functioning correctly.
Correction: This bug has been resolved. Filters now work properly on the Item Types editor.
Complaint: When editing a machine that originally had an inactive model, switching it to an active model sometimes resulted in an error stating the model was inactive.
Correction: This issue has been fixed. Machines can now be updated from inactive models to active models without error.
Complaint: On the Work Order Dashboard, when attempting to invoice a work order, users sometimes saw no response at all if an error occurred. The page simply did nothing after clicking "Invoice."
Correction: We’ve fixed this issue. Users will now see a clear error message whenever an error prevents invoicing, improving visibility and troubleshooting.
Complaint: Users reported that when editing a machine, there was no clear indication if the assigned model was inactive. This created confusion when working with machines tied to outdated or discontinued models.
Correction: We’ve updated the edit view for machines to clearly show when the assigned model is inactive, giving users better visibility and reducing confusion when managing machine records. Users will be shown an error message when attempting to save a machine with an inactive model.

Complaint: When creating a new machine, if a user entered a model name that already existed but was inactive, the system would silently link the new machine to that inactive model. This left the machine in a broken state because its model was disabled.
Correction: We’ve improved the machine creation flow. If a user tries to create a model that matches an inactive one, the system now blocks machine creation and displays the inactive model’s ID with instructions. Users must either reactivate the existing model or select another before proceeding, preventing machines from being tied to disabled models.
Customer Salespeople Relationship [#72685]
Complaint: Users were unable to assign “Primary” or “Secondary” salesperson relationships to a customer.
Correction: Fixed
Complaint: When a sale included an “Other Payment” in addition to a payment on account, the other payment line transferred to QuickBooks without a tax code. This caused it to inherit the regular tax rules of the sale, which resulted in incorrect tax amounts being applied.
Correction: We updated the invoice and memo posting logic so that all “Other Payments” are automatically assigned the “Exempt” tax code (0% rate) for Canadian tenants. This prevents those payment lines from inheriting standard tax rules, ensuring QuickBooks invoices reflect accurate tax amounts.
Complaint: Some Purchase Orders were generating PDFs with missing item details caused by an item description containing special characters.
Correction: Fixed.
Complaint: The Customer Balance report was sometimes crashing when users selected a long date range.
Correction: Fixed.
Complaint: When quoting a model and adding a custom option with a price, the shown Discount % was calculated using only the base model price, ignoring the custom option(s). This sometimes resulted in an incorrect or even negative discount being displayed.
Correction: Fixed.
Last week the Flyntlok team held their annual fantasy football draft. Ivan is looking to stay on top of his game as won BOTH last year’s football league as well as the March Madness contest. And ESPN rated his team one of the top teams in our league this season. Can anyone take him down? Certainly not Dylan who is the only one thus far to not pay his entry fees and might be kicked out before the season even starts.
If you are looking to root for a low-odds victor, cheer for Isabelle who picked her team using ChatGPT creating a squad based on Taylor Swift puns. If Isabelle the Anti-Hero manages to beat Ivan, he will never be able to Shake it Off, and when he gets angry she will simply tell him, “You Need to Calm Down.”
Stay tuned for regular updates!
August 13th, 2025 Release Notes
Learn More at Flyntlok Dealer Management System
Check out our Flyntlok YouTube channel for more highlights of the application!
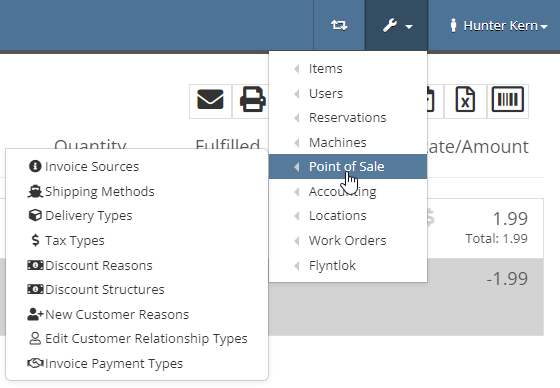
The Point of Sale Administration tab allows administrators and assigned managers to easily edit POS settings. These settings options include setting Invoice Sources, Shipping Methods, Delivery Types, Tax Types, Discount Reasons, Discount Structures, and more. To access the POS Administration tab, go to the Wrench in the top right -> Point of Sale -> select the necessary tab option.
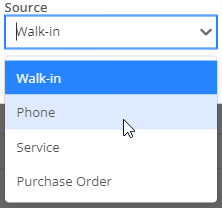
Invoice Sources are the origins of your Sale Order such as Walk-in, Phone, Service, and Purchase Order. You can Edit Invoice Sources by:

Shipping Methods include all freight types or other ways ordered items get to customers. Examples of Shipping Methods include UPS, FedEx, ground freight, air freight, Stock, and Will Call. Important columns in the Shipping Methods table includes short and long name, Shipping percentages, Min. and Max., Shipping Clerk, Ship-out, and Ship-in. Any disclaimers can be accessed by clicking the three dots in the far right. To edit Shipping Methods,
[Add pictures/videos]
Delivery Types are the ??Not opening in Flyntlok, need to look in another tenant?
[Add pictures/videos]
Tax Types are the different kinds of taxes applied to certain transactions. These types may include State Sales Tax, County, Local, or other. To change these Tax Types:

??Not opening in Flyntlok, need to look in another tenant?
[Add pictures/videos]
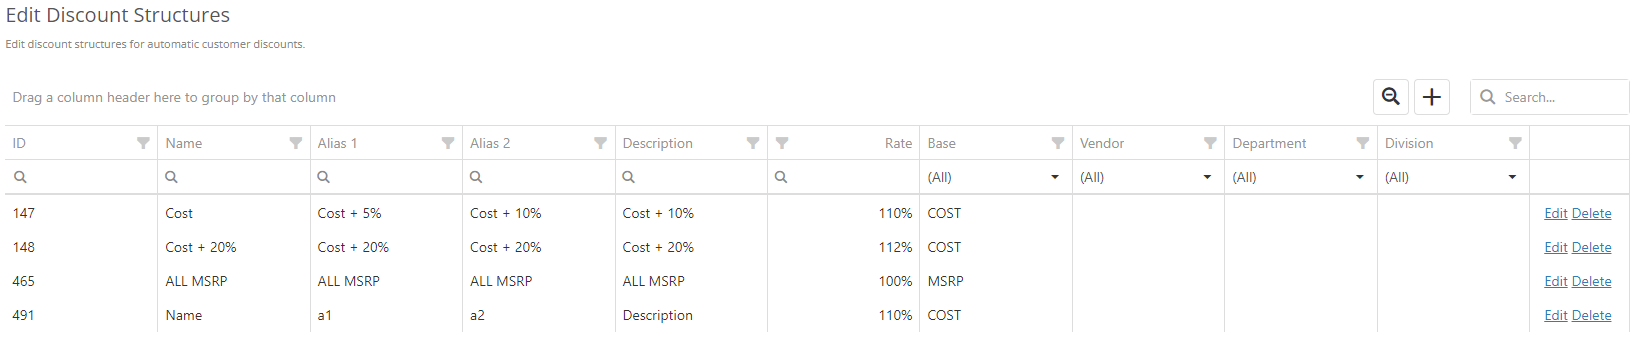
Discount Structures are automatic customer discounts and allow for default discounts to be set on a per customer basis. Users can Edit, Add, or Delete discount structures from this page by clicking the appropriate button. Once Edit or Add is clicked, a pop-up page will prompt ID, Name, Alias, Description and other structure information. Click Save and the changes will be updated on the table.
To assign a discount to a customer, enter the discount on the Discounts text box when editing the Customer dashboard. [See here(Hyperlink to other article)] for more information.
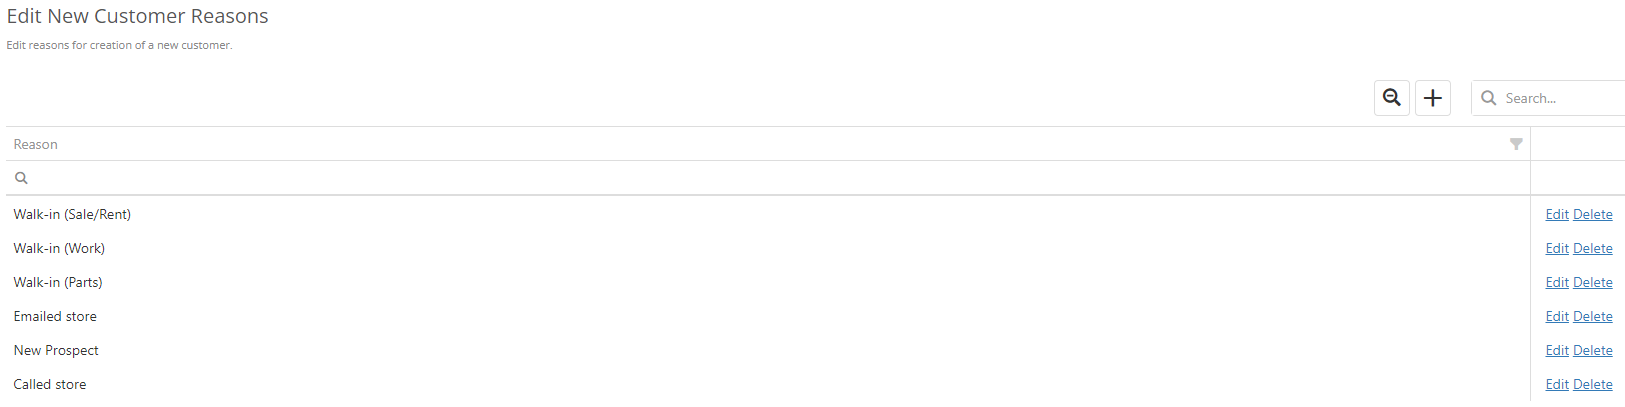
Discount Reasons are the reasons behind the creation of a customer. Whether the customer is a walk-in rental, walk-in parts, or called the store, the Discount Reasons are edited here. Once Edit or Add is clicked, a text box will prompt the Reason, and then click Save to record the Reason to the customer dashboard. But I couldn’t find it in the dashboard??
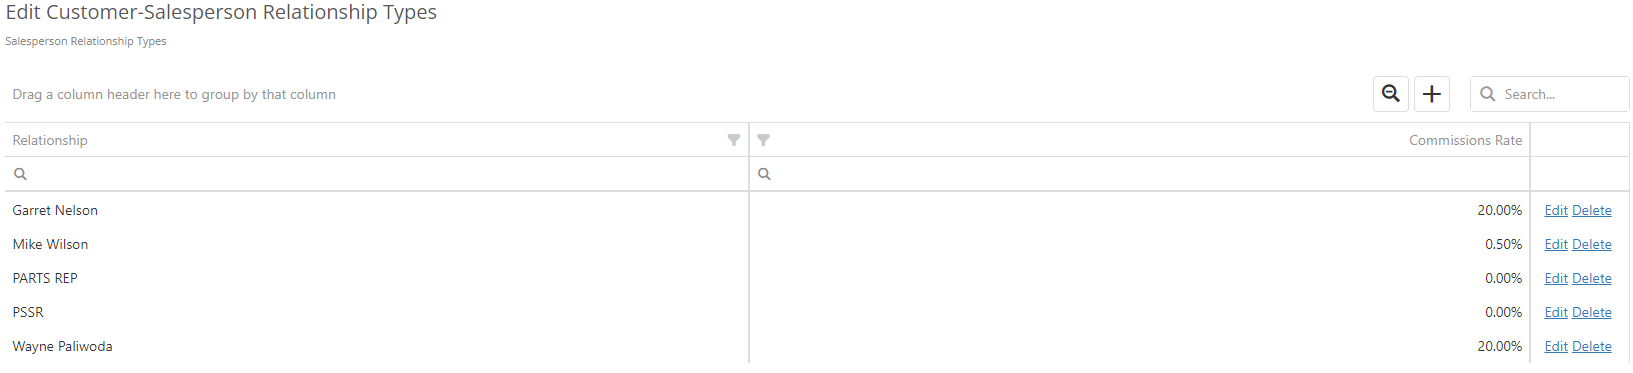
Customer-Salesperson Relationship Types are the different relationships that the customer has with the dealership. You can edit these relationships by clicking the + icon, as well as the Edit and Delete buttons.
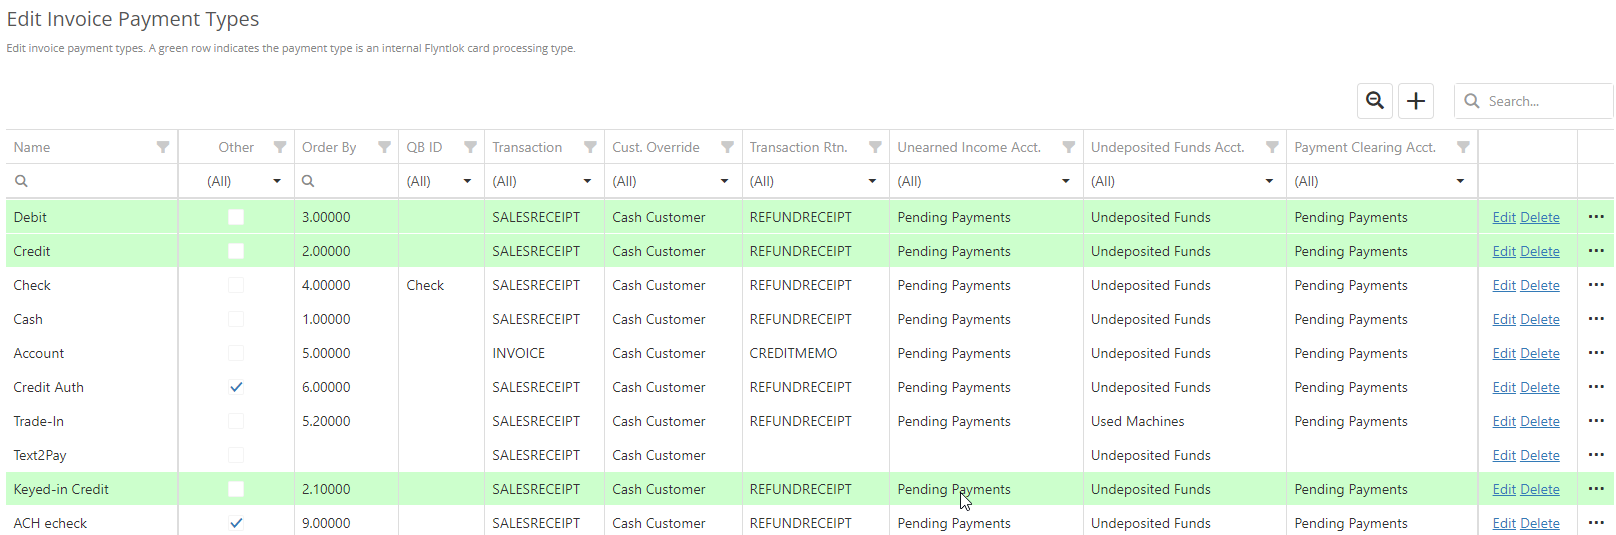
Invoice Payment Types are the different types of payments which customers and users can choose during check out. These not only, but do include Debit, Credit, Check, Cash, Account etc… These can be edited are added to by clicking the Edit, Delete or + buttons. To include Invoice Payment Types in the Other tab when adding Payment to a Sales Order, edit the Payment Types and click the Other check box. To see if the Invoice Payment Type is an Item Reference, Groups Transactions, or is Auto Approved, click the three dots in the far right.
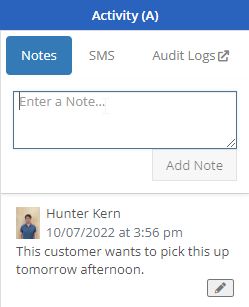
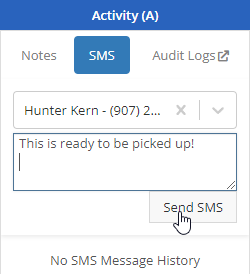
The Activity tab, which opens when the hotkey A is pressed on the Point Of Sale, gives users access to Notes, SMS, and Audit Logs.
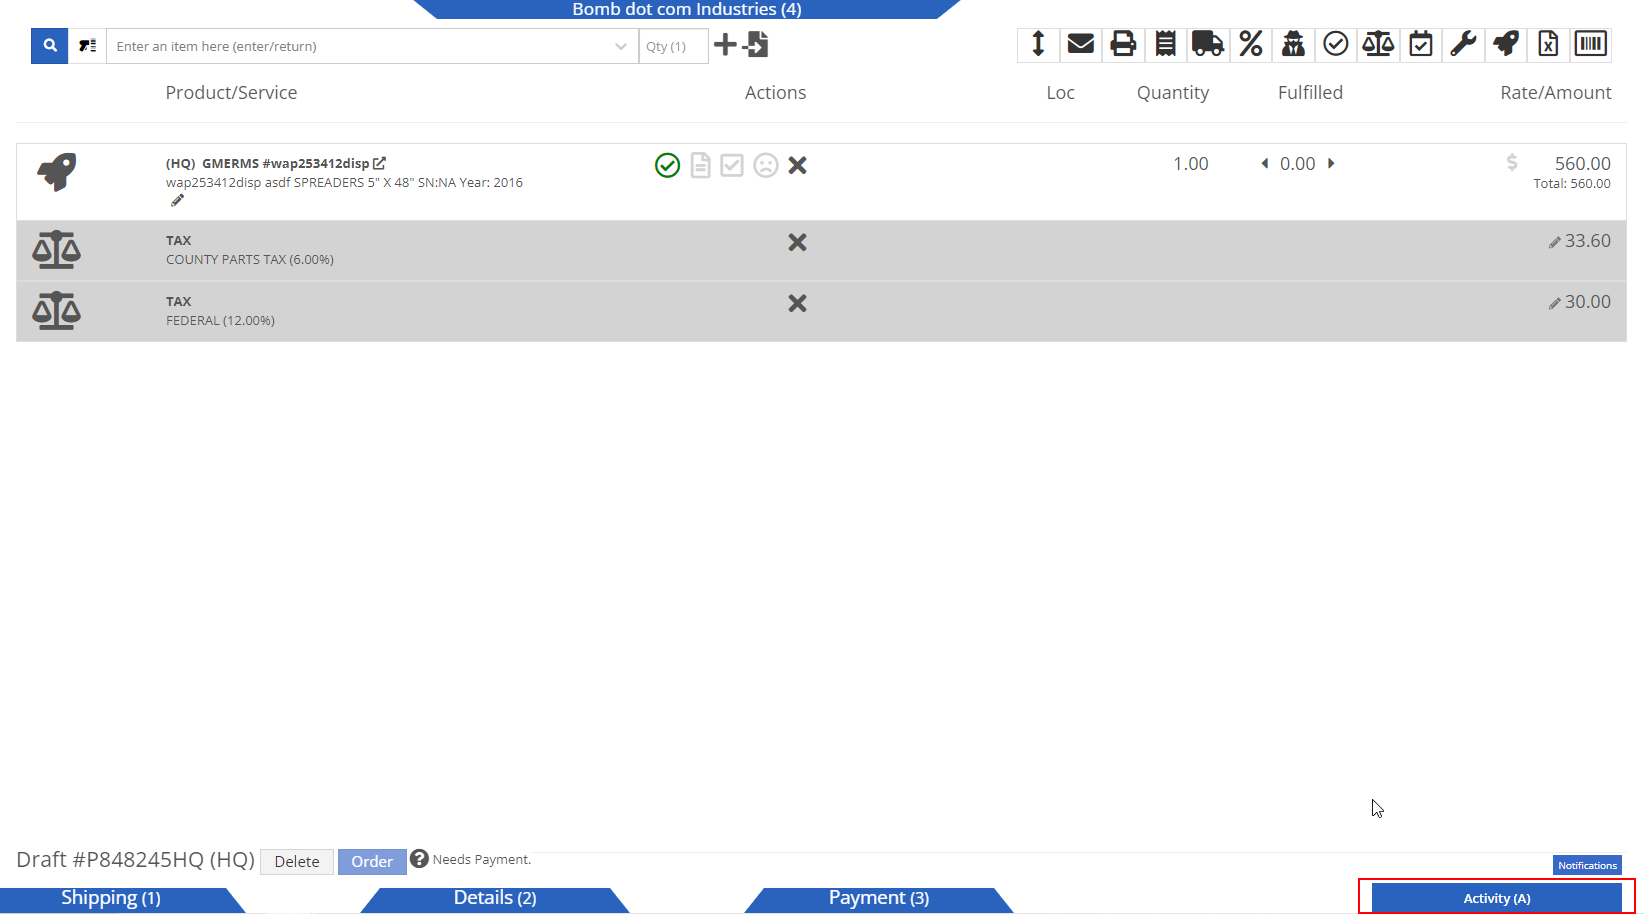
Once in the Activity tab, use the text box provided to write notes and then click Add Note to create. Notes appear in the space below with the most recent first. Notes are editable by clicking the pencil right of each note.
To create an SMS, click the SMS tab at the top of the Activity tab, and use the tab down menu to select the desired contact. To create a new contact, click Add New Contact and enter the name, as well as their phone number, along with any message before clicking Send SMS.
To access, click the Audit Logs button at the top of the Activity tab. The logs page for the invoice will populate in a new page and will include the users, messages and timestamps of all actions made in the sale order. Users include the Flyntlok System as well as each person altering the sales order. Messages will include created, changes, processes, calculations, invoice information, quantities, and more. These log entries are ordered most recent timestamp to latest.

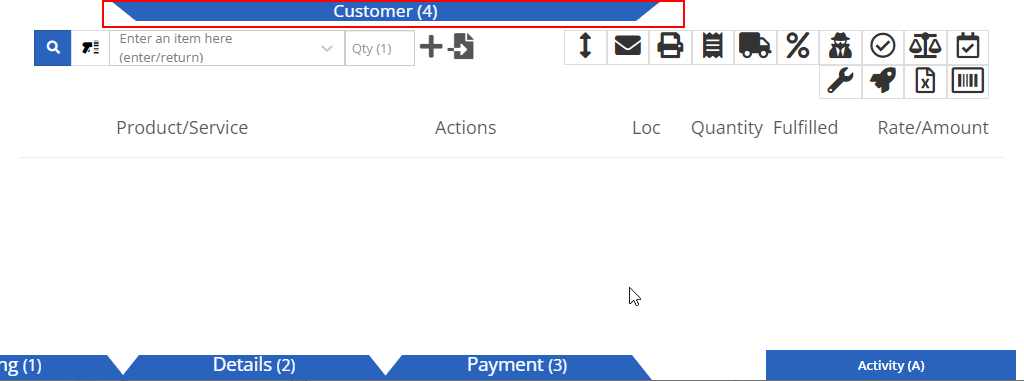
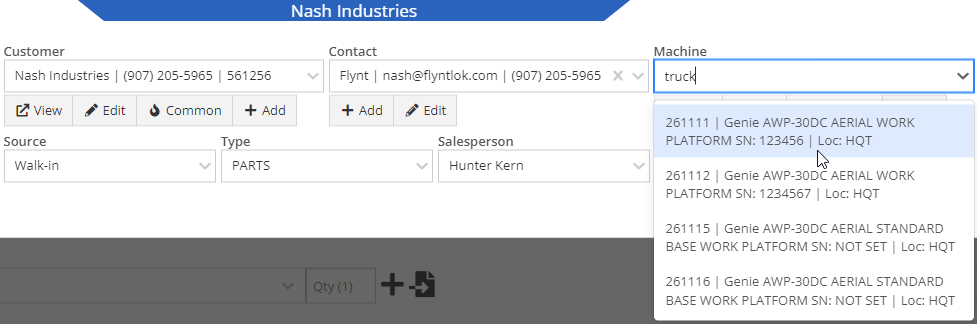
The blue Customer tab allows users to enter the necessary Customer, Contact, and Machine information associated with the Sales Order. When a user creates a Sales Order, the initial tab opened is the Customer (4) tab. The Customer tab opens automatically when the hotkey 4 is pressed on the POS. The remaining information on the Customer tab includes changing the Source of the Sales Order, Type, Salesperson, Location, and Consignment type. These features appear underneath the Customer, Contact, and Machine drop-down menus of the Customer tab.
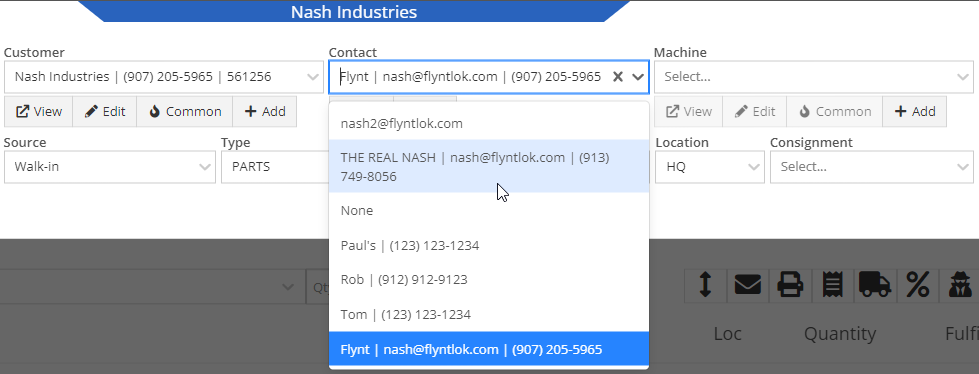
Users can add a customer to the Sales Order by following these steps:

Users can add a contact to the Sales Order by following these steps:
Users can click the View button underneath the Customer and Machine dropdown menus to access their coinciding dashboards. These dashboards will automatically open in a new tab.
Customer dashboards give a detailed report of customer information such as customer ID, contact, company, deposit, payment, rental, recent sale orders information, and much more.
Machine dashboards give a detailed report of machine information such as machine ID, physical location, description, work order, sale order, recent notes, finance information, and much more.

Located next to the View button, the Edit button allows users to edit customer, contact, and machine information in their coinciding dashboards.

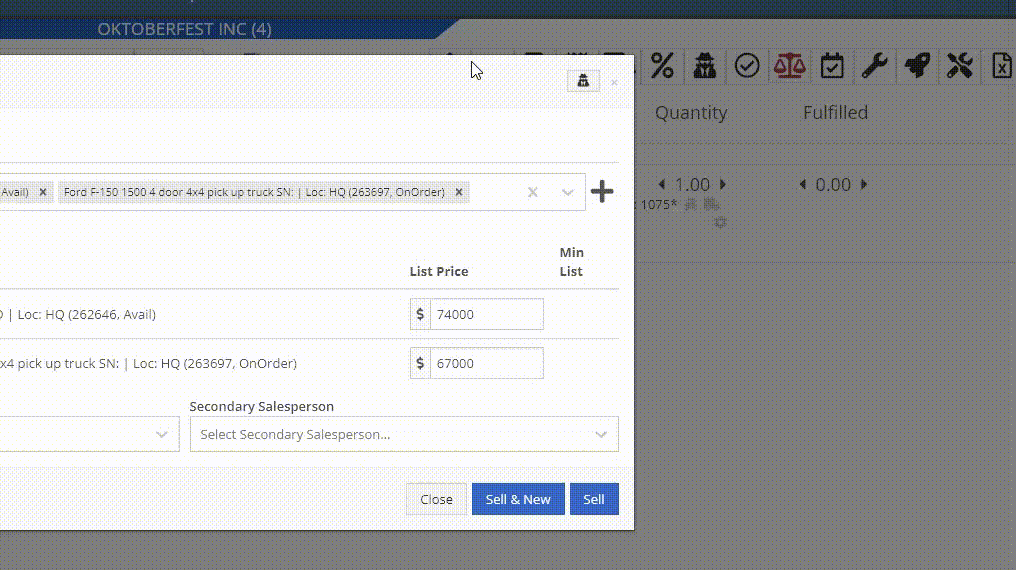
The Common button, located below the Customer and Machine drop-down menus, can be used to view commonly purchased parts by customer and machine. Once selected, either the Customer Common Parts or the Machine Common Parts pop-up menus appear where users can scroll and add desired parts to the Sales Order by clicking the + button in the left column. Added part items will propagate in the line items of the Sales Order.

The Add button, located below the Customer, Contact, and Machine drop-down menus, can be used to add new customers, contacts, and machines quickly from your POS. After clicking the Add button, the Quick Create Customer, Add Contact, or Quick Create Machine pop-up menus appear where you can fill in the required information and press the Create button to finish the add new process. The Quick Create Customer and Quick Create Machine menus have an Advanced option that directs the user to the Manage Customer and Manage Machine menus in a new tab. These menus offer more detailed customer and machine information options.

In the blue Customer tab of the POS, click the Source tab down menu and select to change the source of the customer affiliated with the sales order. The source provides an origin of the customer and default options in the Source tab down menu include Walk in, Phone, Service, and Purchase Order.
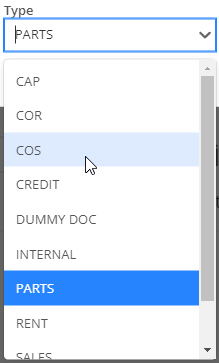
Click the Type tab-down menu and select the desired type to change the type of sales order. The type helps Flyntlok classify this sales order. You can also set up your sales order ID’s to contain a prefix / suffix that contains the type designation.
Click the Salesperson tab-down menu and select the salesperson being credited for the Sales Order.

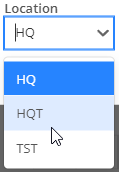
Click the Location tab-down menu and select the desired location of where the Sales Order took place to change to the correct location. You can also set up your Sales Order ID’s to contain a prefix / suffix that contains the location designation. The default location is whichever location your user is assigned to.