Last Release Notes
September 3rd, 2025 Release Notes
Not yet a Flyntlok Customer?
Learn More at Flyntlok Dealer Management System
YouTube
Check out our Flyntlok YouTube channel for more highlights of the application!
Our Dearest Flyntlok Customers! We want to thank you all for another great year, and we wish you all the best as we head into the holiday season, and we hope you all have a very happy and successful 2026.
Holiday Hours: Flyntlok offices will be closed Dec 24-26 and Jan 1. We will respond to your tickets as soon as we can upon our return.

We will be executing a major back-end update that will make Flyntlok unavailable for about 24 hours. We will start this update at 5pm AK time on Christmas Eve, Dec 24. The system will be unavailable on December 25 and we should have it back online on the morning of December 26. We will send out an alert email prior to taking the system offline. Please plan accordingly! Any concerns? Please email us at consulting@flyntlok.com
As mentioned previously, the majority of our year-end efforts are focusing on AI features and taking on numerous system performance improvements.
We aren't going to break out in detail all the performance projects in the release notes, but just so you know what our team is working on:
Our gift to you this holiday season is hopefully a faster and more stable Flyntlok!
Opportunity
Purchasing teams shared that updating Purchase Orders took too many steps and required switching to a separate “Edit” page. This slowed down quick adjustments and made simple changes more tedious than they needed to be.
Solution
We’ve upgraded the Purchase Order page to a more modern, streamlined interface. Instead of opening a separate editor, users can now click directly on the values they want to change. Editing is faster, more intuitive, and stays on a single page.
Improvements:
Choosing a vendor now saves automatically, removing extra clicks and speeding up the workflow.

Users can now edit PO details directly on the main page. Clicking any field opens it for editing.

Line items are now editable directly in the table, making updates significantly faster. Editable fields include:

System permissions are fully enforced on the updated page. Users without PO edit access will see fields disabled and cannot modify vendor details, PO details, or lines.
Opportunity
Parts Department users needed a clear way to see which items required serial numbers before fulfillment, especially when pulling from printed sales orders and pick lists away from a computer. Without this, they often discovered serial requirements only at the fulfillment step, causing rework and repacking.
Solution
Serialized Parts now have a clear visual indicator wherever users work the order: on the Sales Order, the Sales Order PDF, and the Pick List PDF. This makes it obvious which lines require serial numbers to be captured while parts are being pulled, reducing wasted time and avoiding surprises at fulfillment.
Opportunity
The Machine Management report summarizes a machine’s financial information, but was lacking some liability information that is displayed on the Machine Dashboard, such as interest and curtailments. We also found that some financial information from attachments on the machine wasn’t being reflected on the Machine Management report as expected.
Solution
We’ve updated the Machine Management report to show interest and curtailments that are found in the liability section of the Balance Sheet on the Machine Dashboard. We also properly reflect the financial information of attachments on the parent machine’s Machine Management report.
Opportunity
For every machine, there is a Machine Dashboard with a “Configuration Description” section which provides the IDs and links to the machine’s attachments or the machine that it is attached to. This section is not included in the mobile version of the Machine Dashboard. If a user needs information about a machine’s configuration while working on a mobile device, they would have to navigate to the desktop version of the app which is less compatible with their device.
Solution
The configuration description of a machine is now available on the mobile Machine Dashboard. The attachments include links to the mobile Machine Dashboards for the attached machines, which makes it easier for users to access all the machine information they need, regardless of how they access it.

Opportunity
Users wanted to include emojis in their campaign messages, but the system rejected those messages and prevented them from being created. This made it impossible to send more expressive or branded campaign content.
Solution
Emoji support has been enabled for campaign messages. Users can now create and send campaigns that include emojis without encountering errors.

Opportunity
Users shared that it is difficult to differentiate between customers with the same name without associated phone numbers when filling out a work order. In this case, the only other available identifying information is the first line of the customer’s address which is not sufficiently meaningful to the user.
Solution
We added a popup box with the full address that appears when a user hovers over the shortened address in the customer option. The full address provides more information about the customer, including both the city and state/province, which will be helpful in determining which customer option is the right one.

Opportunity
Rental Managers need individual machine serial numbers to appear on rental invoices so they could more easily support audits and verify exactly which units and attachments were billed on each transaction.
Solution
Rental Invoices now display the serial numbers of the machines and attachments on the related line items, matching what is already shown on the rental contracts. This ensures clear traceability between rented equipment and the invoiced charges during audits and reviews.
Opportunity
Teams wanted more flexibility to automate external workflows when a Sales Order is processed, such as notifying other systems, updating records, or triggering follow-up actions. Previously, these steps often required manual effort or custom integrations.
Solution
We’ve added a new Zapier trigger that fires when a Sales Order is processed. This allows you to connect Flyntlok with any Zapier-supported app and configure custom actions that run automatically when your sales team completes an order.

Complaint: Requesting a move from a mobile device redirected users to the desktop version, disrupting the workflow.
Correction: Fixed.
Complaint: Creating a Machine Purchase Order from a Machine Purchase Request did not set the Vendor’s terms on the Machine Purchase Order.
Correction: Fixed.
Complaint: Generating the Physical Inventory Variance journal entry for certain sprints failed.
Correction: Fixed.
Complaint: Some Sage income accounts that included hyphens in the account number failed to save on the item.
Correction: Fixed. We-now-handle-hyphens---Properly.
Complaint: The message input appeared stuck when sending files through SMS, causing users to think the files weren’t sending and leading to accidental duplicates.
Correction: Added a clear upload indicator and locked the message input and send button while files upload. The UI now provides proper feedback. We also prevent duplicate sends. We also prevent duplicate sends.
Complaint: When creating customers in Flyntlok and syncing them to QuickBooks Online, the customer’s city was being overwritten with the state/province abbreviation on the QuickBooks side.
Correction: We corrected the address mapping used during QuickBooks Online customer creation. Cities now sync properly without being replaced by state/province abbreviations.
Complaint: Users noted that they were unable to send emails from their Microsoft-connected accounts. When attempting to reconnect, it would appear to disconnect immediately.
Correction: Fixed.
Complaint: Technicians reported that when creating a new Job from their mobile devices, sometimes the Job Templates selection field would show an empty list.
Correction: Fixed.
Complaint: Managers mentioned that they were receiving duplicate End-of-Day Report emails.
Correction: Fixed.
Complaint: Service Managers noted that when receiving a sublet part against a PO generated by an internal parts order, the part on the Sales Order would update the part to its list price. It should have been using the part's cost instead.
Correction: Fixed.
Complaint: Parts Managers noted that sometimes when attempting to print labels from a Receiving Voucher, they would see a blank page.
Correction: Fixed an issue where labels would not properly be generated when the Purchase Order did not have a Vendor set.
Complaint: Parts Managers reported that when viewing an ERP Part on Item Dashboard, the margin calculated against "Total Cost w/ Labor" appeared incorrect.
Correction: Fixed.
Complaint: Service Managers mentioned that an error message appeared when invoicing a Work Order. Then when attempting to invoice again, they saw duplicate invoices created.
Correction: Fixed an issue where creating work order final invoices during an active inventory sprint incorrectly displayed an error.
Complaint: Receiving Clerks noted that after updating and saving a Machine PO Voucher, when closing the tab, they would be prompted to confirm closing the tab, even though they had no unsaved changes.
Correction: Fixed.
Complaint: All Flyntlok users are automatically logged every night. After a nightly auto-logout, some open pages appeared to remain logged in, leading to errors or unexpected behavior when users attempted to make edits.
Correction: Fixed. Affected pages now correctly redirect to the login screen after auto-logout.
At the end of the regular season, Stephen stood atop the standings (despite the fact that he almost rage quit early in the season); with Calvin tied in wins/losses but behind on points. And in a shocking reversal, Ivan (last year’s winner) became like the Kansas City Chiefs and missed the playoffs entirely by finishing near the bottom.
And speaking of KC Chiefs, Isabelle’s AI selected team based on Taylor Swift/Travis Kelce memes finished in last place. No one, and I mean no one, saw that coming. But I’m sure she will Shake it Off before next year and choose her team in a different manner because she knew All Too Well that AI wasn’t going to win (She will Never Get Back Together with ChatGPT after this past Cruel Summer).
Developer Note: We'd like to mention that despite being outnumbered, all participating dev team members made it into playoffs, and three of the final four are developers. We will not be bullied by the jocks of the sales and support teams! Revenge of the nerds!
Schedule a demo to learn more.
Check out our Flyntlok YouTube channel for more highlights of the application!

Dear Reader, you will notice fewer features have been released over the past few weeks, and that will continue through the end of the year. Flyntlok is focusing almost exclusively on two main endeavors:
Join us for a webinar on Tuesday, December 9th at 3PM EST focusing on Flyntlok's new AI features. Register for the event here: https://www.flyntlok.com/frictionless-ai-a-dealers-advantage-webinar/
Opportunity
Service and sales teams wanted to attach multiple files to a single SMS message from the SMS Hub instead of adding them one-by-one.
Solution
You can now send multiple images in a single SMS conversation. Attach up to 3 images per messagewith a combined size limit of 5 MB. This streamlines sharing equipment photos and other visuals in one go.

Opportunity
Management identified that quick access to new lead creation is essential for maintaining efficient sales workflows. The previous process required too many steps, slowing down users who needed to capture leads on the spot.
Solution
We've added a “New Lead” button directly to the navbar. Selecting it takes users to the “All Leads” page with the “New Lead” form already open, giving teams immediate access to lead creation and reducing unnecessary navigation.

We also updated the layout of the lead creation form to make it cleaner and easier to work with.

Opportunity
Usage data showed that the Documents page and Signature Hub were accessed infrequently compared to other navbar items. Keeping them in the top navigation added unnecessary clutter and made it harder for users to focus on the tools they rely on most.
Solution
We removed both Documents and Signature Hub from the navbar and relocated them to more appropriate sections. The Documents page is now available under Administration → Documents. Signature Hub is no longer enabled by default, but it can be added, just reach out through our regular support channels and we'll get it set up.
Opportunity
Following the recent addition ofGoogle Review associations, many users (and Justin) requested the same capability for Facebook Reviews. Sales and customer service teams wanted a unified way to connect social feedback from multiple platforms directly to their customers, providing a fuller view of customer sentiment right from the CRM.
Solution
You can now associate customers to a Facebook review. Building on our recently-releasedGoogle Review associations feature, linking a customer can be done from the CRM Reviews page, and immediately becomes visible on the Customer Dashboard:

Opportunity
Sales managers needed a faster way to reserve multiple machines when quoting or selling, without opening each machine record individually. This helps prevent double-selling while a quote is pending approval.
Solution
We added a Reserve Machines checkbox to the “Sell Machines“ form (including the “Sell Machine” action on the machine dashboard). When checked, Flyntlok will create reservations for all selected machines in one step. These reservations are set for 7 days from the sale date and automatically set the machine status to On Hold.


Opportunity
Sales managers requested the ability to hide kit sub-items on thermal receipts.
Solution
We've expanded the existing “Hide Kit Items on Sales Order PDF” setting to also apply to thermal receipts. When enabled, kit sub-items will be hidden on Sales Order PDFs and thermal receipts. To enable this feature, go to Flyntlok Settings → Reports → Hide Kit Items on Sales Order PDF and Thermal Receipt.
Complaint:When scanning a kit barcode, only the parent kit item was added, and its sub-items were not included automatically.
Correction:Kits are now fully supported on the barcode scanner. Scanning a kit barcode will correctly add all associated sub-items to the order.
Complaint:Sometimes for multi-currency tenants, after editing a Return of Goods, the PDF would display all costs as 0.00.
Correction:Fixed.
Complaint:Accountants reported that sometimes, when updating a Credit Memo in QuickBooks, it would recalculate some of the lines and move out of sync with the original Sales Order in Flyntlok.
Correction:Fixed. This could occur when an item with negative unit price was submitted on a Credit Memo, which will now correctly be respected.
Complaint:Move completion notifications sometimes failed to send, causing users to miss important status updates.
Correction:Fixed.
Complaint:Sometimes when a Work Order split into customer and warranty invoices, the warranty invoice did not include the complaint, cause, or correction notes on the warranty job line.
Correction:Fixed.
Complaint:Users could fill out the machine move form, but clicking Request Move did nothing. The issue was caused by missing phone-number validation on the Move From contact field, leaving the form in an invalid state without showing an error.
Correction:Fixed. Phone validation now displays properly on the UI, allowing users to see and correct the issue so the move request can be submitted.
Complaint:Users were unable to close certain vouchers even though the front end showed a zero balance. Attempts to close the voucher triggered an error indicating it wasn't actually balanced.
Correction:Fixed a rounding issue that caused hidden balance discrepancies. Vouchers now close properly when the displayed balance is zero.
Complaint:The BOM Entries page was using an old sidebar layout, and the entry order didn't match the order shown on the Work Order BOM view, causing confusion.
Correction:Updated the sidebar to the current UI and aligned the entry ordering so it matches the Work Order BOM view.
Complaint:When entering QBO accounts on a vendor, the account numbers no longer appeared on the vendor edit page.
Correction:Fixed.
Complaint:CSV and Excel exports were converting ampersands (&) into HTML entities (&), causing exported data to display incorrectly for customers.
Correction: Fixed. Exports now preserve the original & character without converting it to HTML.
Complaint:Technicians reported needing to switch to “Show Completed” before being able to see Work Orders they were assigned at the Work Order level and not the Job level.
Correction: Fixed.
November 5th, 2025 Release Notes
Schedule a demo to learn more.
Check out ourFlyntlok YouTube channel for more highlights of the application!
Opportunity
Dealers needed a consistent way to handle serialized items, from receiving through invoicing, without losing serial number tracking. Previously, serialized items in Flyntlok could only have their serial numbers entered at the point of sale. This meant that dealers had to manage serials outside the system when receiving or transferring items. As a result, internal tracking was cumbersome, warranty cores were difficult to manage, and there was no reliable way to know which serial numbers were available to sell.
Solution
We’ve overhauled serialized item handling and implemented a generalized workflow that provides clean serial capture during receiving and sales. The new process works like this:
This means serials are now tracked from the moment they enter your business until the moment they leave it.
Configuration
To start using serialized items, you will first need to create or configure an Item Type for serialized items.


Receiving
When receiving a serialized item on a voucher, Flyntlok now prompts you to enter the serial numbers during receive. This ensures inventory has accurate, traceable serials right away.

If a receive is undone, any serial numbers created in that process are also automatically removed, keeping inventory clean.
Sales
On Sales Orders, serialized items can now be fulfilled by picking from the available serial numbers in stock. For faster workflows, a Scan Mode option has been integrated into workflow so counter staff can scan serials directly at checkout.

Ownership of the serialized unit updates as soon as the sale is completed.
Management
Serialized items can also be managed directly from the Item Dashboard using the Serialized Units Widget. This provides a quick way to review, add, or manage serials without going through receiving or sales.


Opportunity
When searching Vendors on the Part Purchase Order page, if a search returned no results, the user would be prompted to create a new Vendor. Managers requested more control over their users' ability to create one on this page, to prevent unintentional or unauthorized creation of duplicate Vendors.
Solution
A new permission is available on our Access Control page. Under the "Vendor" section, a permission labeled "Allow Vendor Creation on Purchasing Pages" will toggle the user's ability to create a new Vendor while creating or editing a Part Purchase Order.
Opportunity
Dealers often order the same part from multiple distributors, which leads to duplicate item records and makes inventory tracking and receiving confusing. Users needed a way to receive a purchased part into stock as a different part and to find lines using alternate numbers on POs and vouchers.
Solution
We’ve added a new “Receive As” option on the item edit page. This lets you designate a main part that all other versions should be received as. For example, if you set Part A to “Receive As Part B,” any purchase order for Part A will automatically be received into stock as Part B.
In addition, searching on purchase orders and vouchers has been improved so that if you enter an alternate part number, the system will still pull up the correct line.
To configure, edit a part and look for the "Receive As" field in the Purchasing section of the page:


Opportunity
Salespeople requested the ability to specify individual line items to be drop shipped, instead of the entire Invoice as a whole.
Solution
Added a dropship option on the Pick / Order behavior editor. Clicking the gear icon on the Invoice detail under the quantity column will show these options.

Saving this selection will cause the line to be marked as “Drop Ship”. When the Invoice is processed, a Purchase Order will be generated for the part, which will be shipped to the customer’s address. Other items on the invoice will still be ordered or pulled from stock like normal.

The original drop ship button under the Shipping Methods tab has been renamed to “Drop Ship All To Customer.” Checking it will work as before, and mark all lines on the invoice to be drop shipped.
Opportunity
Managers setting up Work Orders noticed the name of the customer’s address was not displayed when choosing an on-site address for the Work Order. They requested to see the address’ name as it is the primary way they identify their addresses.
Solution
The address’ name is now presented when selecting an on-site address on the Work Order. Furthermore, you’ll also see customer address names when selecting an address for pickup or delivery.
Opportunity
Technicians using the mobile view needed an easier way to return to the main Work Order page from a Job page. The back button often left them stuck on the previous page they had visited instead of the Work Order page, creating confusion during navigation.
Solution
A direct Work Order link has been added at the top of the Job view in mobile, giving technicians a quick and reliable way to return to the main Work Order page.
Opportunity
Sales and Rental Managers wanted to be able to see Reservations marked as open-ended on the Customer Dashboard.
Solution
These reservations are now visible in the “Active Reservations” widget.
Opportunity
Users reported that during peak hours, emailed documents and notifications could be delayed, slowing down communication with staff and customers. Timely delivery of these messages is critical for smooth daily operations.
Solution
We’ve made (and continue to make) behind-the-scenes improvements to our email system to increase speed and reliability. Our aim is to reduce delays during busy times so your staff and customers receive their messages more quickly and consistently.
Complaint: Internal Work Order PDFs were displaying fee prices instead of fee costs, and total costs were being calculated using prices rather than actual costs.
Correction: Updated Internal Work Order PDFs to display fee costs and use them in total cost calculations.
Complaint: Sales Orders containing kits could remain stuck and not move into the Delivered status. This happened when receiving the kit parent, if any sub-items had a quantity of 0, their received quantity was not updated, leaving the order in a broken state.
Correction: Fixed the kit fulfillment logic so that sub-items with a quantity of 0 are properly updated when the kit parent is received.
Complaint: Salespeople reported that in some cases, the PDF receipt of a Sales Order would display the subtotal as one cent off from the actual Sales Order.
Correction: Fixed.
Complaint: Service Managers reported that the billable total in the Job Finances section of the Work Order Dashboard Performance Tab would sometimes be different than the sum of the lines.
Correction: Rejected jobs billed by estimated hours were being included in the total calculation. These have been filtered out.
Complaint: Sales Orders paid using saved credit cards were sometimes having duplicate credit card surcharges applied, causing customers to be charged twice.
Correction: Fixed.
Complaint: Accountants reported that their Sage Intacct credit accounts would sometimes not populate on the generated Machine Deprecation Journal Entry.
Correction: Fixed.
Complaint: When returning a final Work Order Invoice, job lines from the original Work Order invoice were incorrectly carried over and displayed on the return.
Correction: Fixed.
Complaint: Users reported that they were unable to group columns on the Upcoming Maintenance Schedules page.
Correction: Fixed.
Complaint: Managers noted that all users were able to preview a machine's margin calculation while selling a Machine. Toggling the "View Internal Pricing Info" button did not toggle this field.
Correction: Fixed. Additionally, for those with the permission enabled, we have made the toggle button available on the "Sell Machines" pop up so users do not have to close it to reveal margin information.
Complaint: Managers noticed the customer’s name they’re searching for does get used as the name in the “Create New Customer” form on the New Work Order page like it does on a Sales Order.
Correction: The name typed into the Customer Searcher on the New Work Order will now be used to prefill the name in the Create New Customer form, just like on Sales Orders.
September 17th, 2025 Release Notes
Learn More at Flyntlok Dealer Management System
Check out our Flyntlok YouTube channel for more highlights of the application!
Opportunity
Service Managers requested the ability to duplicate work orders. Previously, work orders had to be recreated manually, making it time-consuming to set up similar jobs or reuse common work order structures.
Solution
We’ve added the ability to duplicate Work Orders. To duplicate a Work Order, go to the Actions dropdown → Duplicate.
When duplicating, the system copies:

Opportunity
Service Managers noted that when adding jobs directly from the New Work Order form, the warranty customer input is not available. This caused warranty jobs to have no customers, leading to incorrect pricing and forcing staff to re-enter parts and labor.
Solution
We’ve added a Warranty Customer input to the New Work Order form. This field only appears when the job category is set to Warranty
Opportunity
Technicians reported that when adding parts to a Work Order from the mobile view, the bin location was not visible. This forced them to leave the Work Order page and look up the item separately, slowing down the process of finding and picking parts.
Solution
The mobile Work Order view now displays the bin location for parts directly when they are added, allowing technicians to quickly locate items without leaving the Work Order.
Opportunity
Sales Managers noted that when selling multiple machines on a Sales Order, the selection field did not clearly show which machines were already on the Sales Order. This made it difficult to avoid selecting the same machine twice.
Solution
We improved the Sell Machines tab by disabling machines that are already on Sales Order and displaying a message: “This machine is already on the invoice!”. This makes it clear which machines have been added and prevents duplicate selections.

Opportunity
Sales managers requested more control over who can save tax rule changes directly to customer records when working on Sales Orders.
Solution
We’ve added a new Access Control permission for the “Save To Customer” button on tax rules edit. Only users with this permission will be able to save tax rule changes back to the customer record.
Complaint: Rental Managers complained that Reservations tied to reserved Rental Contracts were showing up in the rental timeline view for conflicts alongside the Rental Contracts themselves, leading to confusion.
Correction: Reservations tied to Rental Contracts no longer appear in the conflicts list.
Complaint: Sometimes negative fee-only receiving vouchers failed to post to QuickBooks.
Correction: Fixed. These are now posted to QuickBooks as Vendor Credits.
Complaint: Managers purchasing machines noticed that the descriptions they set on the Machine Purchase Order were not carrying over to their machines once they were received.
Correction: Received machines will get their descriptions from the Machine Purchase Order, with a fall back to inherit the description of their model.
Complaint: Managers reported that they were seeing large negative margins on certain item dashboards, specifically for items that had configured purchasing units quantities (e.g. buying hose by the foot but selling it by the inch).
Correction: Margin calculations now properly account for purchasing unit quantities.
Complaint: Inactive items were showing up in the Parts Used search on the Work Order mobile view, even though inactive items should not appear. This did not happen in the desktop view, causing inconsistent results.
Correction: Fixed.
Complaint: Managers reported saving multiple accounting contact emails works fine on the Customer Edit page, but the next time they load the Customer Edit page only one of the emails are shown. This could lead to accounting contact emails being blown away the next time they save the Customer.
Correction: Fixed.
Complaint: The links on Customer Activity notifications to the Customer Dashboard in the My Notifications report were formatted incorrectly, making them unclickable.
Correction: Fixed
Complaint: Salespeople sending SMS Campaigns with an image attachment noticed some of their messages did not send as expected, and they saw some odd looking (very technical) errors in the Sent Messages details providing the reason why.
Correction: We’ve addressed an issue causing some SMS messages with images not to be sent, and improved clarity around how many SMS messages were attempted and how many sent or failed.
Complaint: When a customer signed a Work Order estimate requested via SMS, the system attempted to send an email to the customer’s phone number. Since phone numbers are not valid email addresses, this generated failed email errors.
Correction: The system has been updated to skip email sending for phone numbers when processing SMS estimate signatures, preventing invalid email attempts.
Complaint: Accountants noted that Machine Purchase Order Vouchers with a negative total would sometimes not post to QuickBooks Online when using a separate distributor currency.
Correction: Fixed.
Complaint: Managers using the “Consolidate Models” feature for their Sales Order PDFs reported their print outs were showing incorrect values for the Back Order column on model lines.
Correction: The back order column now shows a count of model lines that will generate purchase requests and have not been associated with a machine.
Complaint: Salespeople mentioned that when selling a Kit that contained a Model, the green dot "fulfill" action would appear on the Kit line. Clicking on this action would do nothing.
Correction: Fixed a visual bug where the action would appear incorrectly. It will no longer show when selling a Kit that contains Models.
Complaint: When managing parts on Work Orders, Technicians and Service Writers reported seeing backorder warnings when updating quantities of Non-Inventory Items.
Correction: Fixed.
Ivan is officially the Kansas City Chiefs of the Flyntlok league. After dominating last season, he has gone 0-2 this season. (Though in fairness, he lost this week by less than a point.) And poor Alex is 0-2 with a combined point differential of only -2.32. And Isabelle’s Taylor Swift-themed team surprisingly won.

September 3rd, 2025 Release Notes
Learn More at Flyntlok Dealer Management System
Check out our Flyntlok YouTube channel for more highlights of the application!
Opportunity
Salespeople requested the ability to add discount tiers to customers when they are being created from the Invoice.
Solution
This functionality was added to the “Quick Create Customer” dialog box.

Please contact your friendly Flyntlok consultant if you are interested in activating this feature for your sales team!
Opportunity
Salespeople need better visibility into machine warning notes during the sales process. Previously, these notes were only accessible by navigating to the Machine Dashboard, which slowed down workflows and increased the chance that important warnings could be overlooked.
Solution
Machine warning notes are now fully integrated into the Sales Order page. When searching for machines to sell, the warning note is displayed.

When a machine on a Sales Order has a warning note, an icon is shown. Hovering over it reveals the note.

Opportunity
When searching for parts with the Magic Wand tool, users could only see quantity on hand at their current location. This made it harder to quickly identify stock available at other branches, slowing down sales and fulfillment workflows.
Solution
The Magic Wand searcher now provides visibility into inventory at other locations:

A yellow asterisk next to the quantity badge indicates that additional stock is available elsewhere. Hovering over the badge reveals the quantities on hand at other locations. This makes it easier to identify and source parts across your organization without leaving the search screen.
Opportunity
When viewing costs using the "View Internal Pricing" ![]() tool on Point of Sale, sales managers could only see margin as a percentage, making it harder to quickly assess the actual dollar value of profit.
tool on Point of Sale, sales managers could only see margin as a percentage, making it harder to quickly assess the actual dollar value of profit.
Solution
We now display both percentage and dollar value margins, giving sales teams clearer insight into profitability at a glance.
Opportunity
Users (Wayne once again) wanted more control and efficiency when importing parts into Point of Sale. Previously, if a part existed across multiple vendors, the system required manual selection of the part for each line.
Solution
We’ve made enhancements to the Point of Sale import tool.
Additional improvements:
These changes streamline imports, reduce manual corrections, and improve data accuracy on invoices.
Opportunity
Sales Managers requested clearer visibility into estimate totals. Currently, estimates only showed an overall total, leaving customers and staff without an easy way to see how parts, labor, discounts, and taxes contributed to the final amount.
Solution
We've added a new setting: "Display detailed subtotal breakdown on estimate". When enabled, estimates will now include a breakdown showing Total Parts, Total Labor, Discounts, Subtotal, Taxes, and the Overall Total.
To turn this feature on, go to Flyntlok Settings → Sales section.
Opportunity
Sales Managers working on-the-go wanted the ability to not only upload machine images from their mobile devices but also publish listings online quickly. The "Advertise" field is used by some teams to communicate to online sales reps that a machine is ready to be listed. Previously, the "Advertise" field could only be edited from the desktop interface, slowing down the process of getting machines online.
Solution
The "Advertise" field is now editable when managing machines on Mobile. This allows sales teams to upload images and immediately mark machines for advertising in one step, streamlining the process of getting inventory online faster, from anywhere.

Opportunity
Technicians and Service Managers needed a faster, more flexible way to access files uploaded to Work Orders. Previously, clicking on a file link always opened the file in a new browser tab, making it inconvenient for users who simply wanted to download files directly, or download multiple files at once.
Solution
We’ve improved file handling on the Work Order Dashboard with new actions:

These enhancements save time and make file management more convenient when working with Work Orders.
Opportunity
Service Managers rely on dashboard goals to track team performance, but until now only Productivity and Efficiency goals could be set. Many teams also wanted to monitor Recovery, an important metric for understanding how effectively labor hours are being billed.
Solution
We’ve added a new "Recovery" goal to the Service Dashboard. It functions just like the existing Productivity and Efficiency goals, allowing managers to set targets and track actual performance in real time. This provides a more complete picture of service operations and profitability.

Opportunity
Rental Managers requested clearer totals on Rental Contracts. Previously, contracts only displayed estimated totals per rental schedule.
Solution
We have added a new setting: “Show Estimated Billable” under Rental settings. When enabled, the contract will display a breakdown of the Estimated Total Billable amount at the bottom of the agreement.
Opportunity
Businesses needed tighter control over who can edit accounting-related fields when managing customer records. Without permission controls, there was a risk of unauthorized changes that could affect accounting accuracy and reporting.
Solution
We’ve added a new user permission that allows access to accounting-specific fields when editing customers. Admins can access this permission in Access Controls under the Customer category:

Opportunity
Sales Managers reported confusion when customers saw different customer IDs in the “Bill To” section of Sales Order PDFs. Customers expected to see an ID consistent with the Sage Intacct customer ID, but instead saw the Flyntlok internal customer ID.
Solution
Sales Order PDFs will now display the Sage Intacct Customer ID in the “Bill To” section when available.
Complaint: Service Managers noticed the order of job parts lists were not consistent when creating multiple Work Order Estimates. This was causing confusion when an estimate was sent to a customer again after being adjusted.
Correction: Fixed.
Complaint: Managers reported customers were not receiving surveys after purchasing a machine when they had a configured survey rule with the “Invoice Machine’s Make” filter applied on the Manage Surveys page, even though the make of the sold machine matched what they set on the filter.
Correction: Fixed.
Complaint: Service Managers reported that Work Order Job Templates were being created without respecting the company’s default job billing style.
Correction: Fixed.
Complaint: Managers reported that the Quick Transfer button on the Machine Dashboard was not creating and processing a Machine Move like they expected.
Correction: Fixed.
Complaint: Users noticed that the city, state, and zip line would not appear on Sales Order PDFs if the information was only partially filled in.
Correction: This has been fixed. Sales Order PDFs will now display the address line correctly, even if only part of the information is present.
Complaint: On smaller screens, part of the Actions menu on the Work Order Dashboard was inaccessible due to a visual bug.
Correction: The Actions menu is now fully visible and accessible on all screen sizes.
Complaint: On some Part Voucher PDFs, the totals amount would sometimes be cut off and not fully visible. (Yeah, seems to be a trend of things not fully displaying correctly this week…)
Correction: Fixed.
Complaint: After collecting a signature and then accepting an account payment, users still saw a warning that a signature had not been collected.
Correction: This has been fixed. The warning will no longer appear once a signature has been collected.
Complaint: Some users reported that they were unable to create tags when editing a customer.
Correction: This issue has been fixed. Tags can now be added successfully while editing customers.
Complaint: When a customer had a labor type override set, it did not replace the job template's labor type when adding a job.
Correction: Fixed.
Complaint: The true/false filters on the “Item Types” editor were not functioning correctly.
Correction: This bug has been resolved. Filters now work properly on the Item Types editor.
Complaint: When editing a machine that originally had an inactive model, switching it to an active model sometimes resulted in an error stating the model was inactive.
Correction: This issue has been fixed. Machines can now be updated from inactive models to active models without error.
Complaint: On the Work Order Dashboard, when attempting to invoice a work order, users sometimes saw no response at all if an error occurred. The page simply did nothing after clicking "Invoice."
Correction: We’ve fixed this issue. Users will now see a clear error message whenever an error prevents invoicing, improving visibility and troubleshooting.
Complaint: Users reported that when editing a machine, there was no clear indication if the assigned model was inactive. This created confusion when working with machines tied to outdated or discontinued models.
Correction: We’ve updated the edit view for machines to clearly show when the assigned model is inactive, giving users better visibility and reducing confusion when managing machine records. Users will be shown an error message when attempting to save a machine with an inactive model.

Complaint: When creating a new machine, if a user entered a model name that already existed but was inactive, the system would silently link the new machine to that inactive model. This left the machine in a broken state because its model was disabled.
Correction: We’ve improved the machine creation flow. If a user tries to create a model that matches an inactive one, the system now blocks machine creation and displays the inactive model’s ID with instructions. Users must either reactivate the existing model or select another before proceeding, preventing machines from being tied to disabled models.
Customer Salespeople Relationship [#72685]
Complaint: Users were unable to assign “Primary” or “Secondary” salesperson relationships to a customer.
Correction: Fixed
Complaint: When a sale included an “Other Payment” in addition to a payment on account, the other payment line transferred to QuickBooks without a tax code. This caused it to inherit the regular tax rules of the sale, which resulted in incorrect tax amounts being applied.
Correction: We updated the invoice and memo posting logic so that all “Other Payments” are automatically assigned the “Exempt” tax code (0% rate) for Canadian tenants. This prevents those payment lines from inheriting standard tax rules, ensuring QuickBooks invoices reflect accurate tax amounts.
Complaint: Some Purchase Orders were generating PDFs with missing item details caused by an item description containing special characters.
Correction: Fixed.
Complaint: The Customer Balance report was sometimes crashing when users selected a long date range.
Correction: Fixed.
Complaint: When quoting a model and adding a custom option with a price, the shown Discount % was calculated using only the base model price, ignoring the custom option(s). This sometimes resulted in an incorrect or even negative discount being displayed.
Correction: Fixed.
Last week the Flyntlok team held their annual fantasy football draft. Ivan is looking to stay on top of his game as won BOTH last year’s football league as well as the March Madness contest. And ESPN rated his team one of the top teams in our league this season. Can anyone take him down? Certainly not Dylan who is the only one thus far to not pay his entry fees and might be kicked out before the season even starts.
If you are looking to root for a low-odds victor, cheer for Isabelle who picked her team using ChatGPT creating a squad based on Taylor Swift puns. If Isabelle the Anti-Hero manages to beat Ivan, he will never be able to Shake it Off, and when he gets angry she will simply tell him, “You Need to Calm Down.”
Stay tuned for regular updates!
August 13th, 2025 Release Notes
Learn More at Flyntlok Dealer Management System
Check out our Flyntlok YouTube channel for more highlights of the application!
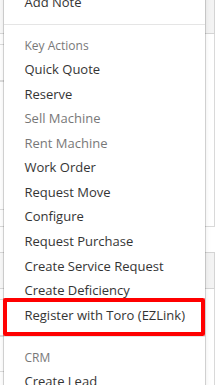
Toro Dealers using Toro’s Product Registration and Warranty portal to register their sold machines requested an integration with Toro to streamline their product registration process using Flyntlok. To meet this request, we’ve released the Dealer Connectivity integration with Toro. (This integration was formerly known as “Toro EZLink”.)
Once the integration is setup, to register a Toro machine, navigate to the Machine Dashboard and under the “Actions” dropdown select “Register with Toro (EZLink)”. The only requirements to register a Toro machine are that the machine was sold and has a serial number.
After navigating to the Toro product registration form, provide some basic information like who the machine is being registered to and what it will be used for.
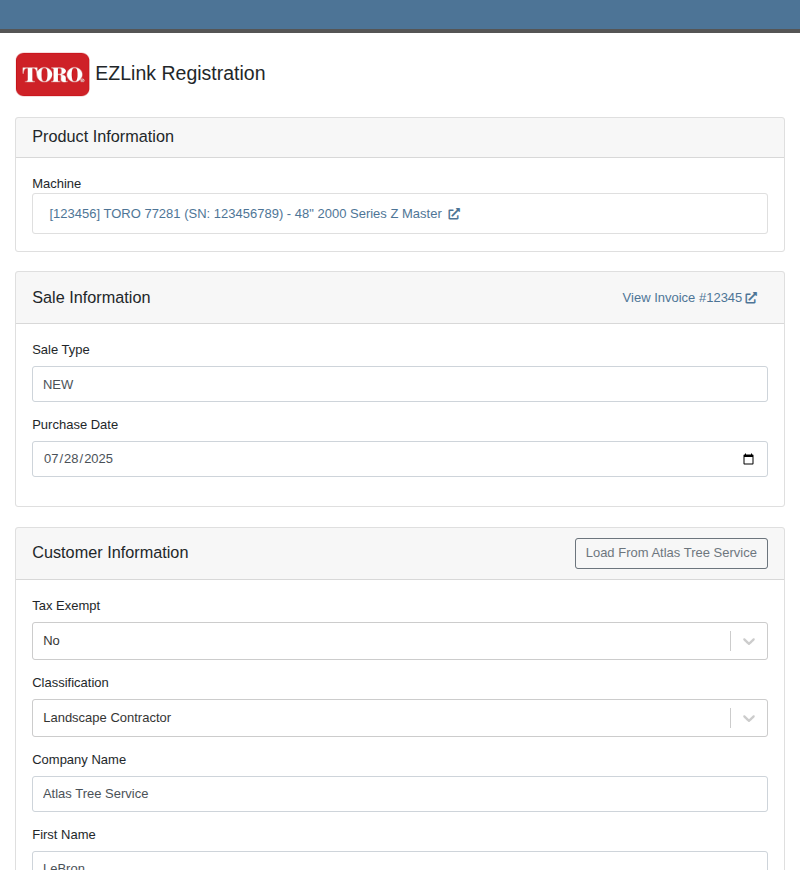
Users should routinely check the registrations in the Toro portal to ensure they are being processed properly.
You can reach out to your friendly consultant to start getting set up to use this new integration.
Opportunity
Sales teams needed a streamlined way to manage and assign sets of discount structures to customers without configuring them individually. Previously, managing discounts at scale required manual updates for each customer.
Solution
We’ve introduced “Discount Tiers” as a way to define and assign a reusable set of discount structures to multiple customers.
Key Features:
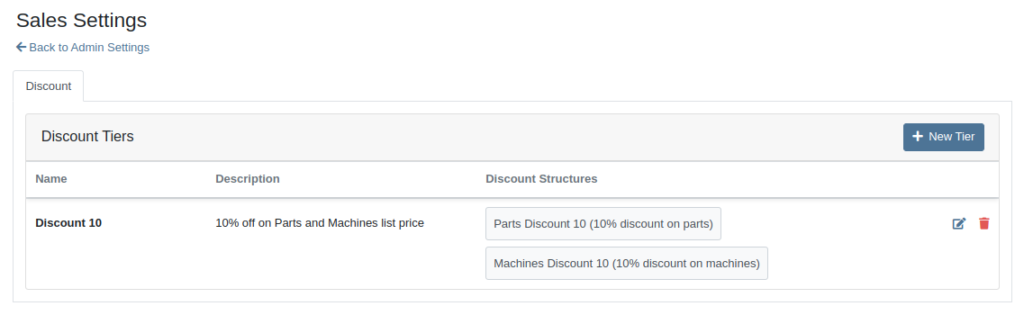
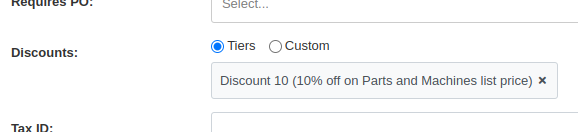
We expect this feature to roll out within a few days, but feel free to reach out to your friendly Flyntlok Consultant if you are interested in getting this feature enabled for your environment now.
Opportunity
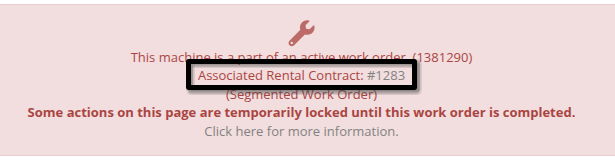
Service Managers needed an easier way to track which Rental Contracts are tied to Work Orders. Previously, there was no simple way to connect the two without manually cross-referencing notes or opening multiple records.
Solution
We’ve added a new widget to the Work Order dashboard: Associated Rental Contracts.
If any job on a Work Order is linked to a Rental Contract (via a form), that contract will now appear in the widget for easy access and visibility.
Opportunity
On the Machine Dashboard, Flyntlok currently displays a widget with the latest Rental Actions for the Machine. However, there was no way to dive deeper into older or cancelled/closed Rental Contracts.
Solution
We’ve added a “View All” button on the Rental Actions widget which will link to a report containing all Rental Contracts related to that Machine.
When Flyntlok ingests a Shopify Order, we build a set of payments based on how the Customer actually paid, including zero-dollar payment lines for pending payments. However, on rare occasions, we will see an Order that looks as though it was completely paid, but it also has pending payment lines on it. This makes it impossible for Flyntlok to recognize whether it needs to check for updated payment information later.
To resolve this, we’ve added a new Shopify section to the Flyntlok Invoice page. In the Details panel you’ll find the “Shopify” tab in the Actions section. Click “Queue Shopify Payment Update” and in the next 5 minutes Flyntlok will attempt to update the Invoice’s payment information from Shopify.
Opportunity
Rental Managers requested more visibility into the source of active Work Orders on Machines.
Solution
You can now see Rental Contracts associated with active Work Orders on any Machine’s dashboard.
Opportunity
Shops needed a way to categorize Work Orders more precisely by department, enabling better organization and reporting. Some users also wanted to link these departments to existing Categories for more structured workflows.
Solution
A new fully-customizable Department field has been added to Work Orders. Departments can be selected when creating or editing a Work Order:
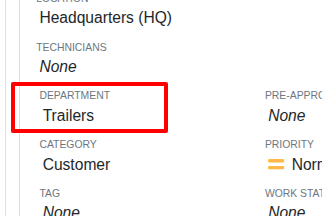
Custom Departments can be managed by navigating to the Wrench Icon -> Work Orders -> Work Order Departments. Simply provide a department name, and optionally associate a Category.
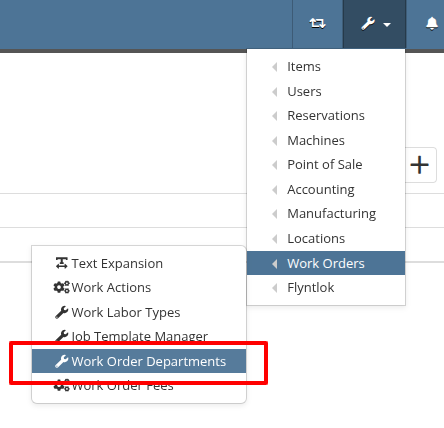
Additionally, technicians using Mobile Work Orders can search by these Departments.
Opportunity
Users previously had to create a machine from the Work Order Dashboard and then navigate to the Machine Dashboard to add a Customer Unit Number. This extra step was inefficient for busy service departments.
Solution
You can now enter the Customer Unit Number directly when creating a new machine from the Work Order Dashboard. This streamlines the process and ensures all important details are captured in one step.
Opportunity
Zapier users requested the ability to access the “Notifyee Email Addresses” field when automating workflows around “Customer Activities”. These email addresses are often needed for downstream actions like sending updates or triggering external systems.
Solution
The "Notifyee Email Addresses" field is now available when polling Customer Activities via Zapier. This gives users more complete data for automation and communication flows.
Opportunity
Users who manage multiple connected email addresses across Flyntlok's integrations needed better visibility into which address was used to send each message. This was especially important for troubleshooting, auditing, and ensuring proper communication channels.
Solution
We’ve added a "Sent From Email" column to both the “All Emails” and “My Emails” reports. This makes it easy to identify which connected email account was used to send each message, improving clarity for users who operate across multiple accounts.
Complaint: Scan mode on Part Purchase Order Receiving Vouchers was not working correctly.
Correction: Fixed.
Complaint: Users noted that there was sometimes a discrepancy between stale QOH indicators on the Item Dashboard and the Transfer dialog box on the Invoice page.
Correction: Fixed.
Complaint: Discounted parts on Work Orders sometimes did not reflect the discount on the printed PDF.
Correction: This issue has been fixed. Discounts on parts will now correctly appear on the printed Work Order PDF.
Complaint: Users reported that when creating a QuickBooks vendor, the “state/province” field would appear twice, in the place of the city.
Correction: Fixed.
Complaint: When adding a new shipping address to the Sales Order, the address was saved correctly but did not immediately appear in the interface. Users had to manually refresh the page to see the newly added address.
Correction: Fixed.
Complaint: Rental Managers calling off multiple units noticed the billable duration was not adjusting when changing the call off dates like it does when calling off a single unit.
Correction: Fixed.
Complaint: In some cases, when printing a Work Order’s final invoice, the Complaint, Cause, and Correction lines were missing from the PDF.
Correction: Fixed.
Complaint: Parts teams reported that Core Purchase Requests were not being associated with Special Orders when the base part was assigned to a sale during receiving.
Correction: Fixed.
Complaint: Technicians & Service Managers reported not being able to clock into Work Orders in “Completed” statuses from their phones.
Correction: Fixed.
Complaint: Users noticed that item prices were not being automatically calculated in some cases when editing items. This was traced back to scenarios where a buy or sell quantity of zero was allowed.
Correction: Fixed a bug that allowed zero-quantity values. The system will now prevent 0 buy/sell quantities to ensure valid and accurate price calculations.
Complaint: Rental users reported that invoices printed from rental contracts showed the internal Machine ID in the "Part" column, which was confusing for customers.
Correction: Fixed. We now display the Machine’s Display ID instead, providing more clarity on rental invoices.
Complaint: Managers experienced frequent disconnections with their company-level Microsoft email accounts, requiring repeated manual reconnections.
Correction: Fixed. Microsoft accounts should now remain connected as expected.
Complaint: Users reported that when trying to reset their password through the User Settings page, their current password was being rejected even when it was entered correctly.
Correction: This issue has been resolved. The system will now properly recognize and accept valid current passwords when updating account credentials.
Learn More at Flyntlok Dealer Management System
Check out our Flyntlok YouTube channel for more highlights of the application!
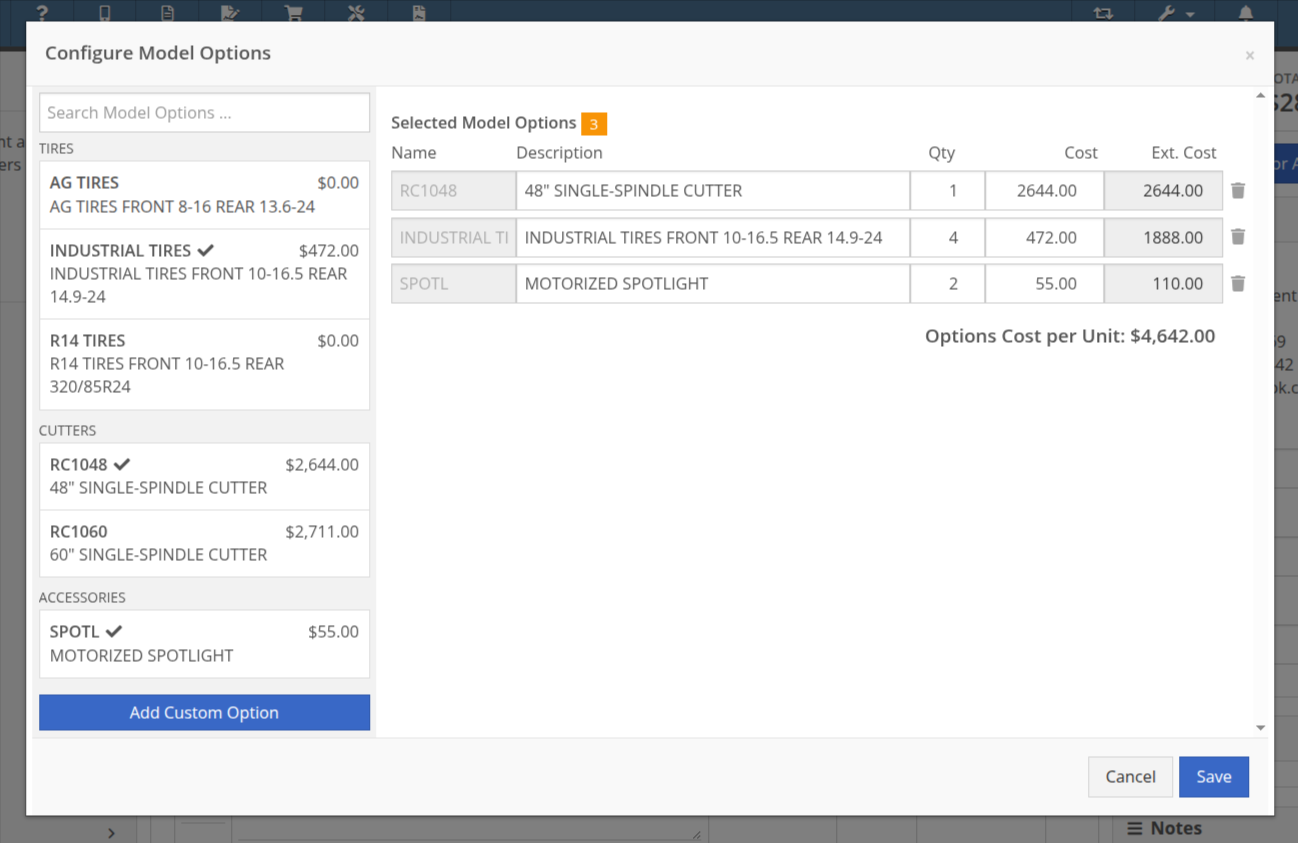
Models can now be configured to be quoted, sold, and purchased with quantities of Model Options. You will find that quantity amounts can now be set throughout the entire quoting and purchasing workflow. This includes:
Purchasers wanted the ability to edit the cost of Model Options while editing a Machine Purchase Order. Previously, when ordering Models and then finding out about price changes after submitting the PO, the only way to adjust the cost was to either recreate the Purchase Plan, or remove all the existing options and recreate a new set of Custom Options with the updated pricing.
We have updated Model Options editing capabilities on our Machine Purchase Order page. You can now edit descriptions and costs. Similar to how Model Options was updated across the rest of Flyntlok in a previous update, this should feel more inline with all other purchasing workflows. And yes, quantity can be edited here too:
Opportunity
Purchasing teams wanted the ability to view the Item’s MSRP directly within the Part Purchase Order interface.
Solution
Item MSRP is now available in the column chooser on Part Purchase Orders, allowing users to include it in their custom layout. Further, some datagrid improvements enable layout saving and resetting for a personalized experience.
Opportunity
Service Managers needed a way to troubleshoot large machine Receiving Vouchers more easily. Without an export option, reviewing long lists of received machines was time-consuming.
Solution
Machine Receiving Vouchers now include an "Export CSV" option in the Actions dropdown, allowing easy export of all voucher lines for review in Excel.
Opportunity
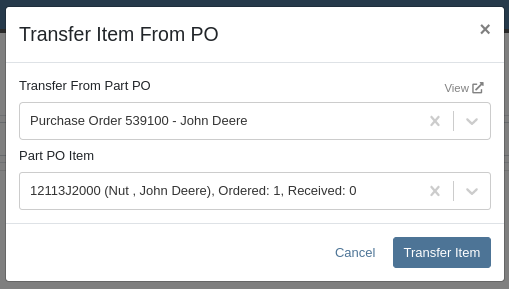
When vendors shipped parts on a different Purchase Orders than originally ordered, parts staff had to manually edit the original Purchase Orders and recreate the receiving voucher to ensure accurate receiving.
Solution
Added the ability to transfer items between Purchase Orders. When an item is transferred, it is automatically included on the open Receiving Vouchers of the Purchase Order. This functionality is available from the Actions dropdown on the Purchase Order, labeled "Transfer Item From PO."
Opportunity
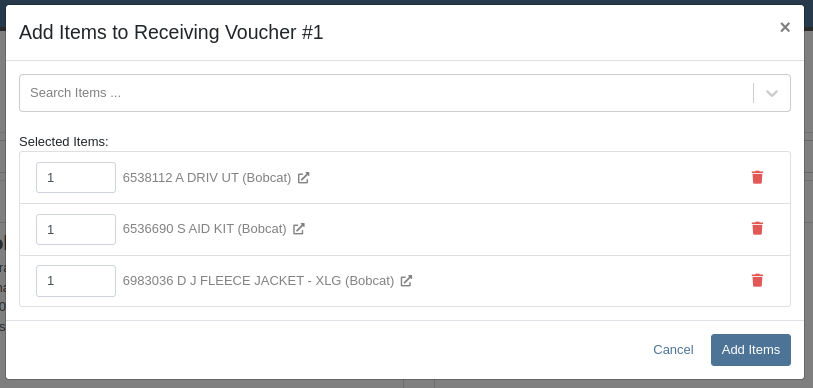
Parts Managers reported inefficiencies (and boldly challenged Flyntlok to solve this problem) when vendors shipped additional parts that were not originally listed on a Purchase Order. To receive these unexpected items, users first had to update the PO manually before they could add them to the voucher.
Solution
Challenge Accepted, Neil! Introduced a new “Add Items” option under the Actions dropdown on the Receiving Voucher page. This allows users to add missing parts directly to the voucher. When items are added this way, the corresponding Part Purchase Order is automatically updated.
Opportunity
Parts Managers requested visibility into both the Item MSRP and List Price directly on the Part Purchase Order PDF to assist with pricing validation.
Solution
Added a new setting: "Display Item List Price and MSRP on Parts Purchase Order PDF." When enabled, this setting will include both the MSRP and List Price of each item on the printed Purchase Order PDF. To turn this feature on, go to Flyntlok Settings and find it under the Purchasing section.
Opportunity
CRM users needed a more flexible and powerful search when working with leads. Previously, searching by phone number or email returned no results, limiting the usefulness of the search function.
Solution
We’ve enhanced the global search on the "All Leads" report to include phone numbers and email addresses, making it easier to find leads with limited information.
Opportunity
CRM users reported issues with lead handling, noting that new Leads that were created from the “Text Us” widget or from Zapier weren’t automatically linking to customers and that users could initiate Sales Orders, Work Orders, and Rental Contracts without a customer assigned.
Solution
A Customer will now be automatically assigned to a new Lead if the phone number or email matches a contact on exactly one customer. Additionally, a customer must be assigned before creating a Sales Order, Work Order, or Rental Quote from a lead.
Opportunity
Sales Managers needed a way to display selected “Machine Options” on the Sales Order and invoice PDFs.
Solution
We’ve updated the Sales Order system to include ”Machine Options” when a machine is sold using the “Sell Machine” button or through the Machine Dashboard. Options now appear directly on the Sales Order page and in the PDF.
Opportunity
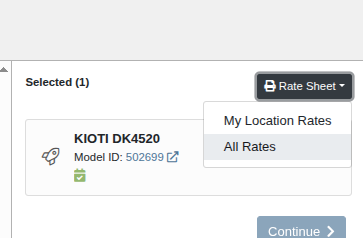
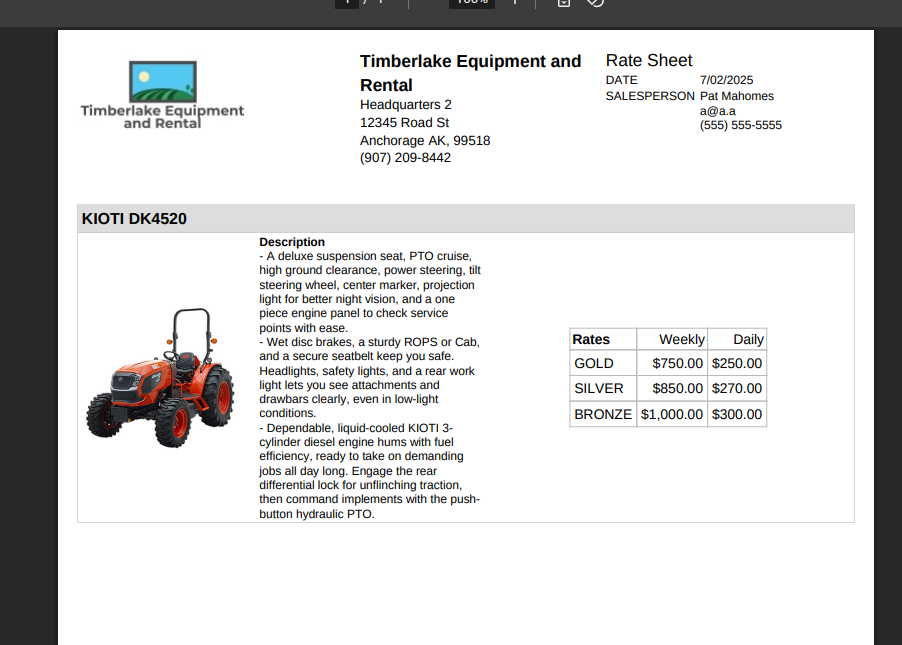
Salespeople requested the ability to show multiple Rent Schedules when printing a rate sheet for their customers. This is because many Rental Departments use tiered pricing to support upsell opportunities, such as offering discounts for preferred customers or better rates for long-term rentals. Being able to present flexible pricing options would help to maximize rental opportunities.
Previously, rate sheets were limited to showing only the default Rent Schedule based on the contract’s location.
Solution
The updated Rate Sheet now offers two display modes:
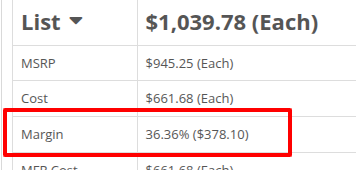
Opportunity
Users reviewing item costs wanted a quicker way to assess profitability without needing to do manual calculations. Visibility into margin and profit directly on the Item Dashboard supports faster pricing and purchasing decisions.
On Item Dashboard, when clicking to reveal costing information, we now show margin percentage and profit amount.
Complaint: Sometimes inactive items are being displayed in the alternates view when viewing part through the search.
Correction: Fixed.
Complaint: Machine Purchasers reported that they would sometimes receive a number of duplicate notifications when they complete a Machine Purchase Order derived from Machine Purchase Requests.
Correction: Only one notification will be received.
Complaint: Users reported that machines that were currently rented out were showing a blank space in the Status column when searched using M?.
Correction: Fixed.
Complaint: Sometimes the Part Sales History report was becoming unresponsive when loading.
Correction: Fixed.
Complaint: The "Work Order Invoice Terms" setting in Flyntlok Settings was not functioning as expected. Instead of displaying its contents on the final invoice, the system was incorrectly using the general "Work Order Terms" setting.
Correction: The "Work Order Invoice Terms" setting now correctly controls the terms displayed at the bottom of a Work Order’s final invoice.
Complaint: Technicians and Service Writers noted that multi-day scheduled events created through Service Scheduler were not appearing in the assigned technician's "My Work" view.
Correction: Fixed. Multi-day scheduled events now appear on an assignee's view when filtering by any date that falls within the start and end date of the event.
Complaint: Service Writers reported that the “Billable Hours” as reported and shown within the Work Order Dashboard did not correctly carry over to the final Invoice.
Correction: Fixed.
Complaint: Inventory Managers reported that on Item Dashboard, they were unintentionally able to transfer more quantity than was available at the source location.
Correction: Fixed. Improved UI to show and prevent when a requested transfer amount exceeds quantity on hand at the selected location.
Complaint: Salespeople noted that sometimes Sales Orders generated by a Sparks customer showed up in their dashboards without an ID set, resulting in the Sales Order link not being clickable.
Correction: Fixed.
Complaint: Technicians reported that when attempting to attach photos to a Work Order from mobile using an Android-based device, they were only presented with the option to select existing photos. Users on iOS devices had the additional option to take a new photo.
Correction: Fixed.
Complaint: Users mentioned that they were not receiving a notification when their password was close to expiring.
Correction: Fixed.
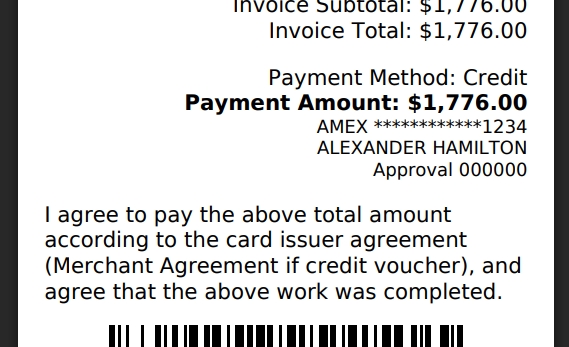
Complaint: Salespeople reported that when accepting a card payment on a Sales Order, the approval code was not appearing on the thermal receipt PDF.
Correction: Fixed approval numbers not showing. Additionally, we now include more card information:
Complaint: Users were able to undo the receiving of a Special Order item that was already fulfilled, leading to incorrect allocation states.
Correction: Flyntlok now warns users when attempting to undo the receiving of a Special Order item if the linked Sales Order is already in a Delivered status.
Learn More at Flyntlok Dealer Management System
Check out our Flyntlok YouTube channel for more highlights of the application!
With our recent CRM Activity upgrade and your valuable feedback, we’ve been working hard to make these tools even more powerful and intuitive. This latest round of updates focuses on simplifying how you log and manage customer interactions, helping your team stay organized, responsive, and efficient.
CRM Activity on Customer Dashboard
When creating a new CRM Activity directly from a Customer Dashboard, you now have the ability to:
Notify Users
You can now notify one or more internal users when logging an Activity. Just check the "Send Notifications" box in the Notifications area to select recipients.

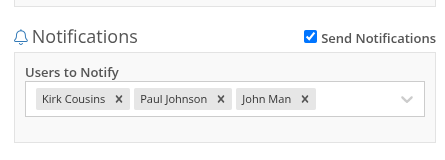
Notifications via the in-app bell icon are enabled by default. Users can also opt in to receive email and/or SMS alerts, configured in User Settings > Notifications > CRM. N.B. If the user has all of the notification options disabled, they will not receive any alert even if they were added to the Notification field on the Activity.


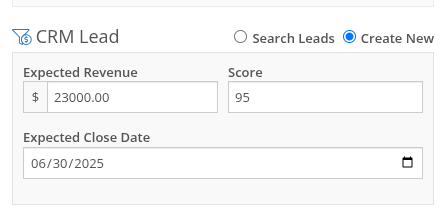
Create a New Lead
Quickly convert a conversation into an Opportunity. Under the CRM Lead area, click "Create New" to instantly add a Lead while recording the Activity. The Lead will be created upon hitting save on the Activity. N.B. You can only create a new Lead when creating an Activity. Not when editing an existing Activity.
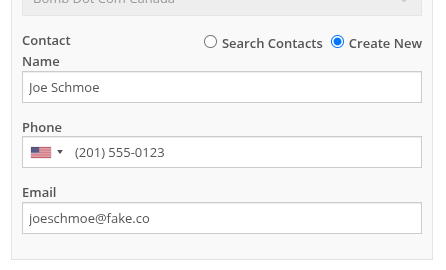
Create a New Contact
Select "Create New" in the Contact section to add a new Contact without needing to leave the Activity form.
Edit Activity Date
You can now edit the Activity Date to backdate entries. The original "Created Date" remains locked for reporting, while "Last Updated" and "Last Updated By" are now saved to maintain a complete audit trail.
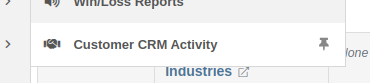
New Page: All CRM Customer Activity
The new “CRM Customer Activity” report lets you browse all logged Activities for all customers in one place. Long-time users may recognize this as a fresh take on our existing "Customer Interactions" report.

Zapier Integration - "New Customer Activity" Trigger
You can now integrate Flyntlok CRM Activity into your Zapier workflows with the "New Customer Activity" trigger!
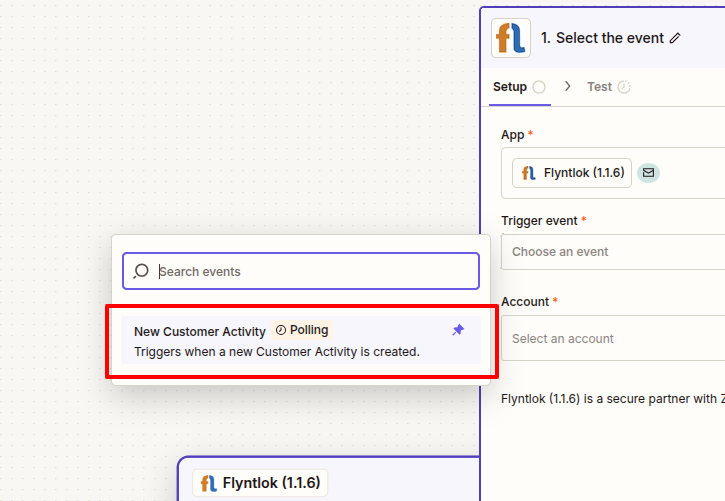
This opens the door to automating follow-up actions and improving team responsiveness. Some example workflows include:
If you have not yet integrated Flyntlok into your Zapier workflows, or are interested in learning more, don't hesitate to reach out to your friendly Flyntlok consultant for more info!
More to come...
We’re continuously building out CRM features to help your team stay engaged, responsive, and customer-focused. Stay tuned for even more improvements on the way!
Opportunity
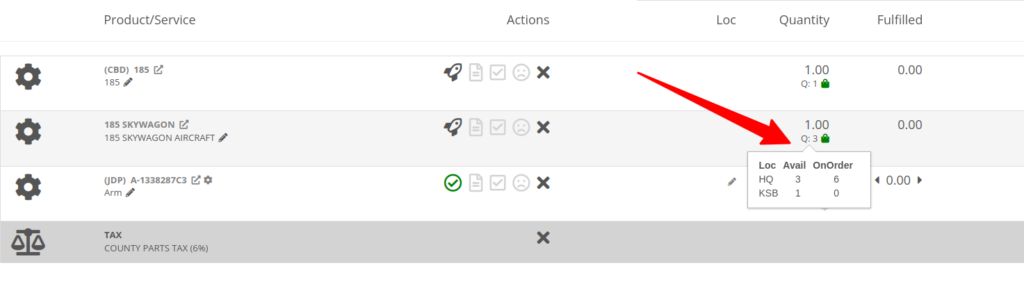
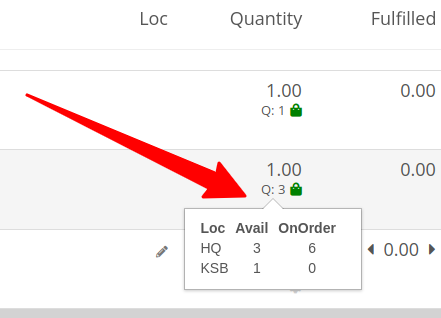
Salespeople requested the ability to see inventory QOH when quoting a Model on a Sales Order.
Solution
We have added the QOH for quoted Models to the Sales Order details. The “Q:” on a model line indicates the number of available Machines at the Invoice’s store location. Hovering over it will display additional information including the quantity of Machines currently on order, as well as inventory information at other store locations.
Opportunity
Sales Managers requested that employees be prevented from taking deposits for walk-in customers. This was often done in error and led to deposits in the system that could not be correlated to a customer.
Solution
Deposits can no longer be taken from walk-in customers. Or from Walken Customers.

Opportunity
Rental Users requested the ability to save driver’s license information to a Contact so it can be used when creating a new Rental Contract.
Solution
We have added this functionality to the New Rental page. When creating a contract, you can enter the driver’s license info under the License section, and then check one of the “Update Contact” or “Save New” options under the Contact section:
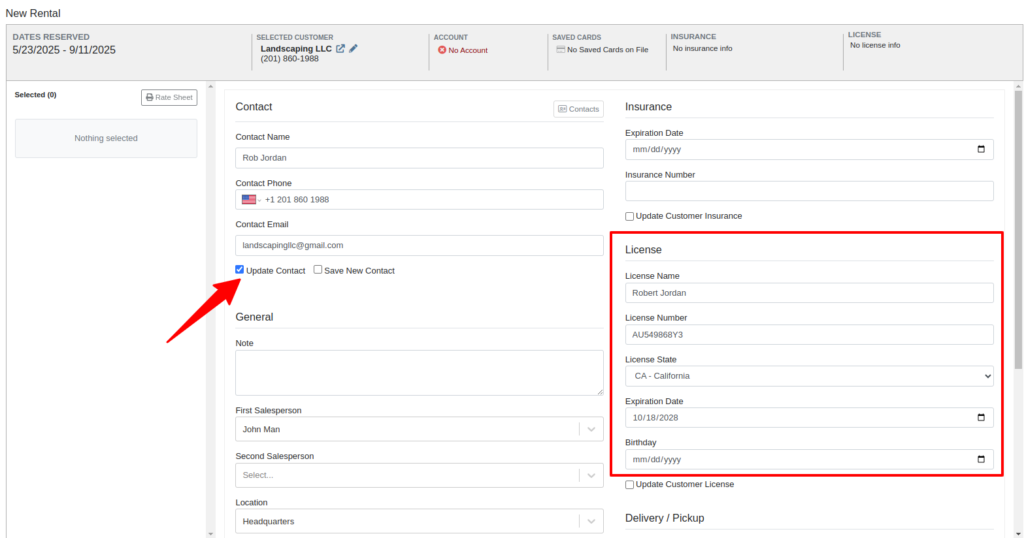
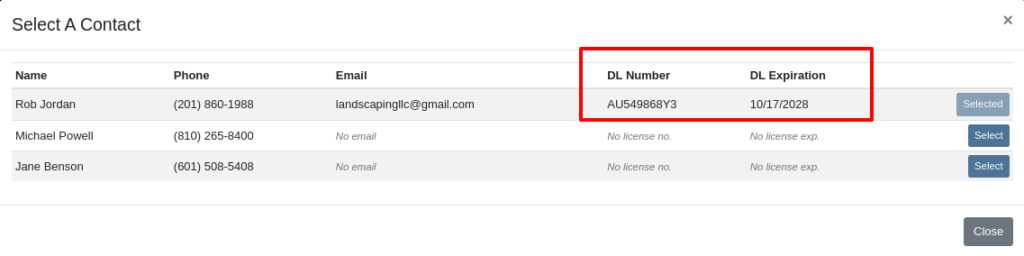
Then on future rentals, you can select the “Contacts” button on that section to pull up a list of the Customer’s Contacts.
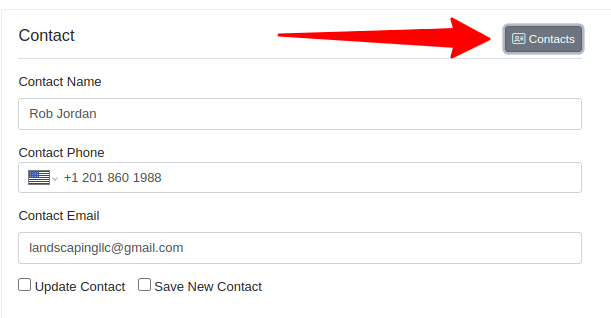
Selecting any contact with saved driver’s license info will auto-fill it in the License section of the Contract:
Opportunity
Rental Managers had requested the ability to choose when to apply pickup and delivery fees to rental invoices generated in bulk.
Solution
Users can now choose whether or not to apply these fees on any billing generated from the “To Be Billed” page.
Complaint: Users reported that sometimes when opening Notifications, it would cause the entire page to go blank.
Correction: Fixed a bug found in a notification message that prevented the notification list from loading.
Complaint: Service Managers reported that entering the complaint, cause, and correction on jobs was sometimes difficult because the input was too small.
Correction: The input size was increased.
Complaint: Sales Managers reported that, when trying to connect a Flyntlok Item to a Shopify Product, the Product in Shopify would sometimes not be found.
Correction: Fixed.
Complaint: Parts Managers reported that they could not find Core Items in the search after they were created from the Item’s edit page.
Correction: Fixed.
Complaint: Receiving Clerks reported that when attempting to use the Print Machine Label bulk option on MPO Vouchers, it would sometimes be slow to load, or would show an error after an extended amount of time.
Correction: Fixed a performance issue that would occur when attempting to print Machine Labels in bulk for a large quantity of Machines.
Complaint: Managers reported that selected Contacts on Work Orders and Rental Contracts were not automatically populating as the selected Contact on the final Invoice generation.
Correction: Fixed.
Complaint: When a Model was added to an Invoice as a Kit sub-item, it would display icons underneath that were only applicable to Parts, and also showed “Ready” before a Machine was associated.
Correction: Fixed. These will now correctly show Model icons, and display the Model QOH before Machine association.
Opportunity
A Distinguished Flyntlok User asked for the ability to submit messages when responding to Issues by pressing Enter, instead of having to click the “Send Message” button.
Solution
Pressing Enter now sends a message with the text in the box when responding to an existing Issue in Flyntlok. (Editor’s Note: Not sure we should have listened to Wayne on this item, but we did...)
Learn More at Flyntlok Dealer Management System
Check out our Flyntlok YouTube channel for more highlights of the application!
Opportunity
When making a sale, knowing the Customer’s account or deposit balance is helpful to the salesperson. To access this information, they would have to access the Customer’s dashboard page, which was inconvenient and time consuming with a customer waiting.
Solution
We’ve added the Customer’s balance information to the top of the Payment popup. When clicking the green “Pay” button on a Sales Order, will now see this information displayed at the top of the box:
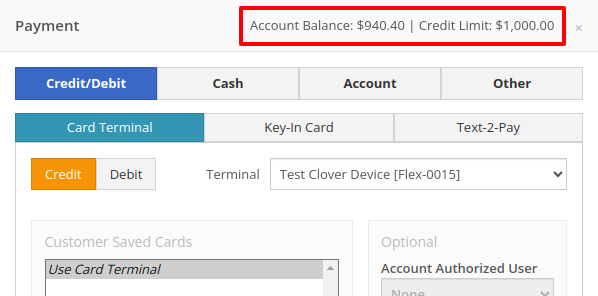
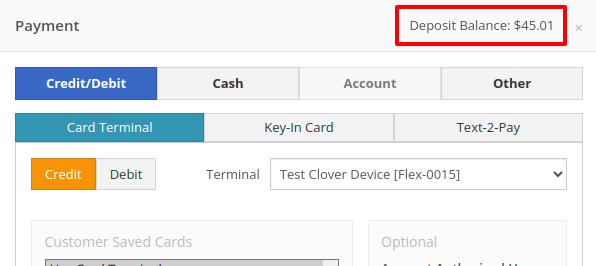
For non-account customers, it will show their deposit balance instead:
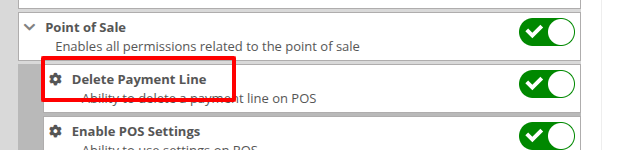
Opportunity
Managers requested the ability to allow or restrict deletion of payment lines on Point of Sale based on their user roles.
Solution
We have added a new permission on our Access Controls page. The "Delete Payment Line" permission can be found under the "Point of Sale" category. Disabling this permission will block deletion of payment lines for Sales Orders in any status.
Opportunity
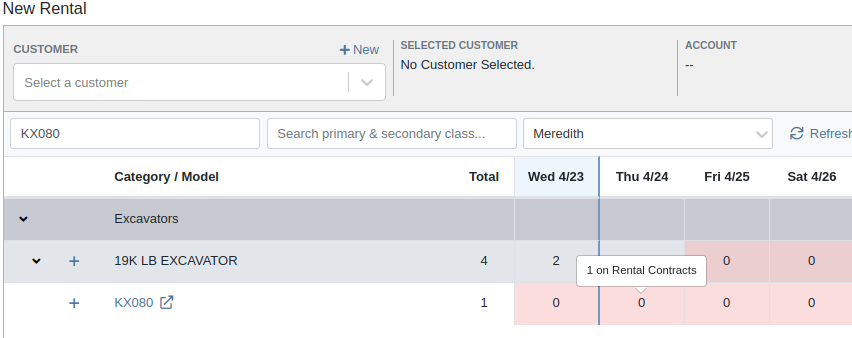
Previously, the text searcher on the Rental Category Timeline combined both Model and Class searching at once. Rental clerks complained that when they searched by a Machine’s Class specifically, it would display no Models underneath, because the searcher required that both Model and Class match the search filter.
We split the text searcher into two separate inputs, for Models and Classes:
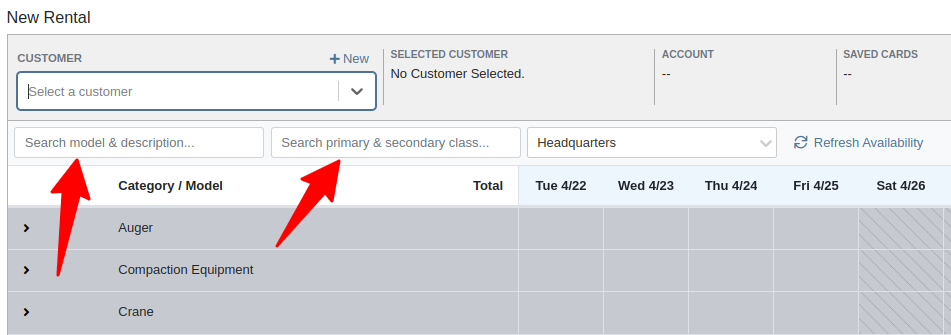
Users can still use the Model searcher to limit results to Models whose Make, Model, or Description matches the filter. Additionally, the Class searcher can be used to limit results to Classes whose name matches the filter.
Having both options available allows users to precisely specify which results they are looking for.
Opportunity
Rental Managers noticed that when viewing a Machine Dashboard, the rental rates from a different location would show first by default, causing confusion. They wanted the system to prioritize the user's location-specific rental schedule instead.
Solution
We’ve updated the Rental Rates menu so that rental rates matching the user’s current location are shown at the top of the list. Additionally, we added location badges to clearly identify which rental schedule belongs to which location, making it easier to find the correct rates quickly.

Opportunity
Managers using Flyntlok's Shopify integration requested more insight into a Shopify-linked Item's status. Previously, we would only show if an Item was initially linked to Shopify. Modifications made to the Item in Shopify that resulted in a de-sync was not being communicated clearly on our Item Dashboard. This led to confusion about the actual sync status of the Item.
Solution
The "In Shopify" checkmark at the top of Item Dashboard has been replaced with a dedicated Shopify section in Item Dashboard. This allows you to view more details, including connection status of the Product, sync status, and the last sync time:

An Item with no Shopify link will display as "Unlinked":
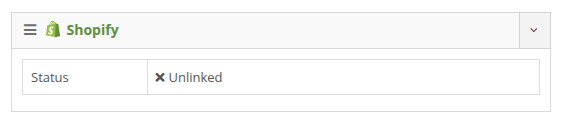
In the case of a linked item that can no longer be found in your Shopify store, the Item's connection status is displayed as "Previously Linked":

Additionally, there are two buttons to external pages provided: "View in Shopify Store" directs you to your storefront's Product page. "Edit in Shopify" directs you to the Product on your Shopify Admin page.
Opportunity
Dealers receiving large quantities of Models requested a more streamlined way to enter Machine serial numbers in bulk. While Flyntlok previously supported bulk entry via barcode scanning, we did not have support for bulk text entry. This is especially important for dealers who prefer to enter serial numbers from a vendor's invoice before physically receiving the stock.
Solution
To use this feature, click the "Enter Serial Numbers" button near the top of an MPO Voucher:
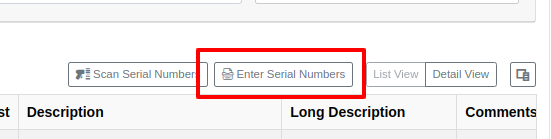
From this dialog, select a Model, then type or paste in the serial numbers. Serial numbers can be separated by line breaks, commas, or a mix of both:

Check "Detect duplicates" to remove any duplicates before proceeding to the next step.
Clicking on "Next" will reveal the preview. From here you can verify that the serial numbers to be applied look correct. We will also display warnings if too many serial numbers were entered as compared to the number of machines on the voucher. If too many are entered, you can remove lines as needed, or click on "Back" to restart the process.
Use the "Overwite existing serial numbers" checkbox if you wish to ignore any existing serial numbers entered on that model. This is especially useful for dealers who use a placeholder serial number.
Complaint: Parts Managers asked for the ability to edit comments on Part Transfers that have been received.
Correction: Comments can now be edited.
Complaint: Service Managers noted that they were sometimes not able to add a new “Work Action” through the Work Actions Admin Editor.
Correction: Fixed.
Complaint: Rental Managers mentioned that when attempting to edit the default title or body for a contract in Rental Settings, the changes were not appearing on newly created Rental Contracts.
Correction: Fixed.
Complaint: Inventory Managers noted that when printing a Receiving Voucher PDF, the footer did not contain the "Generated by" user and timestamp info that commonly appeared on other PDFs.
Correction: Fixed.
Complaint: Inventory Managers complained that when adding a Model Option, sometimes the currency would not be correctly set.
Correction: Fixed. It will now default to the Vendor's currency when adding a new Model Option.
Complaint: Managers reported that under the Balance Sheet section on the mobile version of the Machine Dashboard, the Liabilities section was not accurate and would always appear as $0.00.
Correction: Fixed.
Complaint: Rental Clerks reported that sometimes the “Category Timeline” view on the New Rental page would report no conflicts, even when the Model had Machines that were out on rent.
Correction: Fixed.
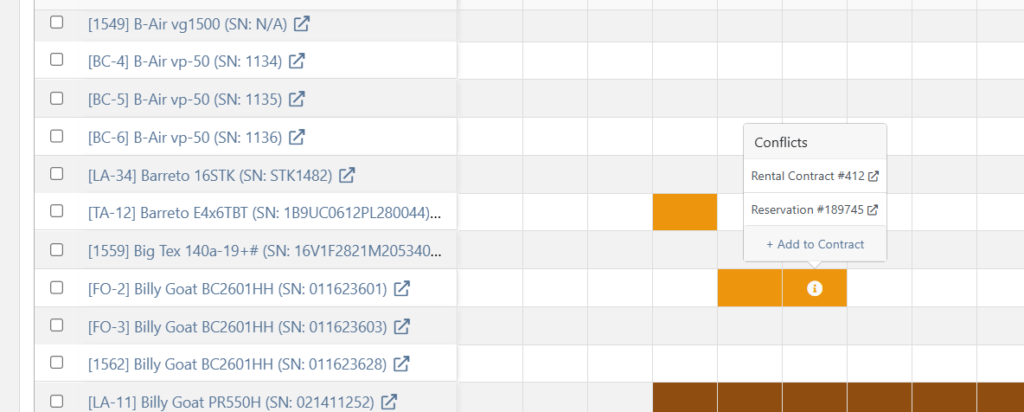
Complaint: Rental Clerks noticed that some machines showed days with conflicts (denoted by colored cells), but when they clicked on the cell the pop up would show “No Conflicts”.
Correction: Fixed.
Complaint: When printing a Purchase Order, core items were appearing twice on the PDF.
Correction: Fixed.
Complaint: Damage waivers were not being automatically applied to new customers without insurance.
Correction: Fixed.
Complaint: Customers using Sparks were unable to select the "Account" payment method and were forced to use a credit card to place orders.
Correction: Fixed. We've restored the "Account" payment option for eligible customers in Sparks.
Complaint: Parts Managers noticed that John Deere information was failing to load with Flyntlok’s API link to John Deere for some parts.
Correction: Fixed. The lookup now ignores white spaces at the start or end of part numbers.
Complaint: Managers reported times were showing in the incorrect timezone on the Issue Dashboard.
Correction: Fixed. Times shown on the Issue Dashboard will be displayed in the current location’s timezone.
Complaint: Technicians reported that some parts they search for on the desktop Work Order don’t appear in the search results when requesting parts on Mobile Work Orders.
Correction: Fixed.
Complaint: Parts Managers complained that they were not able to cancel a Reversal on Part Receiving Vouchers.
Correction: Fixed.
Complaint: Rental Clerks with AvaTax integration noted that they were sometimes unable to reverse Invoices.
Correction: Fixed. This issue only affected reversing of Rental Return invoices whose original sale was processed by AvaTax.
Complaint: Inventory managers using MPO Voucher's detail view complained that they were seeing a "De-sync on Machine Cost" warning even though no changes were being made to the cost.
Correction: Fixed. This was causing bugs in other editable fields on the same view, sometimes preventing the user from editing those fields.
Complaint: Managers mentioned that they were not able to add a note to an issue ticket immediately after submitting it.
Correction: Fixed a bug where the note input was not appearing on issues in "New" status.
Complaint: Service Writers noted that their customer SMS messages were displayed in the wrong order on the Activity Tab of Work Order Dashboard, displaying from oldest to newest.
Correction: Adjusted SMS message history on Work Order Dashboard to always display the newest messages first.
Complaint: Sales Managers mentioned that they were sometimes unable to print a Packing Slip, and that it would show up as a blank PDF.
Correction: Fixed a bug where special characters in a Customer’s contact record would sometimes cause an error in displaying Packing Slip PDFs.
Complaint: Managers noted that their notifications for an expiring Machine Reservation was not showing the correct Machine ID.
Correction: Fixed.
Congratulations are due to Flyntlok staffers Michael F. who welcomed his first baby on April 25, a bouncing boy named Bogdan! And Dylan T. welcomed baby girl Willow (number 3) on May 6! These future Flyntlokers will be coding new features and closing out tickets in no time!!
Learn More at Flyntlok Dealer Management System
Check out our Flyntlok YouTube channel for more highlights of the application!
Opportunity
Technicians needed a way to quickly identify the owner of a machine when printing Work Order worksheets tied to the “Cost of Sale” Invoice.
Solution
We've updated the Work Order Worksheet PDF to include the information of “Cost of Sale” Customer.
Opportunity
When using the "Collect Signature" feature on the Rental Dashboard, users had to select the device every time. They requested a way to configure a default device.
Solution
We have updated the Collect Signature feature to auto-select the last used device.
Opportunity
Users struggled to provide quick and accurate verbal estimates for Rental Contracts because the "Estimated Billable Total" on the Rental Dashboard excluded known additional charges, such as Pickup and Delivery fees. This lack of visibility could lead to confusion, underquoting, or the need for follow-up clarifications with customers.
Solution
The "Estimated Billable Total" has been enhanced to now include Pickup, Delivery, and Damage Waiver charges. This more comprehensive total is displayed prominently at the top of the Rental Dashboard, along with a detailed breakdown section. This update gives users greater confidence in providing quick, all-inclusive estimates to customers, improving both transparency and customer experience.

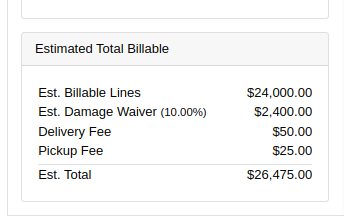
Opportunity
Salespeople previously had limited flexibility when setting the "Generate Purchase Request" option during the Model configuration process. If this setting was selected incorrectly, they had to restart the entire configuration from scratch. This wasted time and increased the risk of errors. The setting also couldn’t be changed after reversing or reprocessing a Sales Order or when duplicating a Quote, adding further friction to the sales workflow.
Solution
We’ve introduced the ability to modify the "Generate Purchase Request" setting while the Sales Order is still in Draft status. When adding a Model to a Sales Order, an icon will appear near the Quantity field, indicating whether a Purchase Request will be generated for that line.
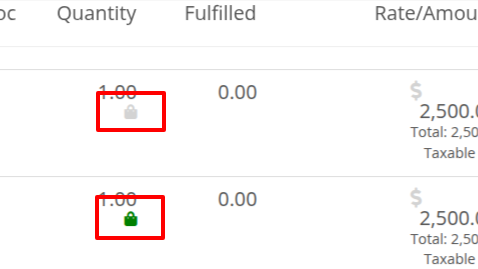
Salespeople can click this icon to easily open the Model Purchase Request Settings dialog and make any necessary adjustments. This should eliminate the need for users to reconfigure from scratch.
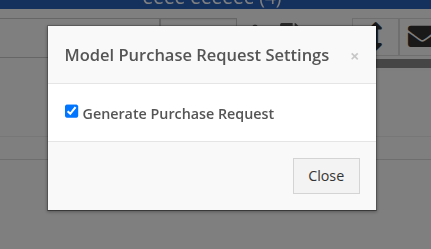
Opportunity
Salespeople often encounter difficulty identifying the correct Customer when multiple records share the same or similar names. This can lead to confusion, delays at the Point of Sale, and potential errors in selecting the wrong Customer profile.
Solution
To make it easier to distinguish between Customers, we’ve added address details to the Customer search results on the Point of Sale page. This additional context helps salespeople quickly and confidently identify the correct Customer, which should speed up the checkout process!
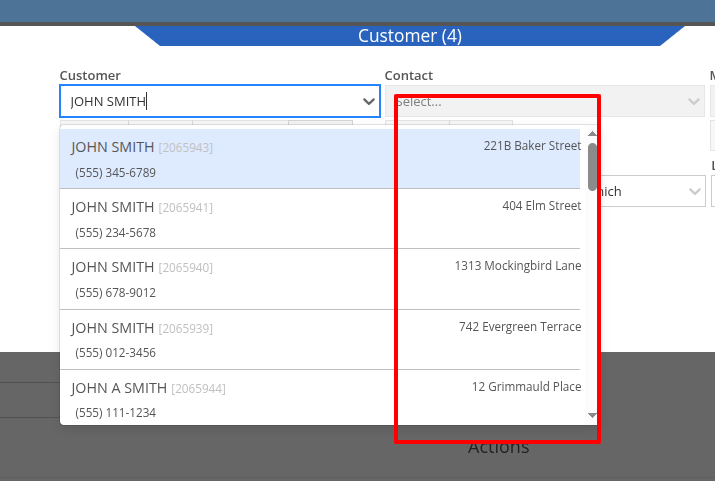
Opportunity
Service Writers reported that when changing the Machine on the Work Order Dashboard's "Info" tab, the searcher displayed all company Machines instead of filtering to only those owned by the Customer. This behavior was inconsistent with other Work Order pages, and made it harder to quickly find the correct Machine.
Solution
The Machine searcher on Work Order Dashboard now defaults to showing only Customer-owned Machines. For flexibility, a checkbox has been added to allow searching across all Machines when needed.
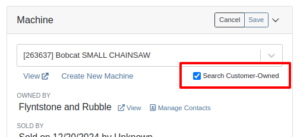
Opportunity
Rental and Sales teams using Sage Intacct have needed a more consistent and hands-off way to ensure the correct income items are used when invoicing Machines or Rentals.
Solution
Flyntlok will now automatically apply the income items to Machine sales and Rentals for Sage-integrated tenants. We've added two new settings: “Default Sage Machine Income” and “Default Sage Machine Rental Income”. To configure them, go to Flyntlok Settings and find them under the Sage Intacct section.
Complaint: When adding a new line to a Sales Order, the item would sometimes appear in random positions—top, middle, or bottom—causing confusion and inconsistent workflows.
Correction: Fixed.
Complaint: When applying a discount to an entire Sales Order, the shipping line was also discounted—but this discount wasn’t visible on the Sales Order screen, only on the printed Invoice, causing confusion.
Correction: We now display the discount on the shipping line directly within the sales order UI, making it consistent with the printed version.
Complaint: Managers reported that the All Contracts report was showing the incorrect timezone under the Last Updated column.
Correction: Fixed.
Complaint: Parts managers reported that the Pick List printout on a Work Order could display Parts requested from a deleted Parts Invoice.
Correction: Fixed. This printout now correctly only shows parts from active Invoices.
Complaint: Salespeople reported that changing the postal code on an existing Customer did not update the city and state for the address.
Correction: Fixed.
Complaint: A job marked as “Rejected” did not show its rejected status in the mobile view, leading to confusion for mobile users.
Correction: The job approval status, including "Rejected", now correctly appears in the mobile view to match the desktop display.
Complaint: Managers reported that the “Date Sold” field was unable to be cleared out on the Machine edit page.
Correction: Fixed.
Complaint: Technicians reported that the “cause” and “correction” fields were missing when adding a Job on the mobile Work Order view.
Correction: Added these fields to the Add Job section. They can be manually entered, or will auto-fill when selecting a Work Order Job Template.
Complaint: Rental clerks noted that after sending an email from Rental Dashboard, the tab would sometimes close itself.
Correction: Fixed. This issue specifically affected Microsoft Edge users. (Editorial Note: Microsoft Edge specific features frequently cause weird and esoteric bugs in Flyntlok. Always making life difficult, eh Mr Gates?)
Complaint: Managers reported that on Machine Receiving Voucher, when changing adding or editing a Machine's PDI cost, the Machine's “List Price” was not re-calculating based on the updated Machine cost.
Correction: Fixed. Changing PDI now immediately refreshes the Machine's “Book Value”, which should result in the correct “List Price” calculation.
Complaint: The list of users available for manual clock-ins in ERP Work Orders included all users, including people no longer employed with the shop, making it difficult to locate current employees.
Correction: We’ve improved the Clock-Ins table in ERP Work Orders to display only active users when adding clock-ins manually. Additionally, you can now search for users by typing into the input fields.
Complaint: Parts Managers mentioned that when applying a text filter to a column on Receiving Voucher, it would persist across all other Vouchers. This would cause confusion, as a search query on one Voucher may not be relevant on others.
Correction: Fixed. Only column sizes and arrangement will be persisted.
Complaint: Managers editing the Contact name on the Manage Customer page noticed that sometimes the previous Contact’s last name would appear at the end of the name they just typed once they clicked save.
Correction: Fixed.
Complaint: Service Managers reported that “Move Requests” generated from Work Orders were not displaying whether they were “Delivery” or “Pickup” under the “Kind” column in the report.
Correction: Fixed.
Complaint: Service Managers reported that Work Orders generated from Service Requests were missing the default fees.
Correction: Fixed.
Complaint: Service Managers reported that Pickup and Delivery Requests generated from Work Orders were missing contact information for the customer.
Correction: Fixed.
Complaint: Sales Managers noted that when copying a Sales Order that was associated to a Lead, they were unable to track the newly created Sales Order from the original Lead.
Correction: When copying a Sales Order, it will now be associated to any Leads that were associated to the original Sales Order.
Complaint: Service Managers complained that Work Orders in "Invoiced" status were appearing on their Job Scheduler page's Job list.
Correction: Invoiced Work Orders are now excluded from this list by default.
Complaint: Rental Users reported that “Move Requests” created from a Rental Contract were not being canceled when the contract was either canceled or reverted to Draft status. This sometimes led to duplicate Move Requests being generated.
Correction: Fixed.
Complaint: Detroit, Boston, Chicago and the New York Rangers (the 4 US teams of the Original Six) will all miss the playoffs in the same year for the first time in NHL history.
Correction: N/A. Can only sadly shake your head.
Learn More at Flyntlok Dealer Management System
Check out our Flyntlok YouTube channel for more highlights of the application!