The Item Line allows users to effectively view part items and their locations, edit ordered quantities, edit fulfilled quantities, and edit amounts as well as check traceability, verify correct Item Numbers, report lost sales, remove items from SO entirely, and create/edit discounts for specific items. The Item Lines appear as rows in descending order by when they were added to the SO.
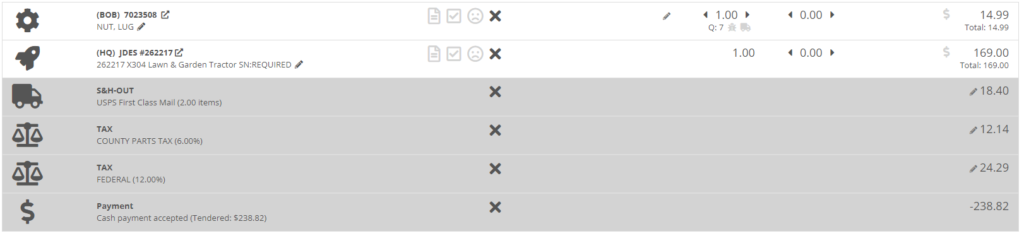
The POS icons that appear in the left-hand column help signify what classification each Item Line is, and the different icons can be defined as follows:
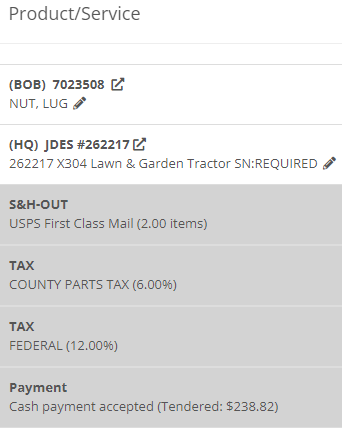
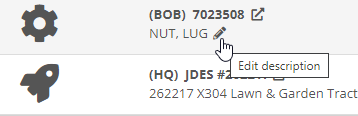
The Product/Service column allows users to view Item Number, Item Description, go to Item Dashboard, and change Item Description. The Item Description is listed underneath the Item Number in the Product/Service Column.
Click the Item Dashboard button located just right of the Item Number to open up the Item Dashboard in a new tab.

Click the Pencil icon to change the Item Description.
If Item has a Core, the Item Line will contain a Dirty Core option underneath the item description. Check the box if the Dirty Core has been returned. You can set the Core status of the Item when editing the Item's Dashboard.

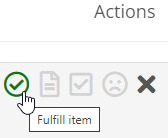
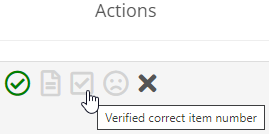
The Actions column, located in the middle of the POS, allows users to check fulfillment status, fulfill item, check traceability, change status of item number verification, report lost sale, check if there is updated pricing, and remove item from the SO.
To fulfill all item quantities, check the green Circled Check Mark icon
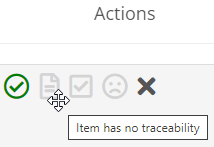
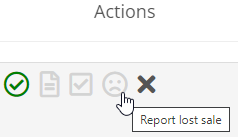

To check Traceability, click the Traceability icon ![]() .
.
To change status of item number verification, click the Squared Check Mark icon.
To Report Lost Sale, follow these steps:
To check Updated Pricing for an item that has changed pricing, a golden icon [picture of the icon] will appear in the action column. After clicking, an Update Pricing notification will pop-up and ask if a pricing update is applicable. If so, press the Send button and the item price will be updated appropriately.
To remove an item from the sale order, click the X, and the item line will disappear from the POS.
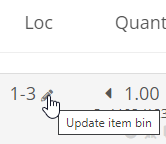
The Location column allows users to update or enter in an Item BIN, or a designated inventory storage location. To set the location, click the Pencil icon and type the BIN into the prompted text.
The Quantity column allows users to view and change Ordered Quantity, and view Quantity on Hand (available quantity), Quantity Consigned, Total Quantity, Dispute Quantity, and Request Transfer.
To change Ordered Quantity, use the arrows or click into the quantity number to manually type in the desired quantity. The QOH, or Available Quantity, is located directly below. Also, by clicking the Information icon, the QOH Breakdown Tab pops-up with the Quantity Available, Consigned Quantity, and Total Quantity.
To Dispute Quantity, click the Ladybug icon and enter the quantity that is actually on hand, not including ordered quantity.
To Request Transfer Quantity, click the Truck icon and fill out the Transfer This Item pop-up page. This page requires the Transfer Location, Transfer Quantity, Shipping Method, and if Drop shipped. Select either Transfer or Quick Transfer to finish the Transfer process.

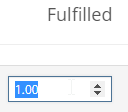
The Fulfill column allows users to view and change fulfilled quantities. To change fulfilled quantity, either click into the Fulfilled Quantity number or click arrows to incrementally add or take away Fulfilled Quantity.

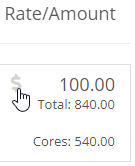
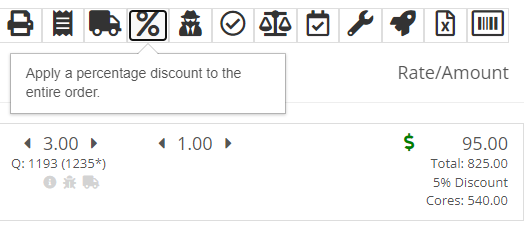
The Rate/Amount column, located furthest right of the POS, allows users to view and change Item Prices, as well as add discounts to each Item Line separately. The top number of the Rate/Amount cell is the Item Price which takes into account the Item Discount. Just below, is the Total Item price which additionally takes into account the Quantity Ordered.
To add an Item Discount, click the Discount Line cell and fill out the Line Pricing pop-up menu and press Save. The Line Pricing pop-up menu requires Discount Percentage, Reason for discount, and will propagate the New Amount.