Opportunity:
In our last Release, we added an "Allocate" option to the Item Receiving Voucher, allowing users to automatically allocate an Item's received stock to outstanding Invoices containing Special Ordered or Back-Ordered Items. Our next iteration will be to group together multiple allocated lines on the Receiving Voucher and allow you to adjust the auto-allocation strategy manually.
Solution:
We have updated the Item Receiving Voucher to group together all of the Item’s individual allocations together for easier viewing and managing. We have also added an “Allocations” column, which will display the allocation status of each item line of the voucher, and, finally, we made a slight change to the “Allocate” option from the  button’s drop-down menu (which now displays as “Allocate All”). Finally, we have created the ability to prioritize the allocation of Received Items to a particular Sales Order.
All Allocated line items will be grouped together under a parent line of the Item. You can expand and collapse allocated sub-sections of the item line by selecting the "arrow" icon on the left-hand side of the line. We have also added an "Expand All"  and "Collapse All"
  option to the action icons list.
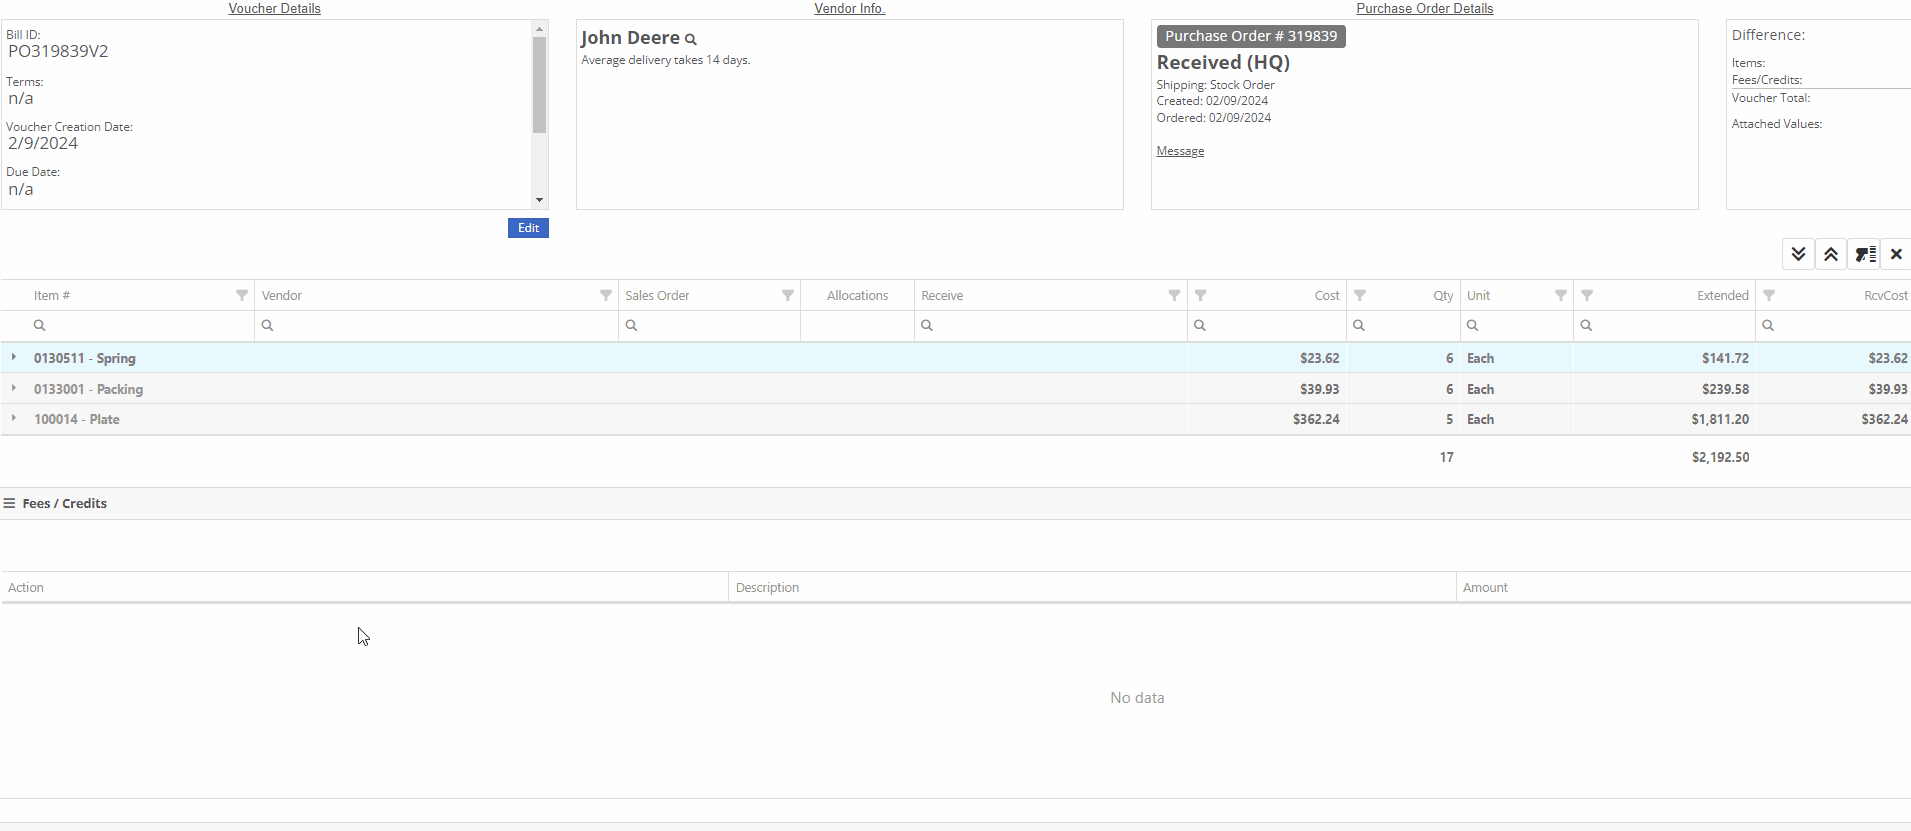
 -This icon indicates that the line has been allocated. Selecting the icon will allow you to remove the allocation from the chosen Invoice.
 -This icon indicates that the line has not been allocated. Selecting this icon will allow you to choose from a list of outstanding Invoices to assign the received quantity to.

Users can manually override an allocation by selecting the icon. The user will then be presented with a drop down list of Open Orders to choose from. If there is not enough of the item to fully allocate to that item, it will allocate what is available and the rest will remain as back-ordered.

We have added a “Prioritize Special Order Receives” check box to the "Details" tab of the Sales Order page. When a SO is marked as a “Special Order Priority”, Flyntlok will automatically move this Sales Order to the top of the Outstanding Invoice queue, bypassing older, non-prioritized orders. Flyntlok will allocate an Item’s Received Quantity to the ”Prioritized” invoices before the oldest outstanding non-prioritized order. Prioritized Invoices themselves are then “prioritized” by oldest to newest before moving to non-Prioritized Invoices.

Opportunity:
Service Managers have requested the option to create, schedule, and track Machine Transfers directly from the Work Order dashboard when Pick-up or Delivery is required for the associated Machine. They would like this option to be available for all Machines associated with the WO; both actual Machines known within Flyntlok and Virtual Machines.
Solution:
Flyntlok will now auto-generate a new Machine Move when pickup/delivery is scheduled for the associated Machine of a Work Order.

The generated "Move" will provide a link back to the Work Order in the "Comments" section.

Opportunity:
Flyntlok customers in Canada have requested the option to apply a Harmonized Sales Tax (HST) to their Sales Orders. HST is a combination of federal and provincial taxes levied on most goods and services sold for domestic consumption, which the customer pays.
Solution:
We have added a Harmonized Sales Tax (HST) option for companies operating in Canada. Please reach out to your friendly consultant if you would like any additional information about applying the HST to your Sales Orders.


Opportunity:
Service Managers have requested the option to add a default "Labor Type" for a specific Customer, so that when the customer is added to a Work Order, Flyntlok will auto-set the Labor field for all jobs associated with a Work Order.This is most typically requested for “Internal Labor” Work Orders.
Solution:
We have added a "Default Labor Type" field to the Customer Dashboard's "Edit" page, allowing managers to set Work Order Labor Type for the specific customer. When the "Default Labor Type" is set, all associated Service Jobs associated with the Customer will be automatically set to the selected "Default Labor Type."
Opportunity:
If an Inventory Item has alternate parts, Flyntlok will display those items on the Items Dashboard in the "Item Information" section. Salespeople have requested the option to display more than one alternate Item.
Solution:
We have updated the "Alternates" section of the Item Dashboard, and Flyntlok will now display up to four Alternates in the "Item Information" section. If the Item has more than four Alternates, Flyntlok displays the first four and indicates how many other alternate parts the item has available with an option to "Show All."

Opportunity:
Rental Managers have requested the option to add additional Model information to the Rental Contract's Lease Agreement. They would like the ability to link a website to the Lease Agreement, where the recipient can be directed to the webpage in order to review information on the associated Model of their Rental Contract (for example, a YouTube video demonstrating how to operate the equipment).
Solution:
We have updated the Lease Agreement as well as the Model Info page and you will now have the option to save a website’s URL to a specific Model. We have added two new fields to the Model Information section of the Model Dashboard titled "Primary Support URL" and Secondary Support URL" which will allow you to input the URL of the support website(s) you'd like customers directed to. Once the support URL is saved to the Model’s information, Flyntlok will automatically add a QR Code for the website(s) to the Lease Agreement when a Machine of that Model is added to a Rental Contract.


Flyntlok will display the QR code(s) on a second page, with a message prompting the recipient to scan the code to learn more about the Model.

Note-Please contact your friendly Flyntlok consultant if you would like this feature set up.
Complaint:
Rental Managers had experienced issues when attempting to invoice a Rental Contract when the associated Machine had been replaced with an alternate Model. While the user could swap the associated Machine on the Rental Contract's Dashboard, the Invoice generated was incorrectly charging for both the replaced Machine and the new Machine.
Cause/Correction:
Fixed.
Default Curser Into Text Box (WO Parts Request Note)-(Ticket # IHK 47985)
Complaint:
Service Technicians requesting parts to complete Service Jobs directly from the Work Order Dashboard requested that we default the cursor to the text box when the add note button is clicked.
Cause/Correction:
Fixed. When requesting parts from the Work Order Dashboard, Flyntlok will auto-focus the curser into the text box when the  button is selected. Yeah, another two-second item, but when you ask, you shall receive! (Plus, I think our developers like to 'pad their stats' with items like this...)

Unable to add Items to "Quick Order" if Vendor is Set as a Distributor-(Ticket # IHK 47985)
Complaint:
Purchasing Managers had reported an issue where they could not add Items to a Purchase Order when attempting to create a "Quick Order" for Vendors set as "Distributors." The Item Searcher inside the "Quick Order" modal of the Vendor Dashboard was not populating the alternate Vendors’ Items distributed by the Vendor.
Cause/Correction:
Fixed. The Item searcher of the Vendor Dashboard "Quick Order" option will populate all Items that the Vendor distributes.
January 31st, 2024 Release Notes
Learn More at Flyntlok Dealer Management System
Check out our Flyntlok YouTube channel for more highlights of the application!

We are excited to announce that Flyntlok, including our CEO and founder Sean McLaughlin, will be attending the Equipment Exposition October 17th-20th in Louisville, Kentucky (Booth Number 42024). The Equipment Exposition is an annual event dedicated to growing landscapers, manufacturers, and equipment dealers’ businesses. Please get in touch with Mike Wasserman (mwassy@flyntlok.com) or Garret Nelson (garret@flyntlok.com) if you would like to arrange a meeting while we are there.
Opportunity:
There are times when a Rental Unit goes down and needs to be replaced with a new Machine. Rental Managers have requested the ability to replace the currently existing Machine on an Active Rental Contract with an alternate Machine of the same Model and have the new Machine inherit the previously billed amounts of the old unit so that the billing continues to flow seamlessly.
Solution:
We have added a "Replace Machine" option to the Actions button drop-down menu of the Rental Contract, which will allow users to "swap" the Machine currently on the contract with an alternate Machine of the same Model. When the "Replace Machines" option is selected, Flyntlok will display a list of available Machines. Users can filter through to select a Machine to add in place of the removed Machine. After selecting a new Machine, you will need to log both the new and previous Machine's Miles, Hours, and consumables. Flyntlok will then "Check-Out” the new Machine and add it to the Rental Contract. For billing purposes, the Machine being replaced will remain on the contract in a "Checked-In" status, but offset from the Machines currently on rent. The new Machine will display a  icon on the right side of the line item, above the Quantity field.
Opportunity:
Rental units can have either Miles or Hours tracked. Flyntlok Users have requested the ability to specify either or both metrics on the Check-In and Check-Out of the Machine from a Rental Contract and have that information logged in the Machines "Meter History" record.
Solution:
We have added fields to log both "Miles" and "Hours" of the associated Machine when checking the unit "IN" or "OUT" on a Rental Contact. While Flyntlok will only handle the billing of one of the two metrics, based on the machines "unit preference" set on the Machine's Dashboard, the values captured here will be stamped back onto the Machine's "Meter History" record.


Adding CC and Internal Emails to Rental Signature Requests-(Ticket #FD-1932, 44256)
Opportunity:
Rental Managers have requested the option to add additional "CC" and "Internal" recipient email addresses when sending a Signature Request from a Rental Contract. The CC and Internal recipients would receive a PDF copy of the Contract.
Solution:
We have added three new fields to the "Rental Contracts" Signature Request modal;

The "CC" field will allow users to add additional Customer email addresses to the Signature Request modal, where recipients will receive an "unsigned" PDF attachment of the Rental Contact. The "CC" field will allow Users to add any valid email addresses or to select from saved customer contact email addresses.
The "Internal" field will allow Users to add internal employee email addresses to the Rental Signature Request, where recipients will receive an "unsigned" PDF attachment of the Rental Contact. The "Internal" field will allow Users to add any valid email addresses or to select from a list of saved employee email addresses. The internal recipients are BCC’d on the email.
The "Message Field" will allow users to add custom text to the signature Request that will be added to the body of the email sent.


Opportunity:
Service Technicians have requested the ability, while working in the Mobile View, to add and edit Work Order "Forms" that are associated with Service Jobs.
Solution:
We have added a "Forms" section to the Work Order dashboard of the "Mobile View" to allow Service technicians the ability to add and edit available Service Forms to Work Orders jobs via their mobile device.


Opportunity:
Service managers have requested we add the associated "Tag Number" of a Work Order to the list views displayed within the Flyntlok Mobile View
Solution:
We have added the associated "Tag Number" to the Flyntlok Mobile Views (All Work Orders, My Work Orders, New WO, and My Recent WO). This field will only be displayed for a WO with an associated Tag Number.
Opportunity:
The Flyntlok team is currently in the process of a continuous update to our general Contact Management Capabilities. Recently, we launched a new "Customer Contacts" report that contains a list of all of a company’s individual customer contacts and allows users to filter and view individual contacts. Our next update is to streamline the process of customer correspondence within the Customer Contacts Report.
Solution:
We have added "quick hit" links to the Customer "phone number" and "email" fields of the Contact Dashboard page, which will allow Users to immediately start a new correspondence with the contact. Hovering over the "Phones" field will display a dropdown menu, where Users can choose to edit/delete saved numbers or immediately attempt to call the customer. If the "Call" option is selected, Flyntlok will first ask you to specify the application you would like to compete the call from, then populate the customers "primary" number into the application

Hovering over the "Email" field will display a dropdown menu, where Users can choose to edit/delete saved addresses or launch a new email. If the "Email" option is selected, Flyntlok will redirect you to your preferred email client, with a new draft email and the contact's "primary" address prepopulated.

Opportunity:
Flyntlok salespeople have requested we add "Repeat Customer" as an option to the "Source" field of a CRM Lead.
Solution:
We have added "Repeat Customer" option to the dropdown menu of the "Source" field of a CRM Lead.

Opportunity:
Purchasing managers have requested the option to set a default Company Email Address that will display on all Purchase Order PDFs. Flyntlok currently displays the Email Address of the User that generated the PO in the "Created By" field of the Item Purchase Order PDF and also in the "Reply-To" section of the sent PDF.
Solution:
We have added a new setting to the "Flyntlok Settings" page, which will allow administrators to set a default "Parts Department" email address. When set, Flyntlok will replace the User Email Address in the “Created By” field of the PDF and the return address of a sent PDF with the "Parts Department Email". Administrators can add a "Parts Department Email" by navigating to the "Flyntlok Settings" page. (Admin Editor Wrench  -> Flyntlok-> Flyntlok Settings ->Company Section).


Opportunity:
Flyntlok Users have requested a warning be added to the Item Receiving Voucher system to alert Users when an automated SMS text message will be sent to a customer upon the receipt of a Special Ordered Item. Currently, users have to go to the customer dashboard to see if a customer is set up for automated text messages as well as if they have received an automated text message.
Solution:
We have added a "Sales Order contact will be notified of parts received" message to the Item Receiving Voucher modal that will display if the Item being received was Special Ordered, and the associated Customer has a least one contact with a phone number/ email saved and the enable SMS/email setting activated.

Opportunity:
Flyntlok Purchasing managers have requested we add a "Core List Price" field to the Item Receiving Voucher that will allow users to manually edit the "Core Items" List price when receiving the Item.
Solution:
On the Item Receiving Voucher page, when receiving an item that has a core, we have added a “Core Received List” field at the bottom of the receiving modal. This will display the Core Item’s current List Price by default, but can be modified/adjusted by Users to change the value of the Core Item upon receipt. Changing this value will also adjust the Core Item's master record to have the new List Price.

Opportunity:
Machine utilization is a simple measure of the productivity of the equipment. Currently, at the top of the Machine Dashboard, Flyntlok displays the Machines "Life time Utilization" (Total income generated by the Machine / Machine Acquisition Cost) and "Year Time Utilization" (Income generated in the last 365 days / Acquisition Cost). Rental managers have requested we add an additional field to also display "Time Utilization".
Solution:
We have updated the Machine Dashboard header by adding two additional utilization fields "Life time Utilization" (Number of days rented / Total number of days from when the Machine was received) and "Year Time Utilization" (Number of days rented in the last 365 days / Number of days passed since Machine was received OR 365 whichever is least). We also renamed the existing fields Life and Year Utilization to Financial Life and Financial Year.

Complaint:
Service managers were experiencing an issue where Work Order estimates were not retaining their correct billing style. If the User updated the billing style of a Service Job on a Work Order, by changing from "Estimate" to "Billable", previously generated estimates were also being updated to the most current billing setting. Estimates should not update after being generated.
Cause/Correction:
Fixed. Once a Work Order estimate is generated, you cannot change the Type and a new Estimate will need to be made if you want to change the billing style of the Work Order.
Complaint:
Rental managers were experiencing an issue when searching for a specific Machine ID or Serial Number among available Machines to add to a Rental Contract on the New Rental page. The results returned were all Machines of the same model as the searched Machine, but the exact match could be anywhere within the result set making it hard to find. The exact match should have filtered to the top of the list.
Cause/Correction:
If the search text exactly matches a machine's display ID or serial number, Flyntlok will sort that Machine to the top of any model search result.

Complaint:
The above release notes lack the usual subtle wit that has been present of late.
Cause/Correction:
It’s hard to inject humor about things like machines, inventory, and rental contracts every week. We’ll be funnier next time so we can keep you reading. (But hey, you made it this far…)
September 27th, 2023 Release Notes
Learn More at Flyntlok Dealer Management System
Check out our Flyntlok YouTube channel for more highlights of the application!
Opportunity:
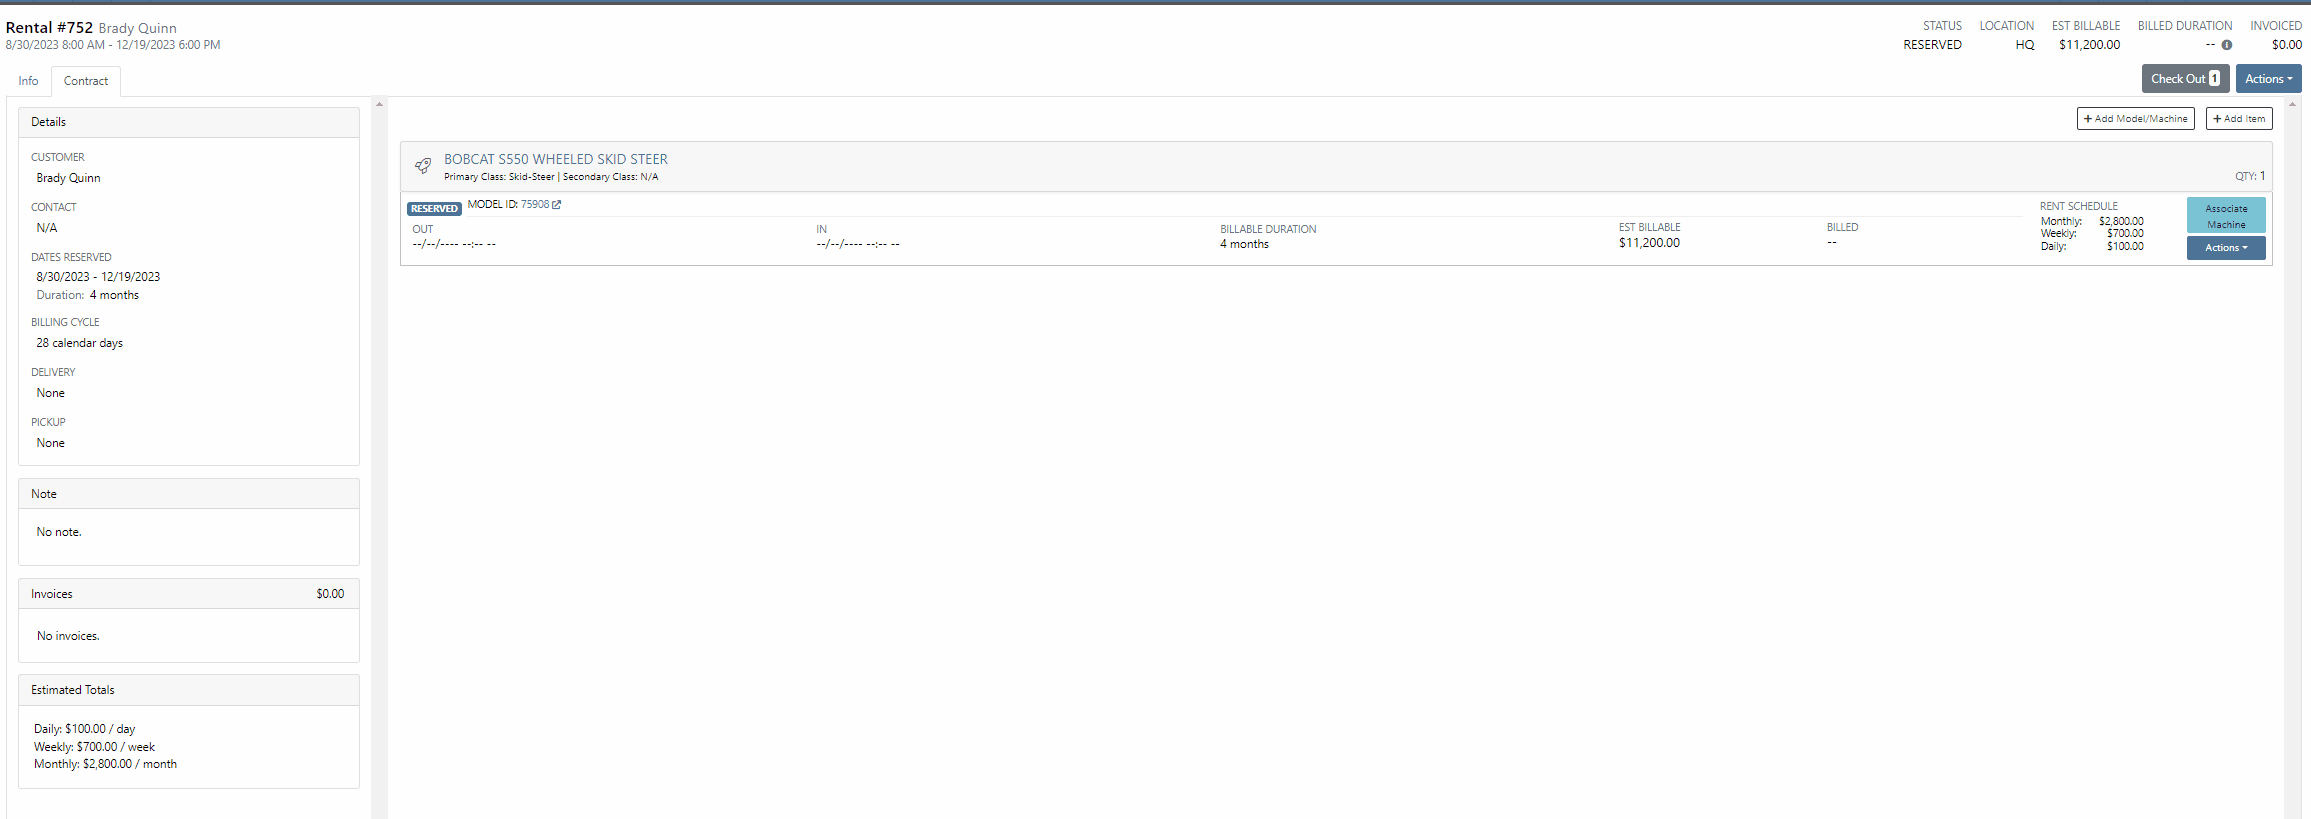
Rental Managers have requested the ability to reserve a Model or Model Classification for a Rental Contract and also have the ability to convert the Model/Class to an actual Machine at a later date.
Solution:
We have added Machine Models and Machine Classifications as selectable options to add to a Rental Contract on the rental creation page or the active rental. When a model/class is selected, that model or class is temporarily added to the contract that users can later change to a specific Machine.
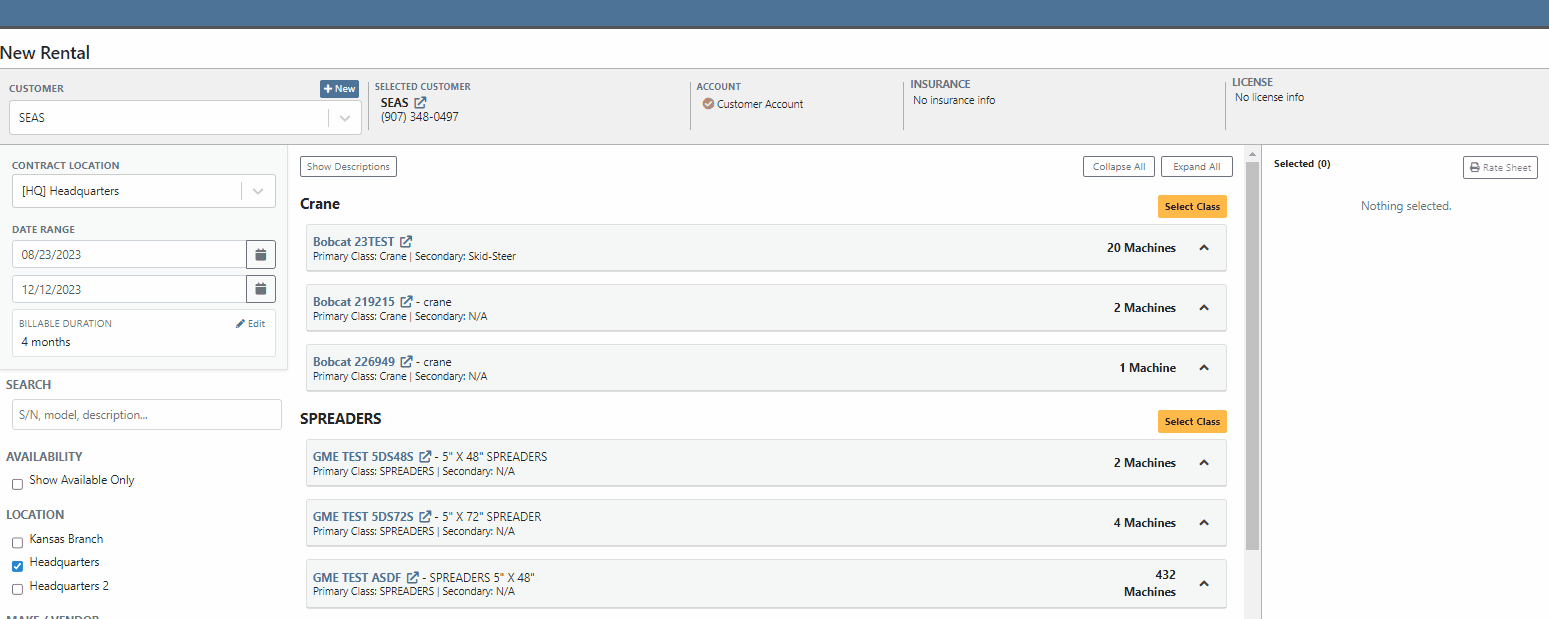
Users will be able to specify an actual Machine to the Model/Class holding spot by selecting the "Associate Machine" button on the individual lines of the Contract. Flyntlok will then display a list of all Machines of that particular Class/Model for the user to choose from.


Users will have the option to generate Interim Invoices for Rental Contracts with reserved Models. When the Model is later replaced with an actual Machine on the Rental Contract, Flyntlok will then display an "Associate Machine To Invoice" dialog. Flyntlok will then suggest line items from the Invoice that the Machine could be associated with. Associating the Machine to the Invoice allows for its monetary value to be applied to the income statement of the Machine.
If the Contract and Invoice have a duplicate of the same Model (e.g. two lines in the invoice have the same model), users will have the option to choose which line item to associate the Machine with by clicking the Edit button.
Opportunity:
Rental managers have requested the ability to convert an active Rental Contract to a “Demo Contract”. Converting a Rental Contract into a Demo Contract allows for the associated Machine(s) to be released on a trial basis. Demo Contracts will block the depreciation of the Machines and eliminate the need to report the Machine(s) as FID to the manufacturer. Flyntlok gave users the option to generate a Rental Contract or a Demo Contract from the rental creation page, but did not allow active contracts to be converted to a "Demo".
Solution:
We have added the "Is Demo" field to the General section of the Rental Contracts "Info Tab" allowing users to convert active Rental Contracts to Demo Contracts.

Opportunity:
Flyntlok users have requested additional information be added to the Rental Contracts Audit Log to make it more evident what Machines or Items have been added or removed from the contract.
Solution:
We have updated the Rental Contracts Audit Log to now display the ID Number of Items, Models, and Machines that have been added or removed from the contract.

Opportunity:
Purchasing Managers working with Honda equipment have requested the ability to generate Item Purchase Order documents for Honda directly from Flyntlok which they can then upload to the Honda Portal.
Solution:
We have added a "Generate Document For Honda" link to the Actions button drop-down menu of the Item Purchase Order which, when selected, will automatically download an interface document onto your computer. Once downloaded you can upload the document to the Honda Portal as a Purchase Order.

Opportunity:
Flyntlok users have requested Item Alternate information be added to the individual line items of the Draft Purchase Order Page, allowing purchasers to more easily see whether an individual item has any alternates. Alternates are Items that can be purchased instead of the original item, as a substitute.
Solution:
We have added an "Alternates" icon to the Draft Purchase Order Page, which will populate to the left of the Item Number if the item has any Alternate Item associated. We have also introduced a new tab titled “Alternate Items” on the "Inventory and Order History" section of an Item, which is visible when an individual item row is expanded. Flyntlok will display a list of available alternates for the given Item in this new section and display a “No Alternates” message if no alternates exist.


Opportunity:
Last release, we added a mileage log capability on Flyntlok. Our next iteration was to add an "Hour History" section to the Machine Dashboard. This will display all Work Order and Rental Contract check-in hour logs as well as any direct edits to the Hours field of the Machines edit page.
Solution:
We have combined the Machine Hours with the Mileage logs and renamed the section "Meter History". This section will display ALL mileage and hour log entries for the specific piece of equipment via the following pages: WO creation and WO check-ins; on Rental Contracts as well as on Check-in/out of the rental; and on changes to the Machine Dashboard edit page. This new section will display the ten most recent entries as well as a link that will redirect users to an alternate view that will display ALL mileage/hour logs for that specific Machine. Flyntlok will display the date, the metric, and the user's name that performed the logging.

Opportunity:
Flyntlok Users have requested a way to easily see if a specific Customer is properly set up with contact marketing information.
Solution:
We have added a new indicator titled "Has Contact" to the Customer's Dashboard, which will display a green check icon if the particular Customer has one or more contacts with Contact name, phone number, and email information saved. This new field will be added to the top bar of the Customers Dashboard next to the "Last Survey Send" field.


Opportunity:
Accounting Managers have recently inquired about where they can create new items as a Service in QuickBooks Online. Creating an item as a Service in QuickBooks allows Users to set a revenue account for the item to book to within QB. Currently, Flyntlok provides a link to add a new Service in QB from the Accounting section of the Item Dashboard's edit page, but does not clearly define what the link does.
Solution:
We have updated the styling of the "Add Service to QuickBooks Online" link on the Item Dashboards edit page and also added descriptive text.

Complaint:
Salespeople have requested to have the logging of the status change "New to New" be removed from the Lead Dashboards Audit Log. Flyntlok gives users the option to edit information surrounding the Lead from the individual Leads Dashboard, such as the status, estimated revenue, contact information, and more. Currently updating any status of a Lead ( for example updating a lead status from "Open" to "Won") creates a log stating "Status changed from NEW to NEW" and then also states the correct status change.
Cause/Correction:
We have removed the logging for the status change (New to New).
Complaint:
Sales Managers had noticed the red "Paid" stamp, usually displayed on a Sales Order invoice that has been paid in full and moved to a Delivered status and has been processed in QBO, is no longer being displayed.
Cause/Correction:
Fixed.
Complaint:
Salespeople were experiencing issues when attempting to document a lost Machine Sale by selecting the  icon of the item line from the Point of Sale. The "sad face" icon allows Users to generate a "Lost Sale" form for the Item or Machine of the line selected. Flyntlok will then generate the "Lost Sale Form" with the Item or Machine information and "Loss Type" prepopulated, in this scenario the generated "Lost Sale Form" form was incorrectly set as an Item and was not populating any Machine information onto the form.
Cause/Correction:
Fixed. Flyntlok will identify the Item or Machine associated with the specific Point of Sale line item and generate the Lost Sale Form with the correct "Loss Type" and Machine or Item information prepopulated onto the form.


Complaint:
Purchasing managers were experiencing an issue where Stock Items' recommended quantities were not successfully updated when users created a new Stock Purchase Order using the Flyntlok recommended quantity, and marked the PO as Ordered, but then deleted the PO. The recommended quantity was not being updated on the Recommended Orders Report or the Draft Purchase Order page.
Cause/Correction:
This was caused by a timing issue based on when Flyntlok updated recommended quantities (which is done in a nightly batch job). We have updated the metrics for inventory items, and we will now immediately update the recommended quantity when a PO with stock items is deleted.
Complaint:
Flyntlok Users were experiencing an issue when trying to submit a Support Ticket when the description field exceeded 4,000 characters. The user would receive a generic error message and the ticket was not submitted.
Cause/Correction:
We have updated the error message displayed when the character limit is reached, and will now notify the User of the specific issue at hand and prompt users to shorten the description to 4,000 characters or less. (And, um, if the issue is that difficult to describe, you can always pick up the phone and call us for help. That’s what we’re here for!)


August 16th, 2023 Release Notes
Learn More at Flyntlok Dealer Management System
Check out our Flyntlok YouTube channel for more highlights of the application!
The Item Line allows users to effectively view part items and their locations, edit ordered quantities, edit fulfilled quantities, and edit amounts as well as check traceability, verify correct Item Numbers, report lost sales, remove items from SO entirely, and create/edit discounts for specific items. The Item Lines appear as rows in descending order by when they were added to the SO.
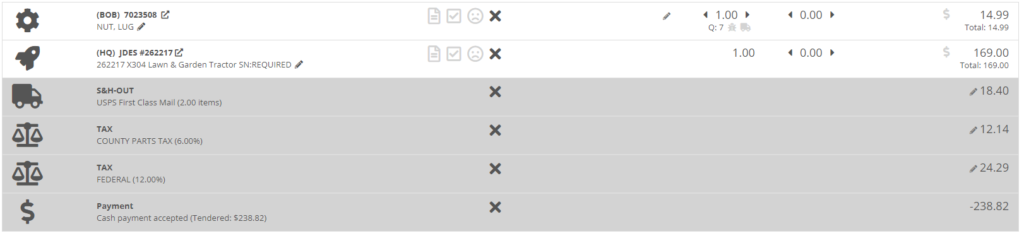
The POS icons that appear in the left-hand column help signify what classification each Item Line is, and the different icons can be defined as follows:
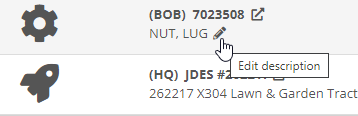
The Product/Service column allows users to view Item Number, Item Description, go to Item Dashboard, and change Item Description. The Item Description is listed underneath the Item Number in the Product/Service Column.
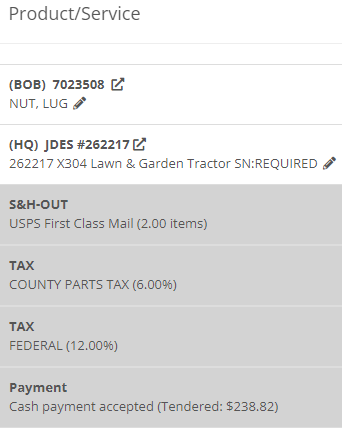
Click the Item Dashboard button located just right of the Item Number to open up the Item Dashboard in a new tab.

Click the Pencil icon to change the Item Description.
If Item has a Core, the Item Line will contain a Dirty Core option underneath the item description. Check the box if the Dirty Core has been returned. You can set the Core status of the Item when editing the Item's Dashboard.

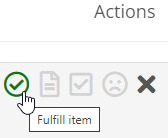
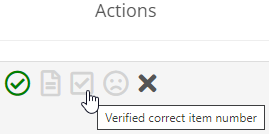
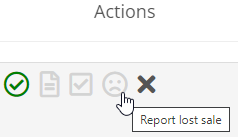
The Actions column, located in the middle of the POS, allows users to check fulfillment status, fulfill item, check traceability, change status of item number verification, report lost sale, check if there is updated pricing, and remove item from the SO.
To fulfill all item quantities, check the green Circled Check Mark icon
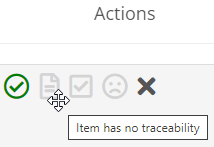

To check Traceability, click the Traceability icon ![]() .
.
To change status of item number verification, click the Squared Check Mark icon.
To Report Lost Sale, follow these steps:
To check Updated Pricing for an item that has changed pricing, a golden icon [picture of the icon] will appear in the action column. After clicking, an Update Pricing notification will pop-up and ask if a pricing update is applicable. If so, press the Send button and the item price will be updated appropriately.
To remove an item from the sale order, click the X, and the item line will disappear from the POS.
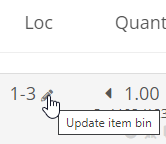
The Location column allows users to update or enter in an Item BIN, or a designated inventory storage location. To set the location, click the Pencil icon and type the BIN into the prompted text.
The Quantity column allows users to view and change Ordered Quantity, and view Quantity on Hand (available quantity), Quantity Consigned, Total Quantity, Dispute Quantity, and Request Transfer.
To change Ordered Quantity, use the arrows or click into the quantity number to manually type in the desired quantity. The QOH, or Available Quantity, is located directly below. Also, by clicking the Information icon, the QOH Breakdown Tab pops-up with the Quantity Available, Consigned Quantity, and Total Quantity.
To Dispute Quantity, click the Ladybug icon and enter the quantity that is actually on hand, not including ordered quantity.
To Request Transfer Quantity, click the Truck icon and fill out the Transfer This Item pop-up page. This page requires the Transfer Location, Transfer Quantity, Shipping Method, and if Drop shipped. Select either Transfer or Quick Transfer to finish the Transfer process.

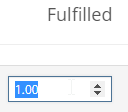
The Fulfill column allows users to view and change fulfilled quantities. To change fulfilled quantity, either click into the Fulfilled Quantity number or click arrows to incrementally add or take away Fulfilled Quantity.

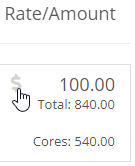
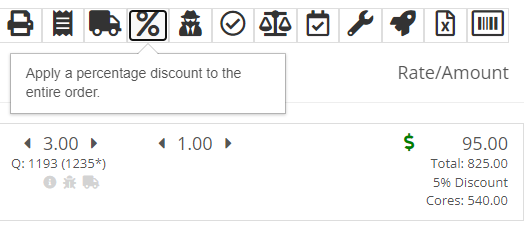
The Rate/Amount column, located furthest right of the POS, allows users to view and change Item Prices, as well as add discounts to each Item Line separately. The top number of the Rate/Amount cell is the Item Price which takes into account the Item Discount. Just below, is the Total Item price which additionally takes into account the Quantity Ordered.
To add an Item Discount, click the Discount Line cell and fill out the Line Pricing pop-up menu and press Save. The Line Pricing pop-up menu requires Discount Percentage, Reason for discount, and will propagate the New Amount.

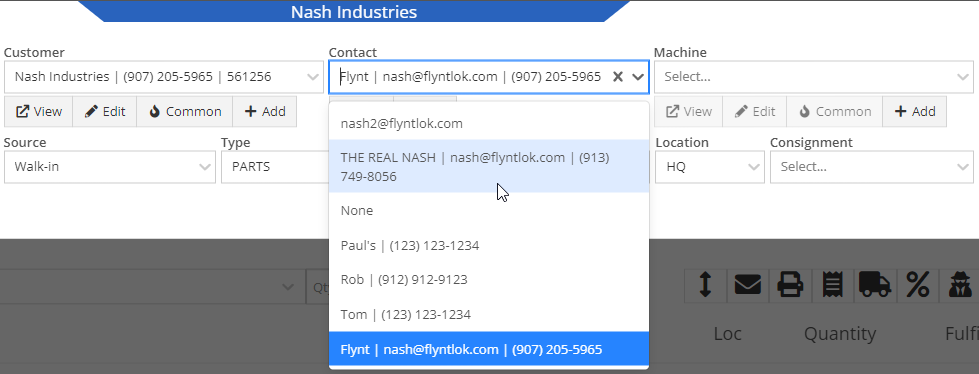
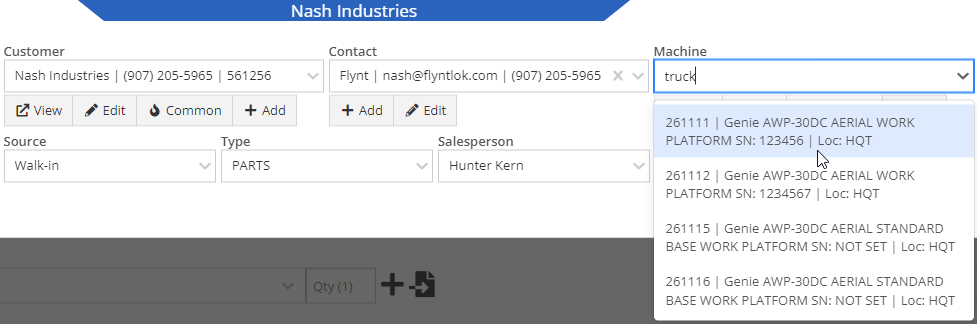
The blue Customer tab allows users to enter the necessary Customer, Contact, and Machine information associated with the Sales Order. When a user creates a Sales Order, the initial tab opened is the Customer (4) tab. The Customer tab opens automatically when the hotkey 4 is pressed on the POS. The remaining information on the Customer tab includes changing the Source of the Sales Order, Type, Salesperson, Location, and Consignment type. These features appear underneath the Customer, Contact, and Machine drop-down menus of the Customer tab.
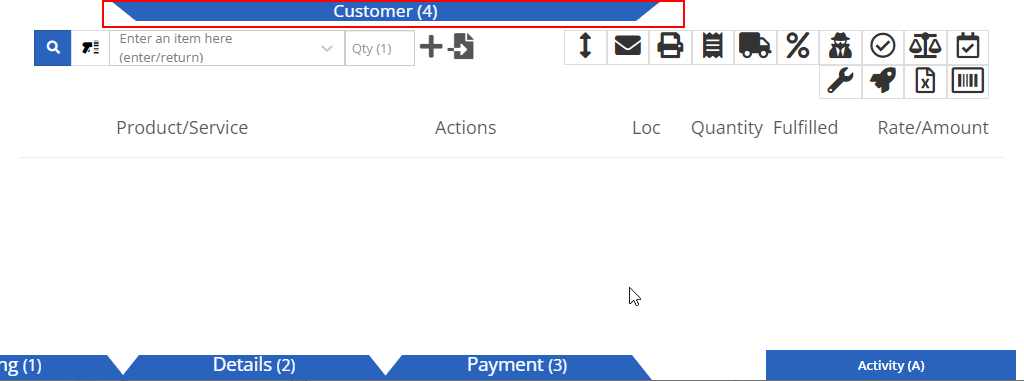
Users can add a customer to the Sales Order by following these steps:

Users can add a contact to the Sales Order by following these steps:
Users can click the View button underneath the Customer and Machine dropdown menus to access their coinciding dashboards. These dashboards will automatically open in a new tab.
Customer dashboards give a detailed report of customer information such as customer ID, contact, company, deposit, payment, rental, recent sale orders information, and much more.
Machine dashboards give a detailed report of machine information such as machine ID, physical location, description, work order, sale order, recent notes, finance information, and much more.

Located next to the View button, the Edit button allows users to edit customer, contact, and machine information in their coinciding dashboards.

The Common button, located below the Customer and Machine drop-down menus, can be used to view commonly purchased parts by customer and machine. Once selected, either the Customer Common Parts or the Machine Common Parts pop-up menus appear where users can scroll and add desired parts to the Sales Order by clicking the + button in the left column. Added part items will propagate in the line items of the Sales Order.

The Add button, located below the Customer, Contact, and Machine drop-down menus, can be used to add new customers, contacts, and machines quickly from your POS. After clicking the Add button, the Quick Create Customer, Add Contact, or Quick Create Machine pop-up menus appear where you can fill in the required information and press the Create button to finish the add new process. The Quick Create Customer and Quick Create Machine menus have an Advanced option that directs the user to the Manage Customer and Manage Machine menus in a new tab. These menus offer more detailed customer and machine information options.

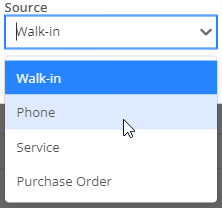
In the blue Customer tab of the POS, click the Source tab down menu and select to change the source of the customer affiliated with the sales order. The source provides an origin of the customer and default options in the Source tab down menu include Walk in, Phone, Service, and Purchase Order.
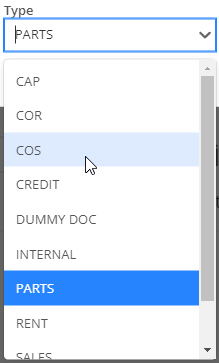
Click the Type tab-down menu and select the desired type to change the type of sales order. The type helps Flyntlok classify this sales order. You can also set up your sales order ID’s to contain a prefix / suffix that contains the type designation.
Click the Salesperson tab-down menu and select the salesperson being credited for the Sales Order.

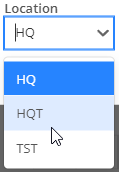
Click the Location tab-down menu and select the desired location of where the Sales Order took place to change to the correct location. You can also set up your Sales Order ID’s to contain a prefix / suffix that contains the location designation. The default location is whichever location your user is assigned to.