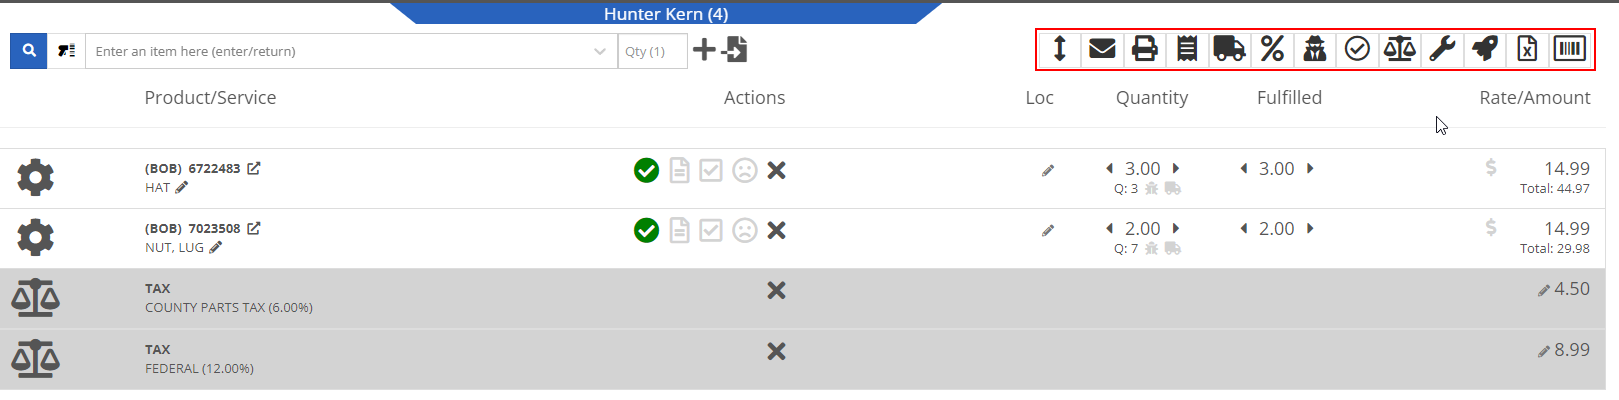
Actions
The Point of Sale includes all necessary Actions and Features that provide customers with a wide range of options when checking out. Many of the POS features can be found by their relatable icon in the top right corner including Reverse Line-Item Order, Email SO Sheet, Print SO Sheet, View Packing Slip, Apply Percentage Discount to the Entire SO, View Internal Pricing Information, Fulfill as Many Items as Possible, Modify Tax Rules, Adjust Payment Posting Dates, Most Commonly Sold Items, Sell a Machine, Export to Excel, and Create Label.
How to Reverse Line-Item Order
To Reverse Line-Item Order, click  in the top right corner of the POS. Once clicked, item lines will reverse order in POS table.

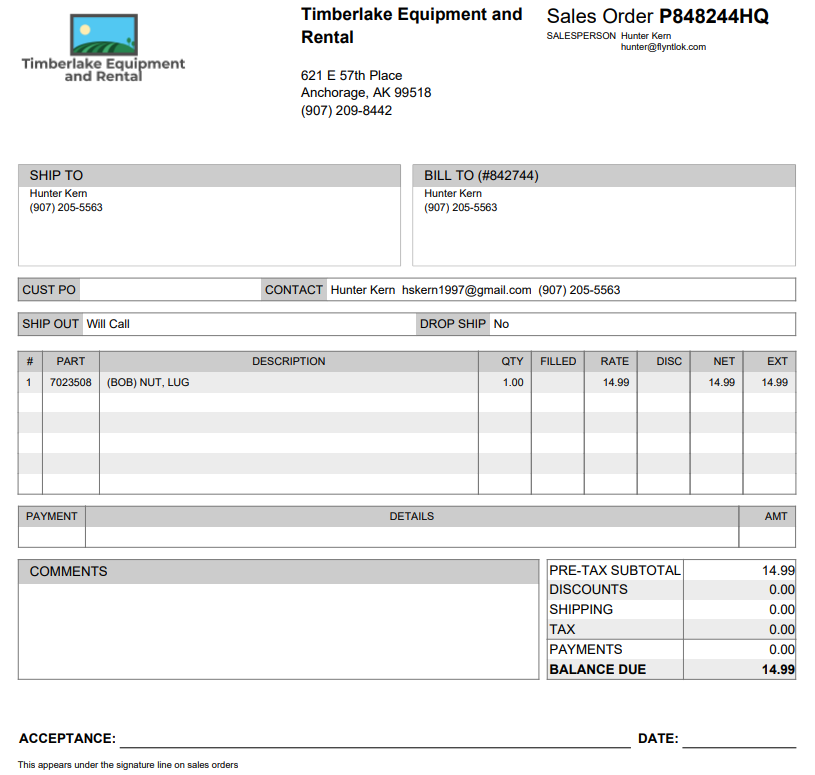
How to Email Sale Order
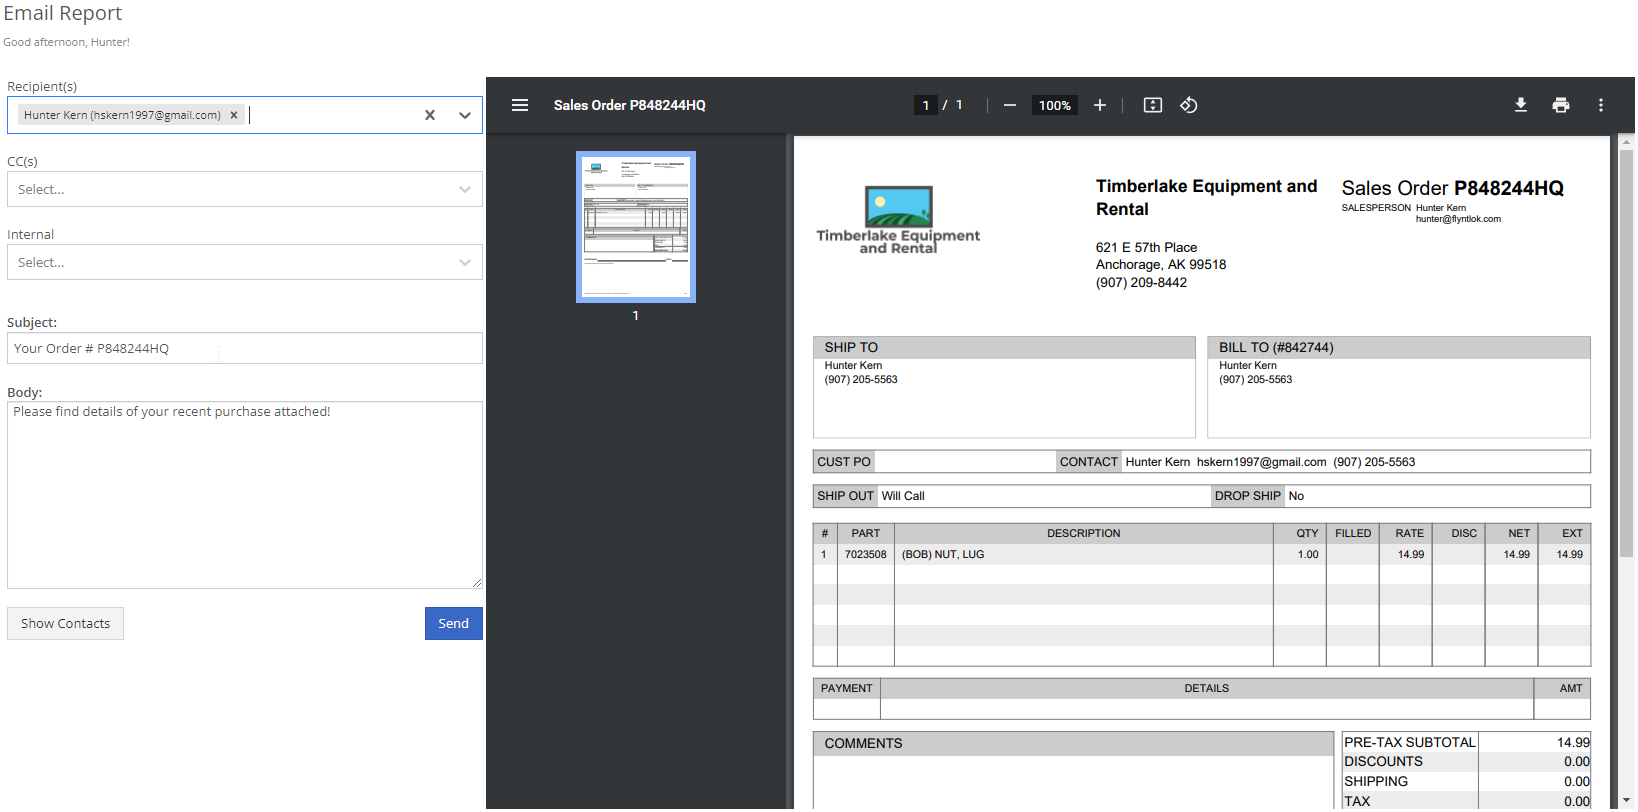
To email the Sale Order, click  or press the hotkey E when on the Point Of Sale.
- After clicking, an Email Report will open in a new tab that includes default email options such as recipients and subjects as well as a display of the SO Sheet
- The SO Sheet includes a heading that has company, basic SO and Salesperson information
- The body of the SO includes shipping, billing, customer PO, contact, item list, and payment information
- After reviewing the email and SO sheet, click the Send button and the email will be sent within 5 minutes.

How to Print Sale Order Sheet
To print SO sheet, click  .
.
- After clicking, the page will redirect to a printable SO sheet
- The SO sheet, same as the sheet created when emailing, includes a heading that has company, basic SO and salesperson information
- The body of the SO includes shipping, billing, customer PO, contact, item list, and payment information
- Choose the print or download options in the top right corner of the page to continue

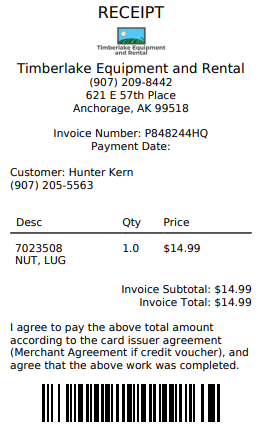
How to Print Sale Order Receipt
To print SO receipt, click  .
.
- After clicking, the page will redirect to a printable SO receipt which includes company, basic SO, invoice, date, and customer information
- The body of the receipt includes descriptions, quantities, and price information, invoice subtotal, tax and total amounts as well as an ID number in a barcode form
- The SO is easily accessible by scanning the barcode ID in Flyntlok’s search bar
- When on the receipt page, choose the print or download options in the top right corner of the page to continue

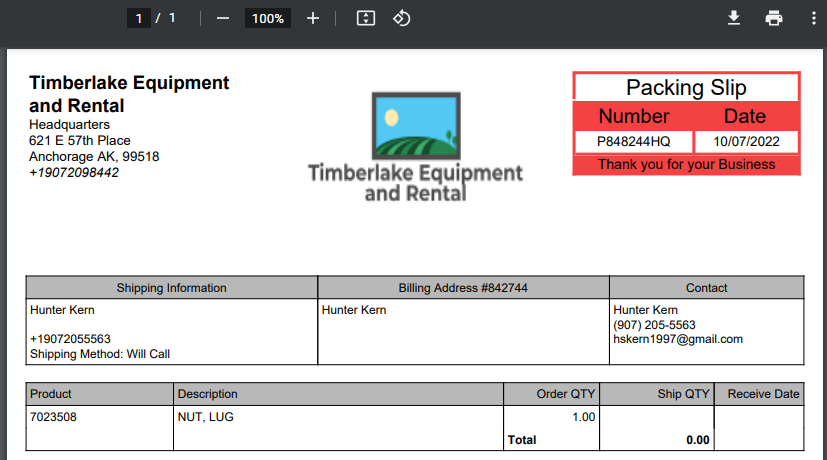
How to Create a Packing Slip
To create a Packing Slip, click  .
.
- After clicking, the page will redirect to a printable Packing Slip
- The Packing Slip heads with company, basic SO, invoice, date, and customer information
- The body of the slip includes addresses, product, descriptions, order quantities, ship quantities, and receive dates
- Choose the print or download options in the top right corner of the page to continue

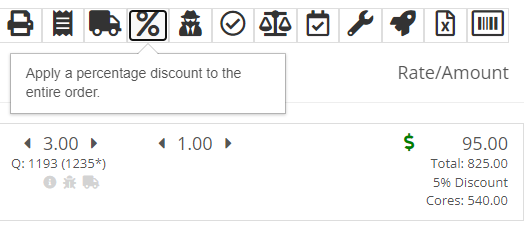
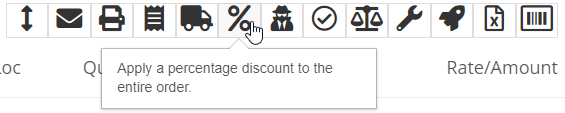
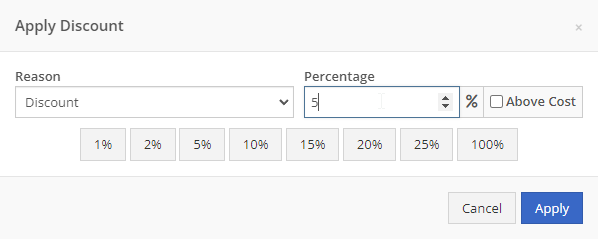
How to Apply Percentage Discount to the Entire Sale Order
To apply a percentage discount to the entire order, click  .
.
- After clicking, a pop-up page will appear prompting a discount to be applied
- Fill in the appropriate reason and percentage, and check above cost if selling a specific percentage above the cost of an item
- After selecting the correct discount information, click Apply and the discount will appear as its own item line on the POS
- The amount docked from the total order will appear in the far-right cell under Rate/Amount
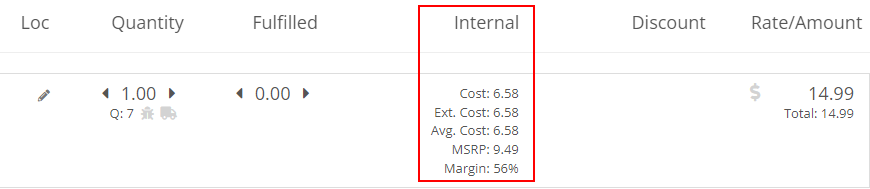
How to View Internal Pricing Information
To view internal pricing information, click  .
.
- After clicking, two new columns, Internal and Discount, will appear in the POS table
- The Internal and item line cell will display cost, extended cost (ext. cost), average cost (avg. cost), and MSRP
- The Discount and item line cell will display the discount applied to the specific item.

How to Fulfill as Many Items as Possible
To fulfill as many items as possible, click  .
.
- After clicking, all items with sufficient inventory quantities for ordered quantities will be fulfilled
- Quantities in the fulfilled column will change to their correctly fulfilled value, and a green check mark will appear in the Actions column of each completely fulfilled item
- No check mark will appear if item was only partially or not fulfilled at all


How to Modify Tax Rules
To modify tax rules, click  .
.
- After clicking, a pop-up menu will appear prompting to edit tax rules
- Use the search bar to search for tax types in this menu, then select the checkbox next to all applicable tax types
- If all listed tax types are applicable, click the top checkmark box just left of where it says tax type
- If there are exemptions, select them in the tab-down menus to the right of each tax type
- Click the Save to Customer button and confirm the notification to save the tax types to the customer associated with the SO


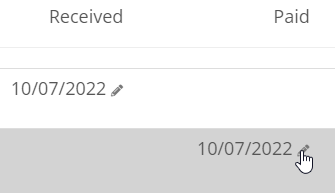
How to Adjust Payment Posting Dates
To adjust payment posting dates, click  .
.
- After clicking, two new columns, Received and Paid, will appear in the POS table
- The Received and item line cell contains a date that can be edited by clicking the pencil icon
- The Paid and Payment line cell also includes an editable date

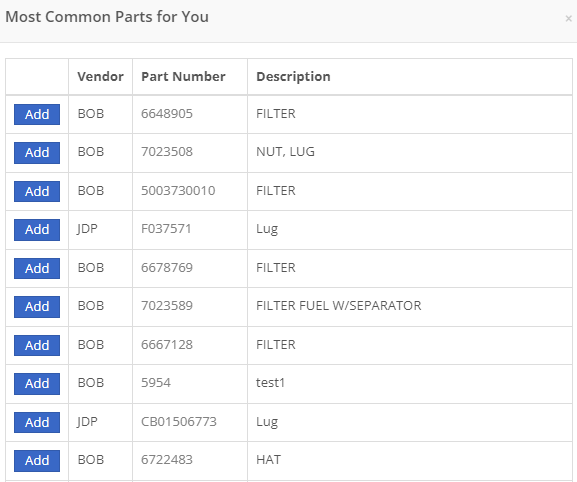
How to view Most Commonly Sold Items
To view most commonly sold items, click  .
.
- After clicking, a pop-up page will appear displaying the most common parts associated with the customer
- Adding commonly purchased items can be done by clicking Add buttons left of each item
- Item dashboards can be accessed by clicking on each item’s part number

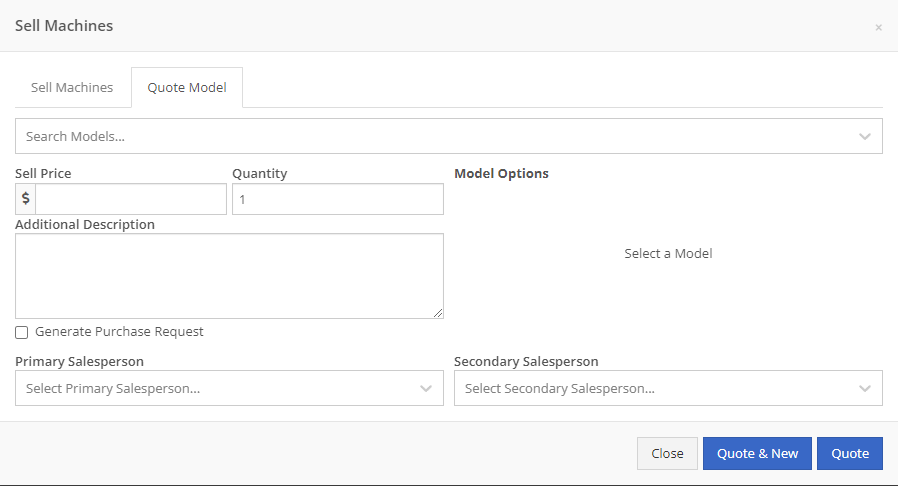
How to Sell or Quote a Machine
To sell a machine, click  .
.
- After clicking, a pop-up page, Sell Machines, will appear
- Use the search bar to enter a machine, as well as the tab down menus to select primary and secondary salespeople
- Click the Add icon to create a new machine, and then the Sell or Sell & New buttons to add the machine to the SO


Another option in the Sell Machines page is quoting a machine
- To do this, click the Quote Model tab and enter all necessary model, price, and quantity information
- If a purchase request is required, select the Generate Purchase Request box
- Then, click the Quote & New or the Quote buttons
How to Export to Excel
To export to Excel, click  .
.
- After clicking, a file automatically downloads from the browser and can be opened with spreadsheet applications such as Excel, and google sheets
- Once opened, a spreadsheet is automatically created with 7 headers: Vend, Product/service, Description, Qty, Fulfilled, Rate, and Amount
- All lines of the SO, such as item lines, machine, discount, tax, shipping & handling, and payment will populate in the spreadsheet


How to Create Label
To create a label, click  . The tab will redirect to a .php file that lists all Labels for each item on the Purchase Order, as well as the optionable QR Code, or Barcode.

Item Line
The Item Line allows users to effectively view part items and their locations, edit ordered quantities, edit fulfilled quantities, and edit amounts as well as check traceability, verify correct Item Numbers, report lost sales, remove items from SO entirely, and create/edit discounts for specific items. The Item Lines appear as rows in descending order by when they were added to the SO.
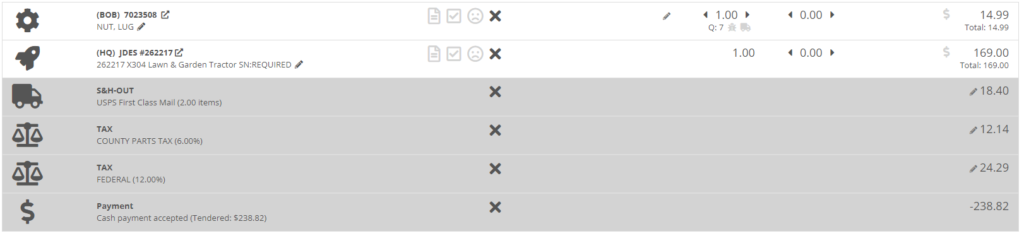
Gear, Rocket, Truck, Tax, Percentage and Money icons
The POS icons that appear in the left-hand column help signify what classification each Item Line is, and the different icons can be defined as follows:
 signifies the item line is a Part
 signifies the item line is a Machine
 signifies the item line is a Shipping and Handling (S&H) charge
 signifies the item line is an added Tax
 signifies the item line is an added Discount
 signifies the item line is a Payment
 signifies the item line is a Note
 signifies the item line is a Rental Contract
 signifies item line is a Work Order
Product/Service column
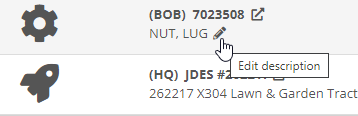
The Product/Service column allows users to view Item Number, Item Description, go to Item Dashboard, and change Item Description. The Item Description is listed underneath the Item Number in the Product/Service Column.
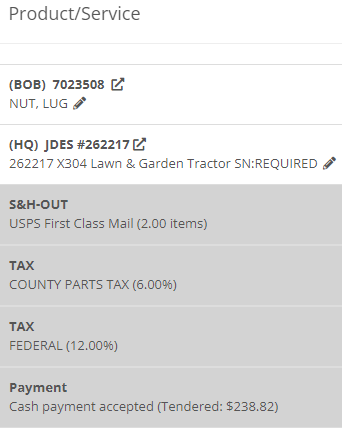
Click the Item Dashboard button located just right of the Item Number to open up the Item Dashboard in a new tab.

Click the Pencil icon to change the Item Description.
- Note that changing Item Description in the POS does not permanently change Item Description in the Item Dashboard.
- Tax Items will include their Tax Percentages in parentheses in its description
If Item has a Core, the Item Line will contain a Dirty Core option underneath the item description. Check the box if the Dirty Core has been returned. You can set the Core status of the Item when editing the Item's Dashboard.

Actions column
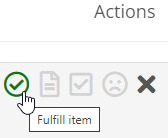
The Actions column, located in the middle of the POS, allows users to check fulfillment status, fulfill item, check traceability, change status of item number verification, report lost sale, check if there is updated pricing, and remove item from the SO.
To fulfill all item quantities, check the green Circled Check Mark icon
- An unfilled Circled Check Mark signifies that the ordered quantities of that specific item are not fulfilled
- A filled in Circled Check Mark signifies that the ordered quantities of that specific item have been fulfilled
- An orange Circled Check Mark signifies that the ordered quantities of that specific item have been partially fulfilled
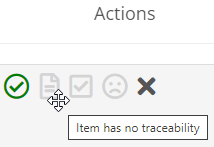

To check Traceability, click the Traceability icon  .
.
- Traceability feature is only enabled when item has traceability information
- This feature is specific to manufacturing ERP companies
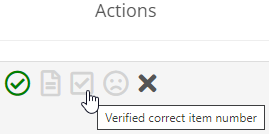
To change status of item number verification, click the Squared Check Mark icon.
- Once clicked, the Squared Check Mark icon
 will change to a Red Warning Sign
  to signify that the Item Number is not verified
- Most likely the customer submitted the Item Number if not verified
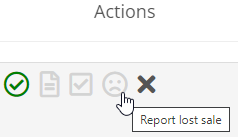
To Report Lost Sale, follow these steps:
- Click the Frowny Face icon
 to redirect to the Loss Report Form
- Fill in Loss Report Details with loss type, customer, reason, and estimation information
- Verify Item Details such as the Selected Item, Listed Price, and QOH
- Click Submit
To check Updated Pricing for an item that has changed pricing, a golden icon [picture of the icon] will appear in the action column. After clicking, an Update Pricing notification will pop-up and ask if a pricing update is applicable. If so, press the Send button and the item price will be updated appropriately.
To remove an item from the sale order, click the X, and the item line will disappear from the POS.
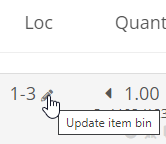
Location column
The Location column allows users to update or enter in an Item BIN, or a designated inventory storage location. To set the location, click the Pencil icon and type the BIN into the prompted text.
Quantity column
The Quantity column allows users to view and change Ordered Quantity, and view Quantity on Hand (available quantity), Quantity Consigned, Total Quantity, Dispute Quantity, and Request Transfer.
To change Ordered Quantity, use the arrows or click into the quantity number to manually type in the desired quantity. The QOH, or Available Quantity, is located directly below. Also, by clicking the Information icon, the QOH Breakdown Tab pops-up with the Quantity Available, Consigned Quantity, and Total Quantity.
To Dispute Quantity, click the Ladybug icon and enter the quantity that is actually on hand, not including ordered quantity.
- Notice that after disputing the quantity, the QOH will automatically be updated on the Sale Order, as well as on the Item Dashboard
To Request Transfer Quantity, click the Truck icon and fill out the Transfer This Item pop-up page. This page requires the Transfer Location, Transfer Quantity, Shipping Method, and if Drop shipped. Select either Transfer or Quick Transfer to finish the Transfer process.

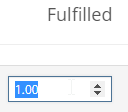
Fulfill column
The Fulfill column allows users to view and change fulfilled quantities. To change fulfilled quantity, either click into the Fulfilled Quantity number or click arrows to incrementally add or take away Fulfilled Quantity.

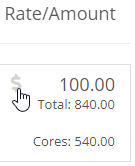
Rate/Amount column
The Rate/Amount column, located furthest right of the POS, allows users to view and change Item Prices, as well as add discounts to each Item Line separately. The top number of the Rate/Amount cell is the Item Price which takes into account the Item Discount. Just below, is the Total Item price which additionally takes into account the Quantity Ordered.
To add an Item Discount, click the Discount Line cell and fill out the Line Pricing pop-up menu and press Save. The Line Pricing pop-up menu requires Discount Percentage, Reason for discount, and will propagate the New Amount.
- After applying an Item Discount, the Money Icon in the Rate/Amount cell will fill green.