How Can We Help?
Transferring Items for a Special Order
Transferring items for a special order entails physically sending a certain quantity of items from one store location to the other, in order to fulfill a Special Order. The complete steps with Transferring Items for a Special Order are as follows:
1. Adding Items to a Sales Order
Once an item has been added to a Sales Order, the quantity on hand shows in the Quantity column on the Point of Sale (POS). This quantity number will show an asterisk if another store location has the sufficient quantity on hand. Hover your mouse over the quantity number to view inventory present at other locations.
2. Insufficient Quantity
If the item has sufficient quantity at other locations, then you are able to transfer this quantity in order to fulfill the Sales Order. To do this, click the truck icon in the quantity column on the item line of the POS.
3. Dropship
Then, fill out all the necessary information around transferring this item such as the store location that the quantity is transferring from, the transfer quantity, any necessary comments, and the shipping method that is being used
- The Dropship checkmark box signifies that the transfer quantity is being drop shipped, or that the quantity is being shipped directly to the customer.
4. Transfer Information
Once the Transfer information has been entered, click the blue Transfer button to request the transfer.
- This Transfer tab also includes an option to create a Quick Transfer.
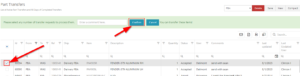
5. Requested Transfer
Once a transfer has been requested, the active transfer will populate on the Requested Transfers report (accessible by the left Nav Bar -> Transfers -> My Location Requested Transfers).
- To confirm a transfer, select the transfers by using the left column and click the Confirm blue button at the top of the report
- Transfer requests can be canceled by the same process but instead clicking the blue Cancel button at the top of the report.
6. Confirm Transfer Request
Once a transfer has been confirmed, the transfer request will drop off of the Requested Transfers report and be added to the Accepted Transfers report
- The Accepted Transfers report shows all part transfers ready to be picked packed, and shipped
- To confirm an accepted transfer, select the transfer by using the left column and click the blue Confirm button at the top of the report
- This report also allows for Transfer requests to be canceled by the same process by selecting the transfer and then clicking the blue Cancel button at the top of the report.
7. In-Transit Transfers
Once an accepted transfer has been confirmed, the transfer will populate in the destination store location’s list of In-Transit Transfers (accessible by going to the left Nav Bar -> Transfers -> My Location In-Transit Transfers).
-
- To confirm an In-Transit transfer, select the transfer by using the left column and click the blue Confirm button at the top of the report
- This report also allows for Transfer requests to be canceled by the same process by selecting the transfer and then clicking the blue Cancel button at the top of the report.
- To confirm an In-Transit transfer, select the transfer by using the left column and click the blue Confirm button at the top of the report
8. Fulfill Allocated Quantities
Once an In-Transit transfer is confirmed, which means that the transferred quantity has been received, the received quantity will be allocated to the item line on the original Sales Order.
-
- Click the fulfill button either on the item line or the Fulfill All button in the top right of the Sale Order page to complete the allocation process.
- Do note that this transfer allocation can be completed without ordering this Sales Order.
- The Questions Mark at the bottom of the Sale Order page shows all downstream operations including linked transfers.