How Can We Help?
The New Payment Module
The New Payment Module provides a clear and efficient process in taking payments on Sales Orders in Flyntlok. Flyntlok’s new payment module allows for functional integration with the Clover Card Reader. This process now consists of a green Pay button at the bottom of the POS screen. To add any payment type to a Sales Order, click the green Pay button which opens up an updated Payment Tab.
![]()
Payment Tab
The top of the Payment Tab includes four payment options, Credit/Debit, Cash, Account, and Other. The Credit/Debit option includes alternative payment types for using a card, such as using a Card Terminal, Keying in a card, or Text-2-Pay.
Credit/Debit Payment
Once the Card Terminal payment type has been chosen, choose if the card is either Credit or Debit, then select the Card Terminal in which the card is being swiped. This module gives a list of customer saved cards. Choose the desired card unless using the card terminal in which case the terminal is selected as the default.
- The customer saved cards includes a Manage Cards drop down menu which gives the option of either key-ing in a new card, saving a card when using the terminal, or removing the selected saved cards.
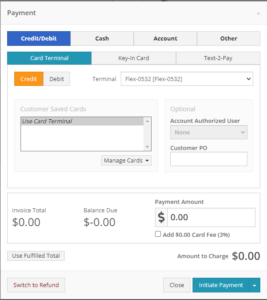
The Credit/Debit, Account and Other payment types include the option to edit Authorized Users as well as enter the Customer PO number.
- Authorized Users are initially set up in Flyntlok’s admin settings (The Wrench -> Users -> Authorized Users)
- After Authorized Users have been created for the specific customer, then you will be able to set the authorized user on the Payment Tab
Credit/Debit Payment Options
The Invoice Total, Balance Due, Payment Amount and Amount to Charge display at the bottom of the payment module. Use the Invoice Total and Balance Due to calculate the amount you want to charge the customer and set the Payment Amount to equal the amount that you are taking for this payment.
- The Credit Payment, as well as a Key-in Card, and Text-2-Pay payment will give the option of adding a Credit Card Fee
- The Credit Card Fee rate can be set Flyntlok’s Admin settings (The Wrench -> Flyntlok -> Flyntlok Settings -> then scroll to the accounting section to set up the Credit Card Fee Rate, Credit Card Account Payment Fee Rate, Minimum Amount for Credit Card Fee, and the Credit Card Fee Items that the income posts to
- Typically, Credit Card Fee item posts to the CCSC - Credit Card Fee Item
The option to switch the SO to a refund is located in the top left corner of the Payment module. After clicking the “Switch to Refund” button, the colors will turn to red indicating that the SO is set as a refund. Then, enter the amount that you are giving back to the customer in the Refund Amount box before clicking Initiate Refund.
If the Sale Order is a Sale, review the Payment tab thoroughly before clicking the Initiate Payment button.
If the Card Terminal option was chosen, then after clicking the Initiate Payment button, the Clover Card Reader should glow up, prompting a credit card to be tapped or swiped
If the Keyed-In Card payment option was chosen, then a Gravity token will be generated and here, credit card information can be entered and securely stored
- The Key-In Card option provides a field to enter and edit the card billing address
If the Text-2-Pay payment option is entered, then a text message will be sent to the customer contact prompting a credit card Payment
- The Text-2-Pay payment option provides a list of customer contact phone numbers, as well as a field to enter a new phone number
- The Text-2-Pay payment option also includes a message preview, that shows the message that goes along with payment text message
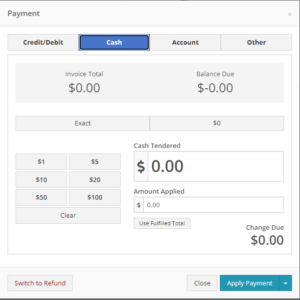
Cash Payment
To take a Cash Payment, choose the Cash payment option at the top of the Payment module. The cash payment option will include the Invoice Total, Balance Due, Cash Tendered, Amount Applied, and the Change Due.
- The Cash Tendered is the amount of cash that the customer hands you
- The Amount Applied is the amount that the payment accounts for against the remaining balance
- The Change Due is the difference between the Cash Tendered and the Amount Applied and is supposed to be the amount in cash that you hand back to the customer in the case of overpayment.
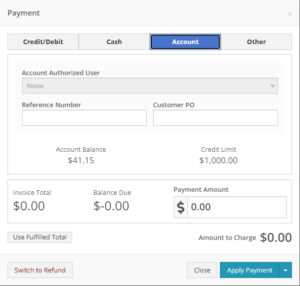
Account Payment
If the Account Payment Type is chosen, the new payment module will show the Account Balance, Credit Limit, as well as the Invoice Total, Balance Due, Payment Amount and the Amount to Charge.
- The Account Balance and Credit Limit pulls from the Customer data and accurately shows the balance of the customer’s account as well as the limit that the customer has set on their account
- The Invoice Total, as well as the Balance Due shows the remaining balance matching the number in the blue bar above the POS.
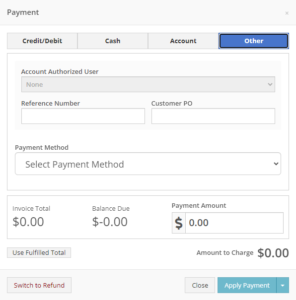
Other Payment Types
The remaining payment type options are in the Other Payment Type. After clicking the Other tab, the specific Payment Method can be selected in the dropdown menu. Other Payment Methods include but are not limited to Check, Credit Auth, Trade-In, ACH Echeck, Vendor Credit, Outside Credit, Outside Debit, and more etc…
Trade-In Payment
Steps to take a Trade-In payment begin with selecting Trade-In in the dropdown menu
- After clicking, a tab to Add Payment to Sales Order pops-up with Trade-In as the payment method that is selected
- Fill the rest of the payment tab with the correct information such as the reference number, authorized user, and mobile notification number
- Also, fill in the trade item information such as the Make, Model, Serial Number, Location, Acquisition Type, Date Manufactured, Previous Machine, Trade-in value(Amount applied to transaction), and Overallowance
- Overallowance is the margin between the trade in value and the actual cost of the machine
- The True Value, displayed in the bottom left of this tab, will take into account the Trade-in Value, as well as the Overallowance
- If there is a Payoff Amount on the Trade-In machine, i.g., if the customer has a lien remaining on the machine, then you can include the remaining balance owed in the Payoff Amount
- Also, enter the name and relevant information of who the debt on that machine is owed to in the Pay To section
- NOTE that the Payoff Amount will subtract from the value which the customer receives from trading in the machine on the Sale Order
- Review all amounts listed at the bottom of the Trade-In Payment tab including the Net Trade Value to Customer, the Net Machine Cost, Payoff Liability, and the Overallowance Expense
- After reviewing, click the Trade Machine, or Trade Machine & Process button
After the Trade Machine button has been clicked, the Trade-In Payment line should show on the Sales Order page.