Machine purchase order vouchers work with the current machine purchase order system. Create a machine purchase order following the workflow defined by your business. When machines start arriving. Do not receive the machines by clicking the gear icon. Create a voucher instead.
To create a voucher, click the arrow attached to the submit button. Then click New Receiving Voucher.

Standard vouchers are created by selecting the New Receiving Voucher. Standard vouchers will always book the base cost of the machines you add to this voucher and any fees added.
Fee-only vouchers are intended to handle the timing difference in booking the actual machine cost and other fees associated with the acquisition of the machine (such as freight). Fee-only vouchers will never book the cost of the machine.
The machine purchase order voucher consists of 3 parts: Header, Voucher Lines, Fees/Credits, and File Attachment.
The header contains the top-level voucher information. This can all be edited until the voucher has been closed.

The voucher lines are the guts of the voucher and where most of the work will take place. All of the information in this section is synced with the machine record in Flyntlok. If you add a serial number, that serial number will be added to the machine record. The grid format makes adding information in bulk fast and easy.

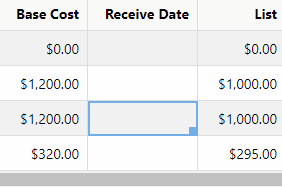
There are two things that need to be mentioned when it comes to data entry, the box drag, and dates. If the same information applies to multiple machines, fill in the information for one machine, then drag the box in the bottom right-hand corner of the cell to apply the change to other cells. If you are familiar with Excel, this should feel very familiar.
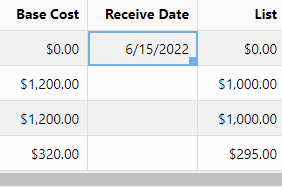
Dates are also easy to enter. Add dates in your preferred format, and we will do the conversion to a Flyntlok-friendly format!
Click the gear icon  to bring up a list of possible columns. To add or hide a column, click the eye icon on the column name. You can also organize the columns in the order you want to see them here.

There are two different ways to look at a machine purchase order voucher. The first is the list view which resembles a spreadsheet. Up until this point, all examples have been shown on the list view. The second view is the detail view. The detail view is a form that will show all of the possible fields that are able to be set on a machine. When you are ready to edit another machine, you can select if from the left or hit Next Line.

You can perform the following bulk actions:

To perform a bulk update, select the machines that you need to update using the checkboxes. Then, select the bulk actions that you would like to perform. Lastly, add the value that you would like to update the lines to, and click Apply to Selected.

You can add a fee or a credit to a voucher in the Fee's/Credits section by clicking  .
.
Then the fee can be added. There are also a couple of different options for booking the fee. You can book the fee to an account of your choosing or capitalize the fee to the machine.

If you are going to capitalize the fee. Click Allocate. You can choose an allocation method and save your choices. Available allocation methods:
The fees set here will book to the machine's asset account, be included in the book value of the machine, and will show up on the machine's balance sheet.

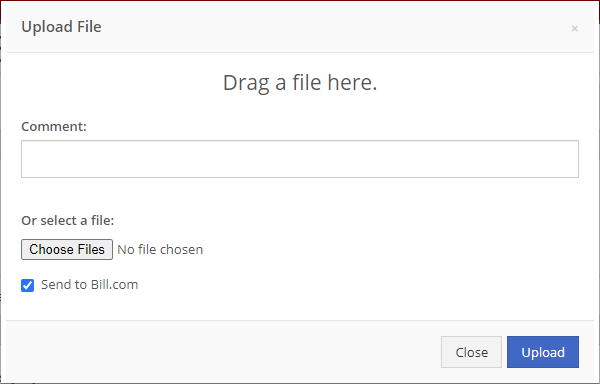
You can attached files to the machine purchase order voucher in the File Attachment section. Bill.com customers can specify whether or not we will send the file to Bill.com.

There are 4 statuses of a voucher: Draft, Review, QuickBooks Post Queued, and Posted. These statuses control what actions you can take on the voucher.
Machine purchase order vouchers are a great improvement to our machine ordering system. They have greatly sped up data entry which results in saving time and money. We are always looking to improve all of our systems. If you have an idea to further enhance this system, please submit a support ticket!
Here are a few useful tips to keep a note of when navigating Machine Purchase Orders:
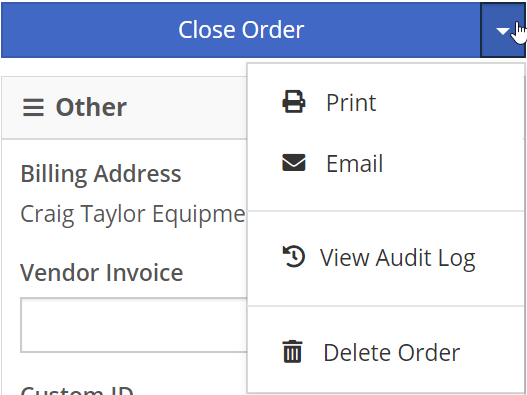
You can print, email, or delete an MPO by clicking the downward-facing arrow on the right side of the blue button.
We allow you to attach any number of files to the purchase order and give you the option to send those attachments to Bill.com.
Here is a short video going through a Machine Purchase Order!
Below the detail lines of the MPO, you can add any fees or credits that are associated with this order. There are two options to add these fees.

Once you have the machine purchase order created, you will be taken to a draft MPO. There are a few things to take note of on the header of all MPOs.
To change statuses, you will need to click the blue button in the upper right of the MPO.
The General Information of an MPO will prefill with information of machines being put onto the order and the location that the order is being created. But all of this information can be edited.
There are multiple different ways to create a machine purchase order. They can be created as blank slates or with machines already populated.
To turn these machine purchase requests into an MPO, head over to the Purchasing tab on you left nav and select Machine Purchase Plans.