How Can We Help?
Flyntlok allows you to create journal entries from the application and port them into QuickBooks or only submit them internally to Flyntlok. This gives you the ability to create adjusted entries for machines costs, revenues, and even depreciation.
Creating a Journal Entry
To find the journal entry section, go to the admin editors in the upper right, head to the accounting section, and then select Journal Entries:

This takes you to a report of all the journal entries that have been created. To create a new journal entry, there are two button options to the upper right of the grid:
![]()
![]()
New Journal Entry
Once you've chosen the type of journal entry to create, you will be taken to the entry editor.

- Journal Date: This will default to the date that the journal entry is created, but can be edited if you want a different posting date.
- Journal Number: This will auto-increment through our data and be set. This can be edited to the number you wish it to post as.
- Status: The status of the journal entry will change depending on the actions taken.
- Draft: Any field on entry can be edited and it is not submitted.
- Pending: The journal entry has been submitted to QuickBooks but has not been posted.
- Submitted: The journal entry has been posted.
Journal Entry Fields

- Account: This is a searchable/dropdown field that will have all the accounts from QuickBooks that have synced into Flyntlok.
- Debits/Credits: Any numerical amount may be put into these fields to debit or credit the account that is assigned to the line.
The debits and credits must balance to post the journal entry.
- Description: The line's description will remain blank unless edited. The description will post with the line to QuickBooks.
The description can be a maximum of 250 characters.
- Type: There are five different types that a line can be posted as. Cost of Sale, Cost of Rent, Capitalization, Depreciation, and Revenue. When the type is assigned and the machine field is assigned, that revenue or expense will be posted to the machine's balance sheet or income statement. This is explained deeper under the Types section.
- Machine: This is a searchable field that will scan through all the machines that have been in the system for your company. When this field is set the journal entry will post against that assigned machine.
- Name: This is a searchable/dropdown field that will list all your company's vendors and customers labeled accordingly [V] & [C]. If a line needs to be associated to a vendor or customer for accounts payable/receivable purposes, you can declare them here.
- Location: This will contain all the store locations associated with your company.
- Class: If you have classes set up within your QuickBooks, you can assign a class to each line of the journal entry.
Types
As stated early, there are five different types for a journal entry line to be posted as:
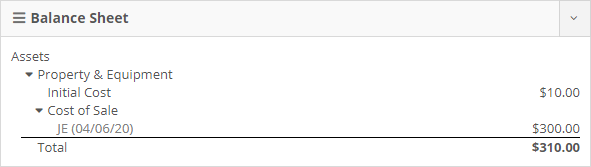
- COS is Cost of Sale. This will post against the machine's Balance Sheet under the Cost of Sale section.
- COR is Cost of Rent. When a line is declared as COR, the journal entry will be posted against the machine's income statement under Non-capitalized Expenses.

- DEPR is Depreciation. You can post an individual machine's depreciation if something was missed or is missing old data. Any journal entry posted with this type will be reflected under the machine's income statement in the Depreciation section.

- CAP is Capitalization. If an adjustment to a machine's capitalized costs is needed, you can use this type when posting the journal entry. The capitalization can be seen under the machine's balance sheet under the Journal Entries section.

- REV is Revenue. Posting revenue against a machine will show as rental revenue on the machine's income statement under the Rentals section.

Posting the Journal Entry
There are two different ways to post these journal entries.
- The first way is to post the entry to QuickBooks using this button:

- The second way to post the journal entry is to submit it only within Flyntlok. This can be used to align previous journal entries created in QuickBooks and the machine income statements and balance sheets within Flyntlok. When the Submit Only Flyntlok is used, it will not queue up the journal entry to post to QuickBooks, but instead, put the journal entry into a Submitted status and immediately be reflected on the machine's statements.

To find the Submit Only Flyntlok button, click the down arrow located to the right of Submit to QuickBooks and it will be the first option.
Journal Entry Tips
Here are a few useful tips to keep a note of when navigating the journal entry page:
- Any changes made to the journal entry can and should be saved. When something is changed and not saved you will see a green save icon next to the journal entry number.

- Click the Save button to the left of the Submit to QuickBooks button.
- Click the drop-down arrow next to the Submit to QuickBooks button and hit save.
- Press Ctrl + S on your keyboard.
When the entry is saved, the green icon will go away. This allows you to leave the journal entry and come back to do more editing without risking losing all the previous work done.
- The journal entry defaults to having eight lines when it is created. Not all eight of the lines have to be used, they can remain blank. If you need more lines, you can click the Add lines button located at the bottom of the grid. This will add eight more lines to the journal entry. If you need to restart the journal entry, you can click the Clear all lines located at the bottom of the grid and to the right of Add lines. This will clear all the input fields and previously added lines.

Lines can be deleted individually from the entry by clicking the trash can on the far right of the line. 